.png?fit=max&auto=format&n=FVKCx30l3CvlX69H&q=85&s=561d79e1baef285c8a19edc54f99ed58)
Integration Guide
This guide will walk you through setting up a webhook integration between Stripe and Hookflo, enabling you to receive alerts for payment, subscription, and other financial events.Stripe webhooks are secured using a signing secret that verifies the authenticity of each webhook event. Hookflo uses this signature to validate that incoming requests are genuinely from Stripe.
Prerequisites
- A Hookflo account with an active project
- A Stripe account with admin access
- Basic understanding of Stripe’s payment processing system
Integration Overview
The integration process follows these key steps:- Set up a webhook in Hookflo
- Configure notification channels (email/Slack)
- Connect Stripe to Hookflo
- Configure Stripe to send webhooks
- Test the integration
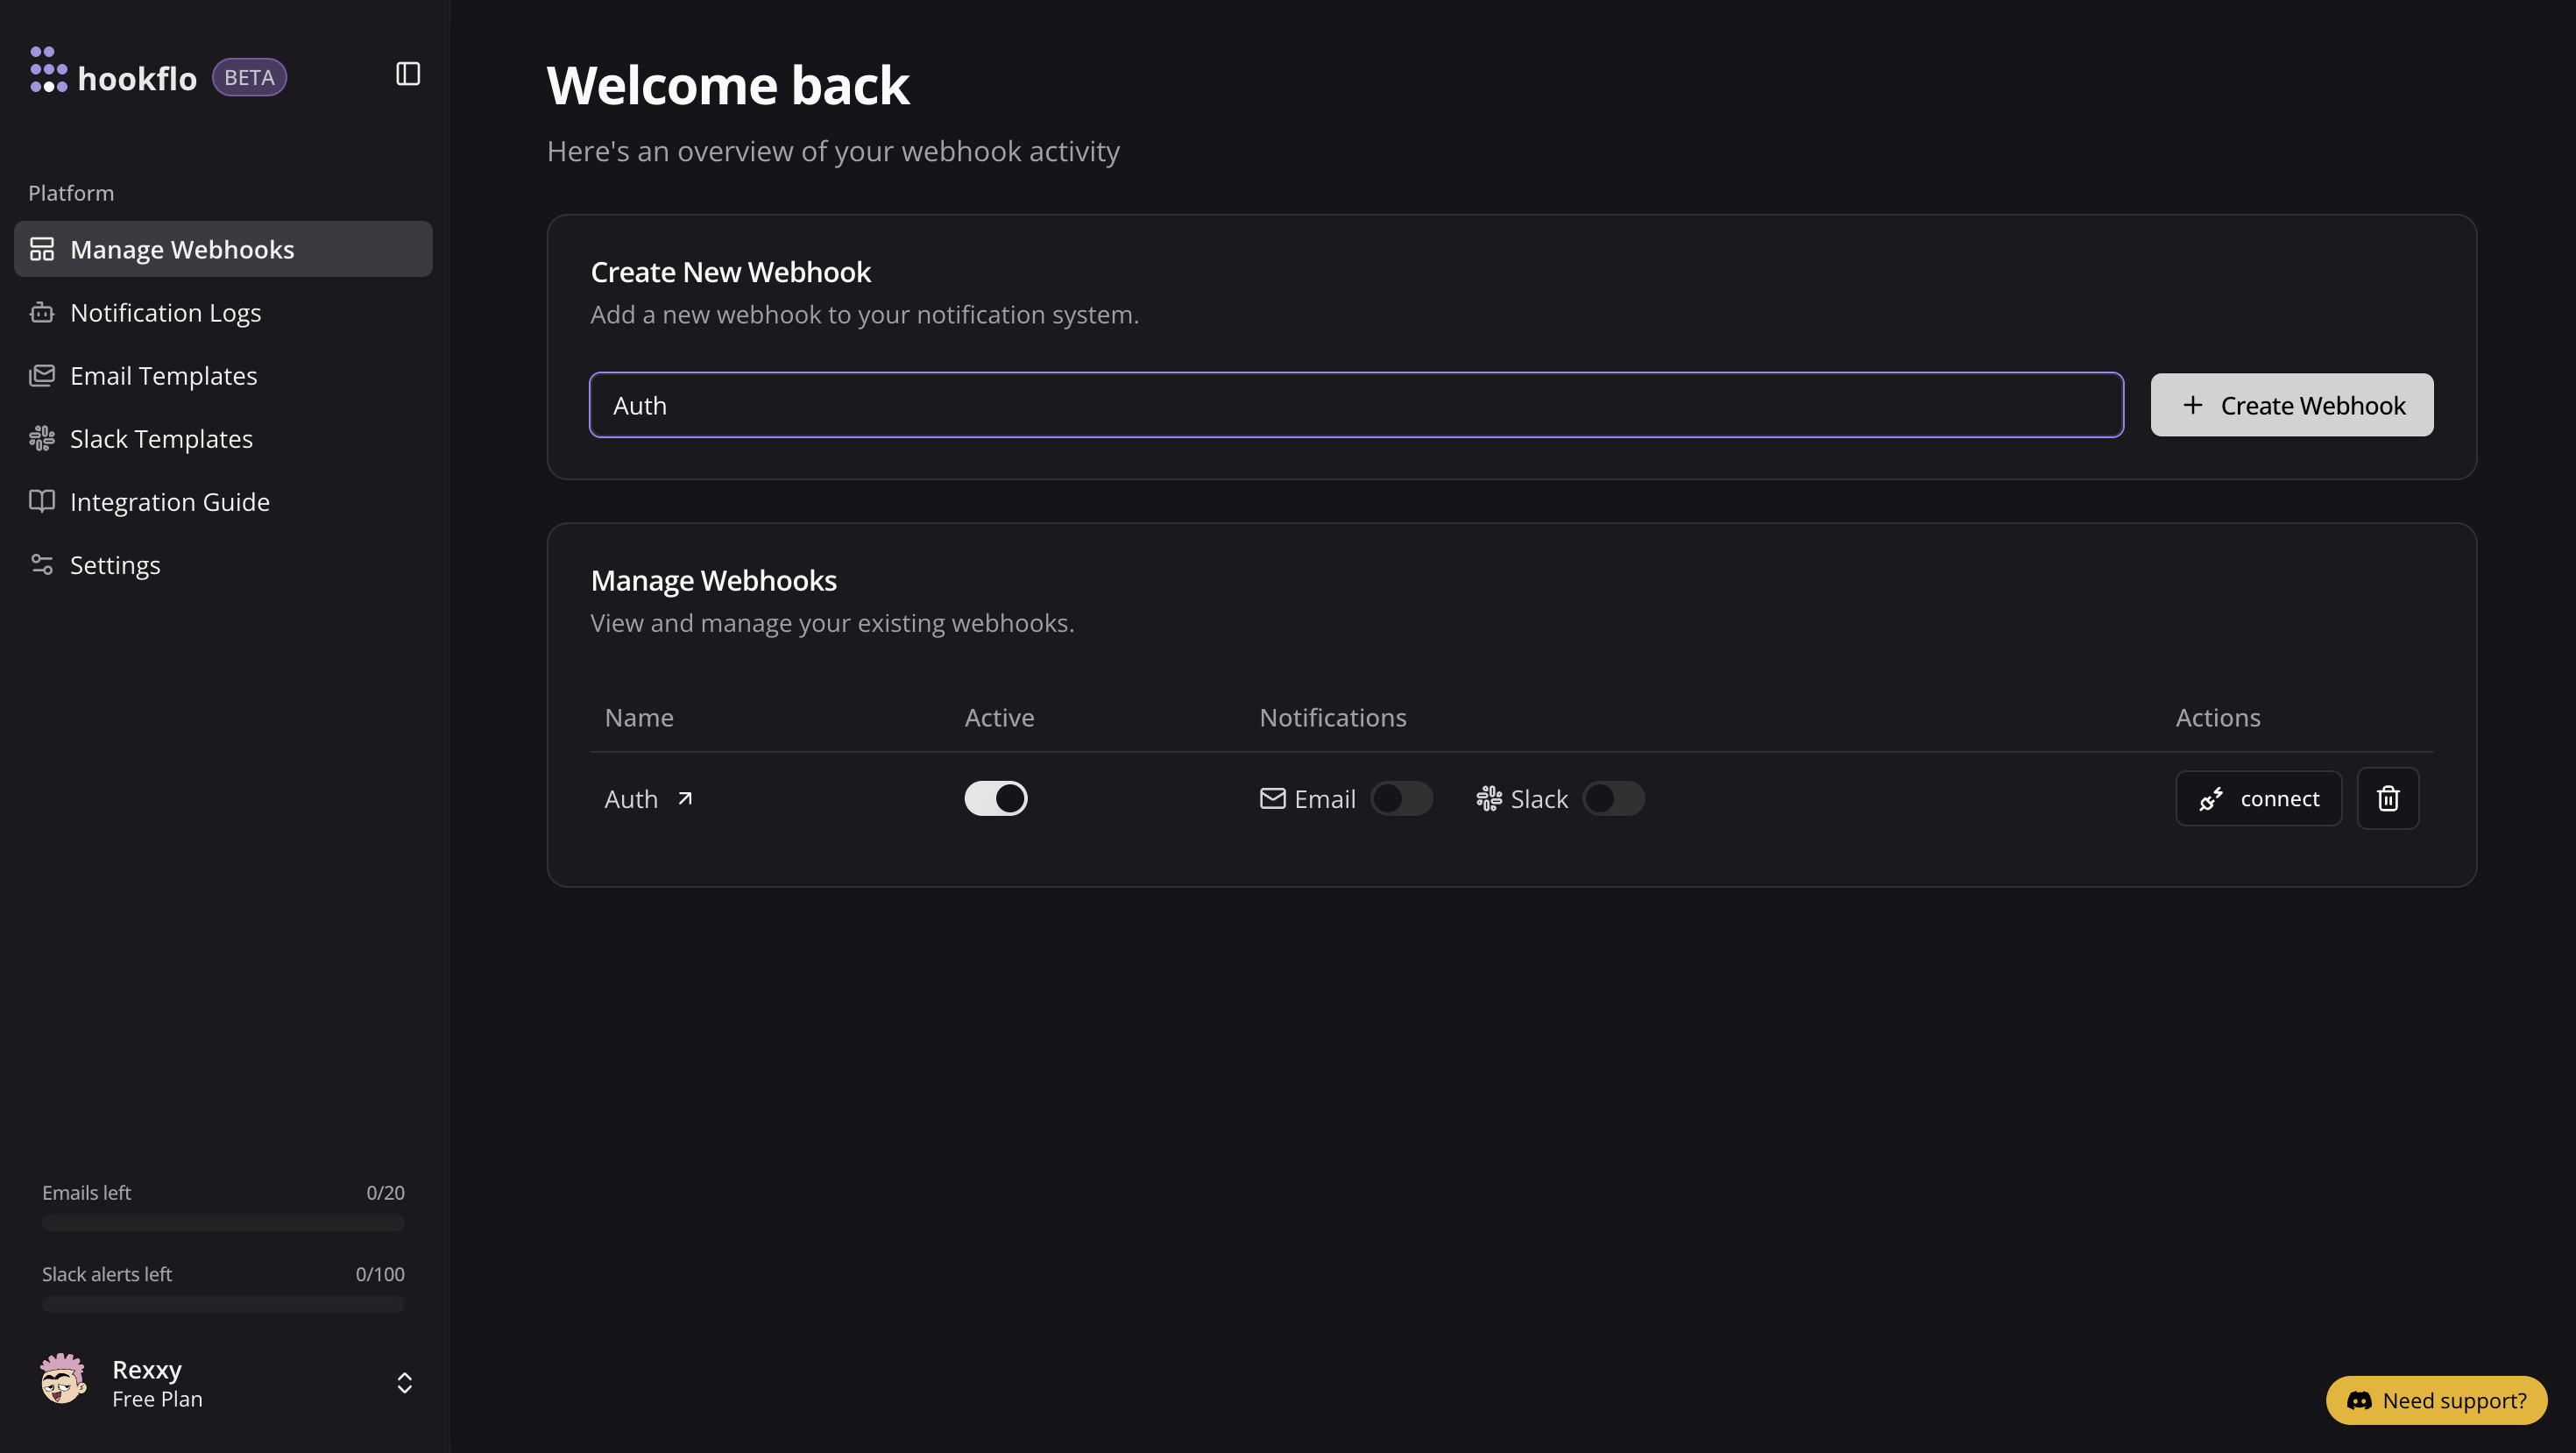
Setting Up Your Hookflo Webhook
After logging into Hookflo, follow these steps to create and configure your Stripe webhook:Create a Webhook
Setting Up Your Webhook Endpoint
Setting Up Your Webhook Endpoint
- From your Hookflo Dashboard, navigate to > Manage Webhooks
- Click on + Create Webhook
- Your webhook will be created in an inactive state by default
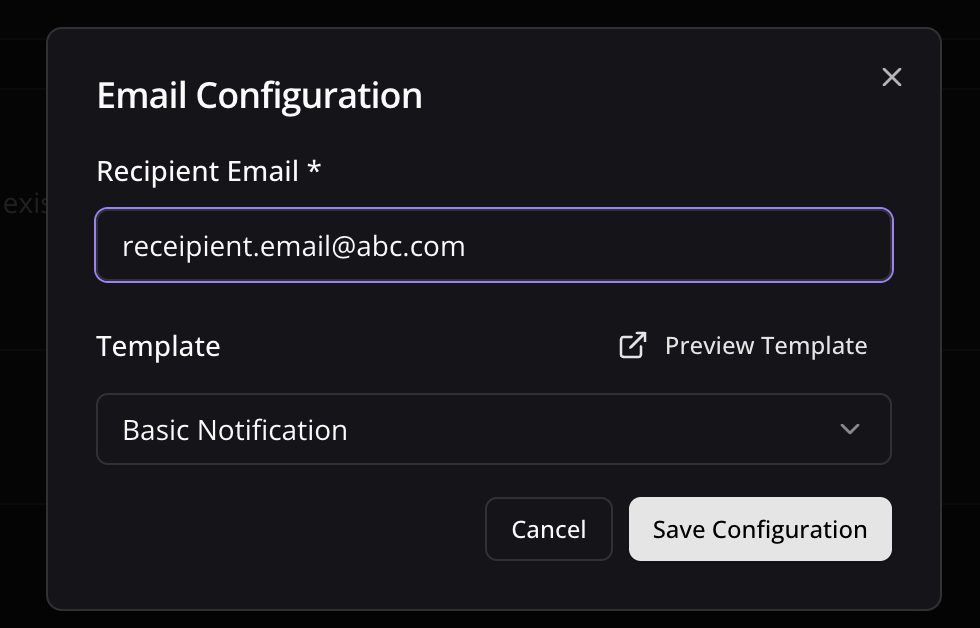
Setup Notification Channel
Configure Email Notifications
Configure Email Notifications
- Toggle the Email Notifications switch to enable email alerts
- In the dialog box that appears, enter the email address where you want to receive notifications
- Select an email template from the dropdown menu
- Click Preview Template to see how your notifications will look
- Use the editor to customize the template if needed
- Click Save Configuration to confirm your settings
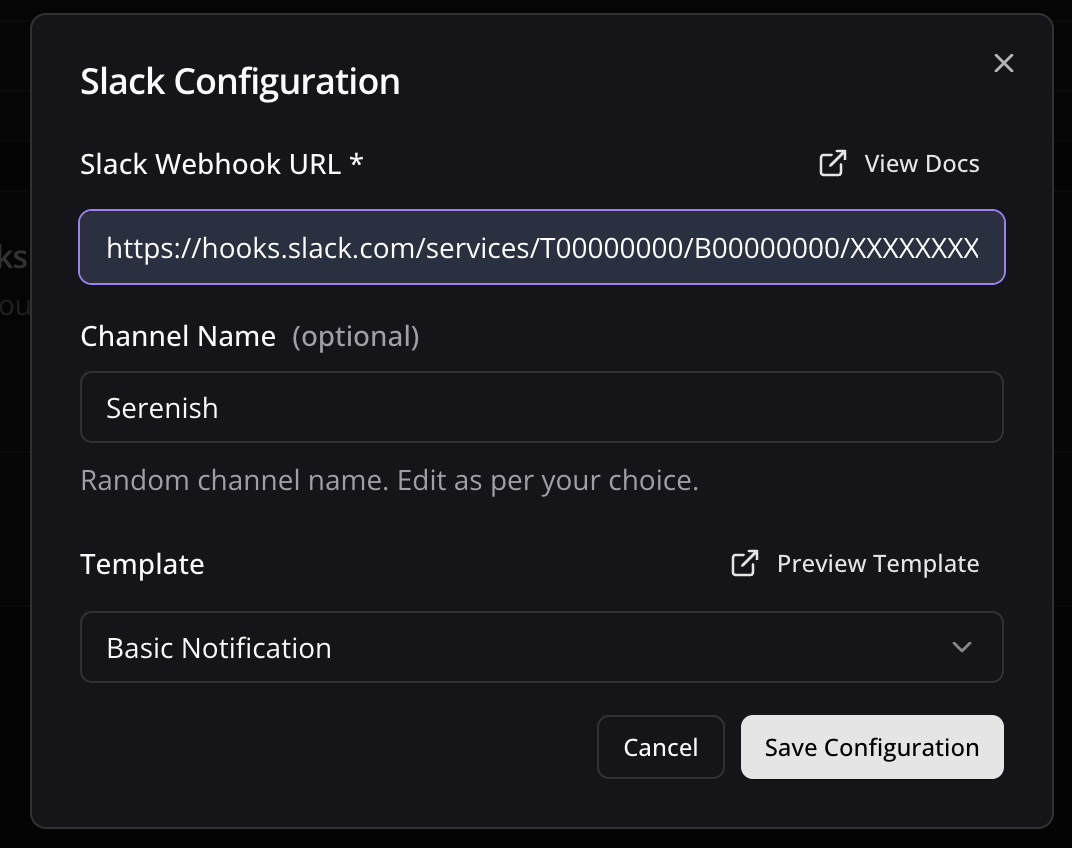
Configure Slack Notifications
Configure Slack Notifications
- Toggle the Slack Notifications switch to enable Slack alerts
- In the dialog box, paste your Slack webhook URL (see
- )
- Keep the random generated name or enter a custom one (optional)
- Select a notification template from the available options
- Preview and edit the template as needed
- Click Save Configuration to confirm your settings
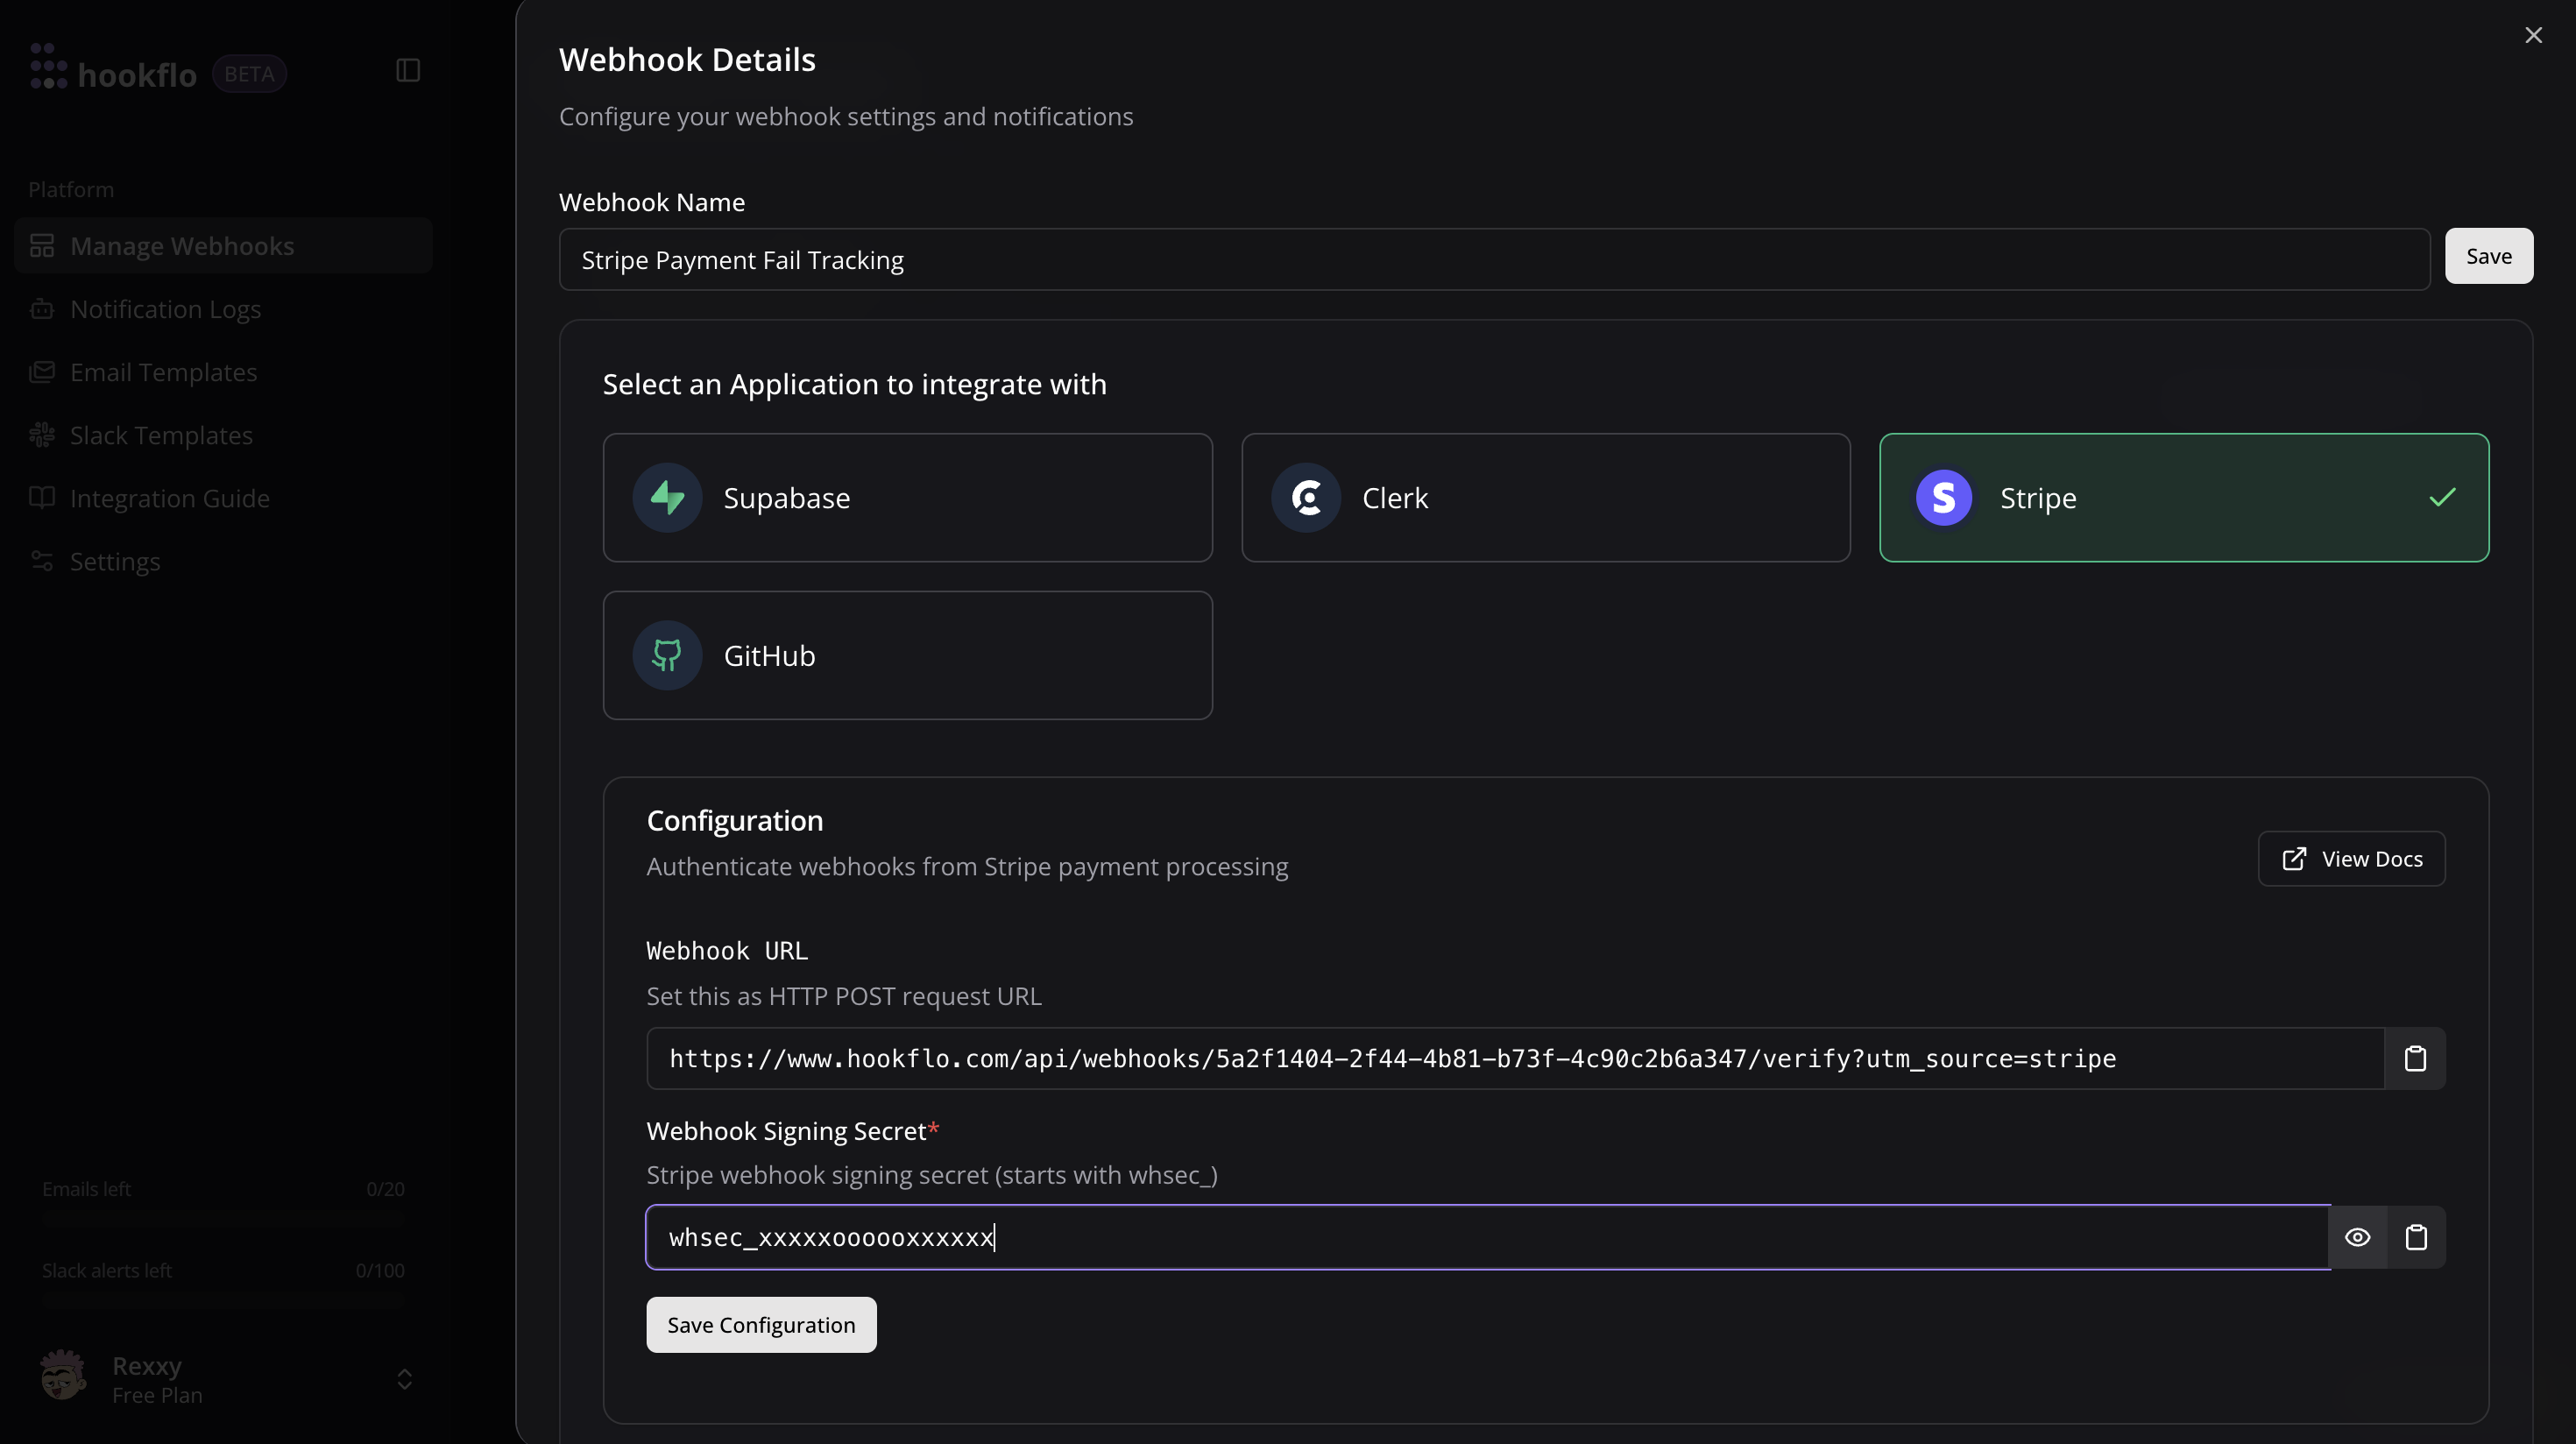
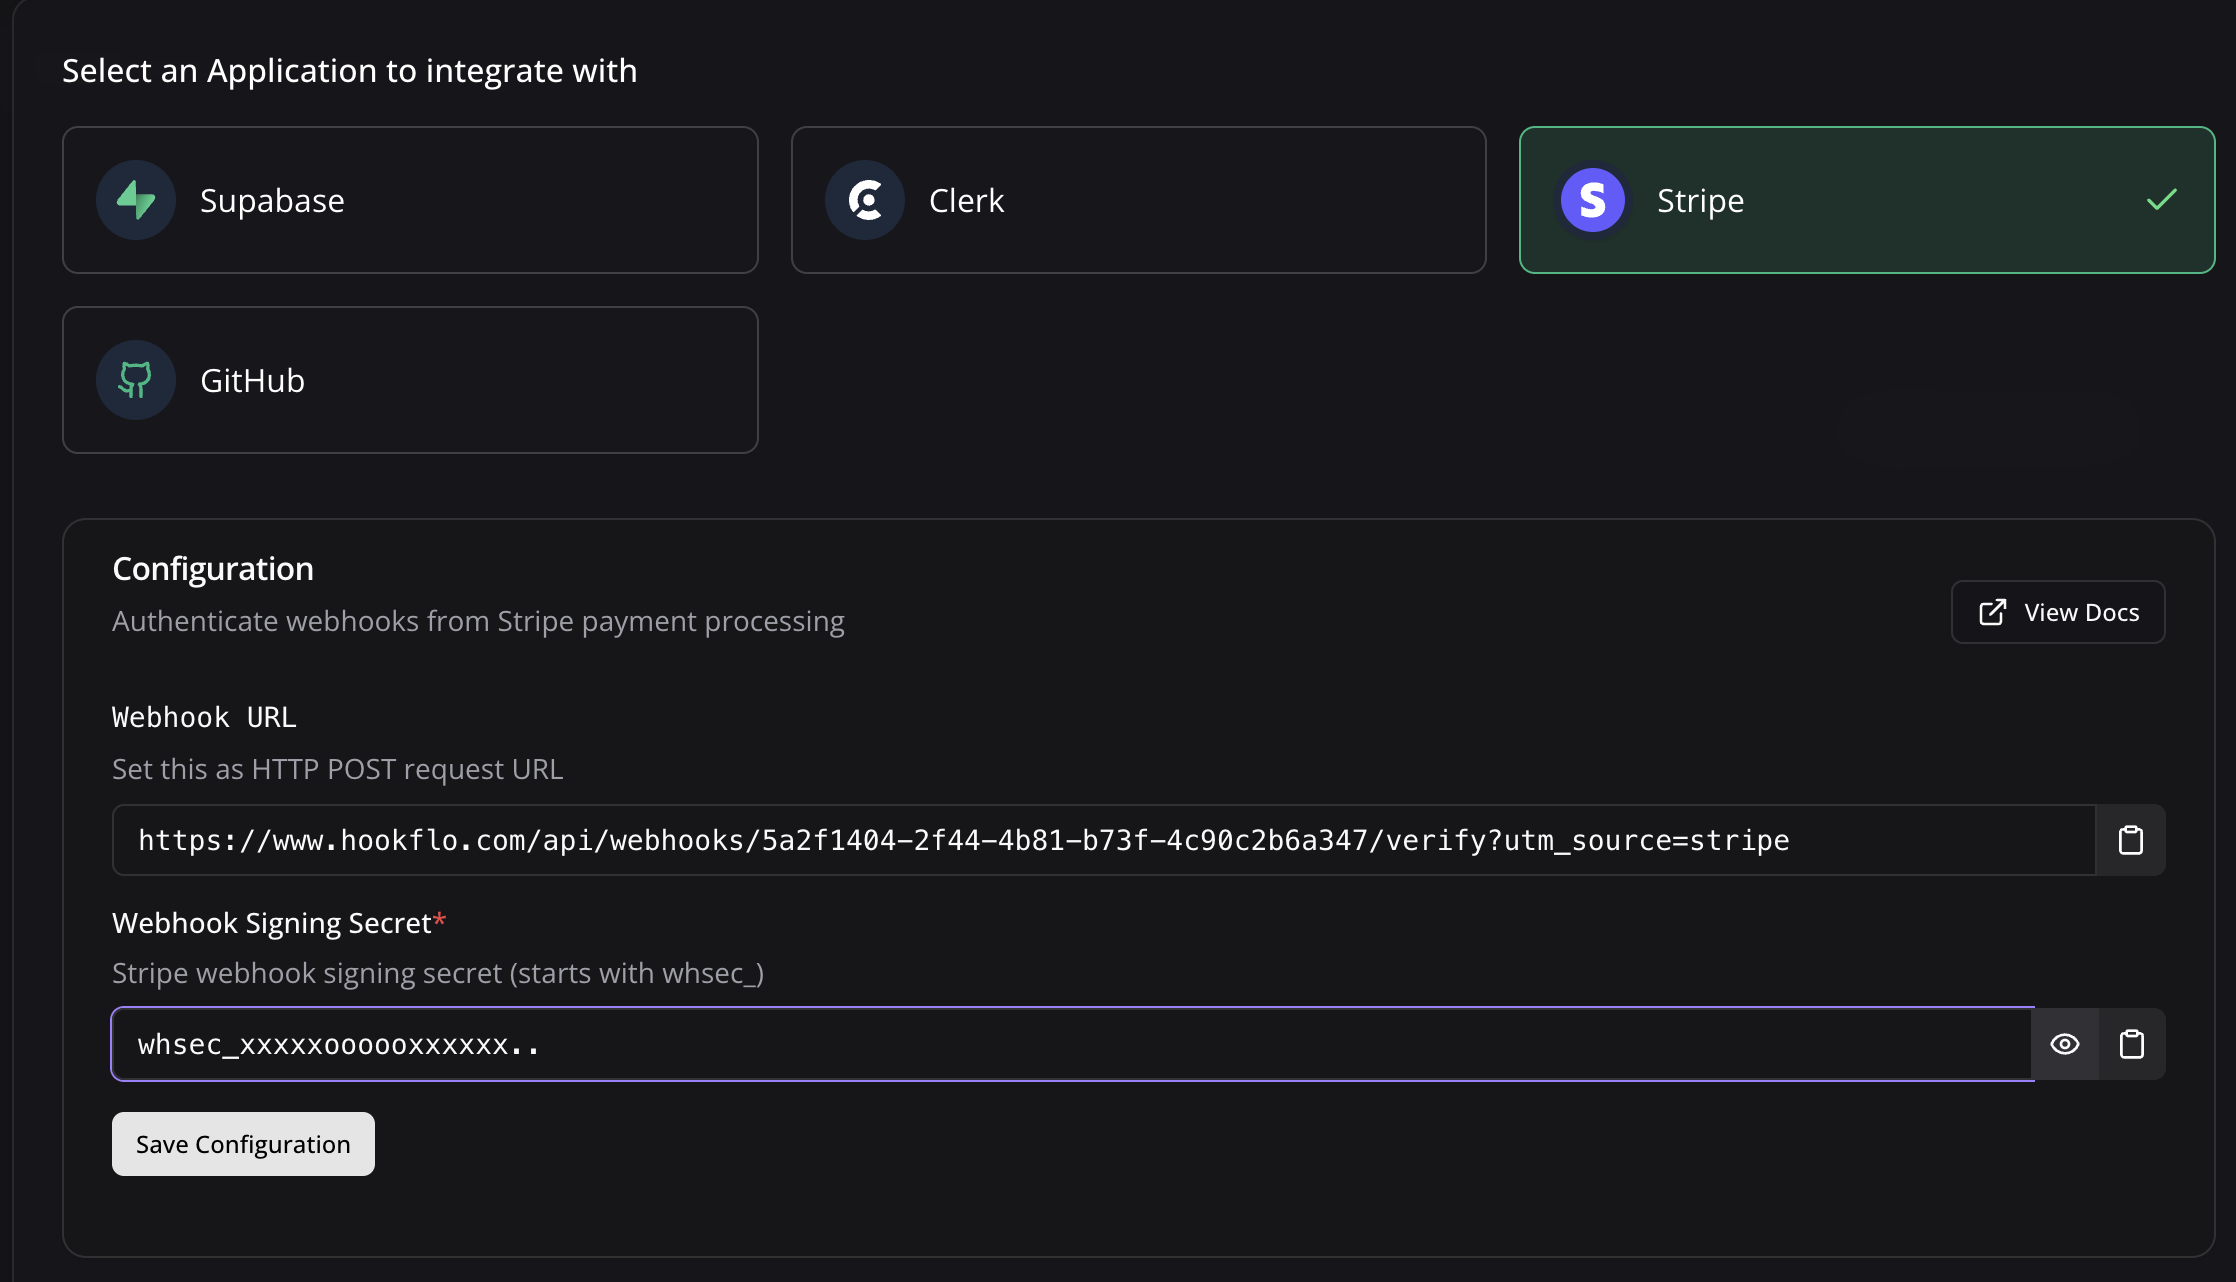
Connect your Webhook with application
Configure Application
Configure Application
- Click the Connect button to activate your webhook
- Select Stripe as application to integrate
- A configuration panel will appear with your webhook configurations:
- Webhook URL: The HTTP POST request endpoint Stripe will send events to
- Webhook Signing Secret: Signing Secret generated by Stripe
- You’ll need to add your Stripe Webhook Signing Secret in the next steps
- Copy the Webhook URL for the next section
Configuring Stripe
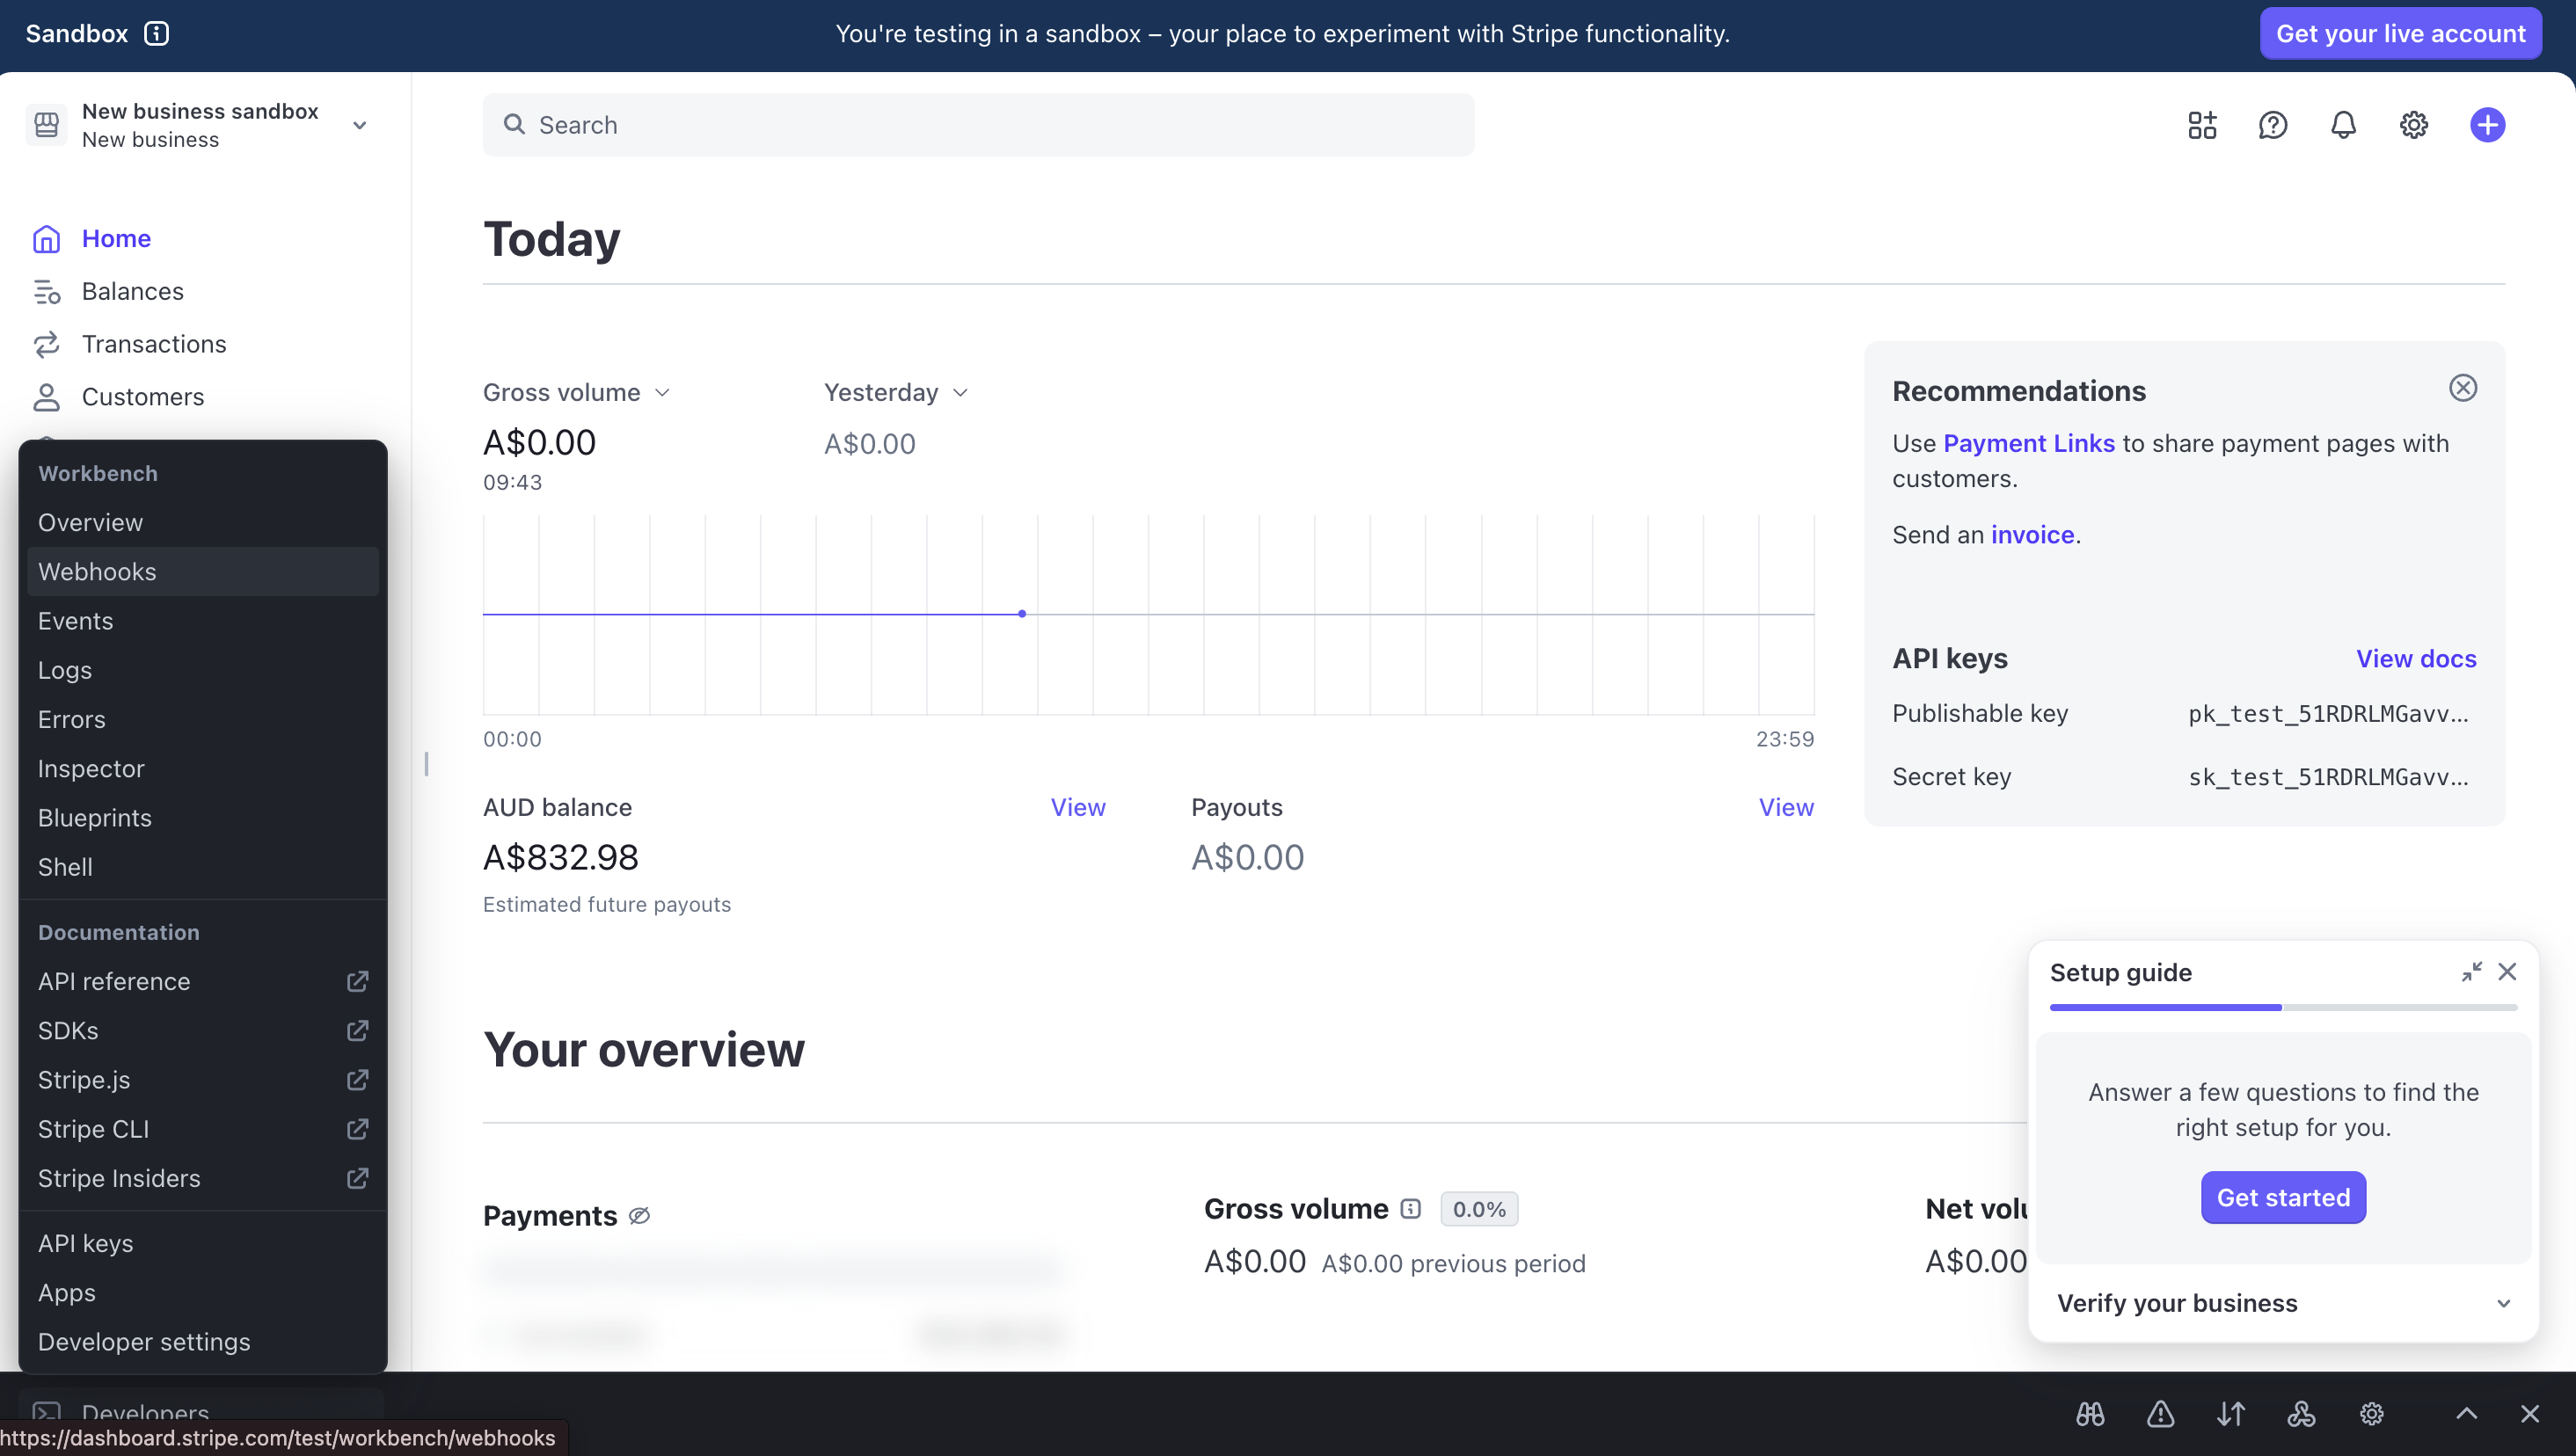
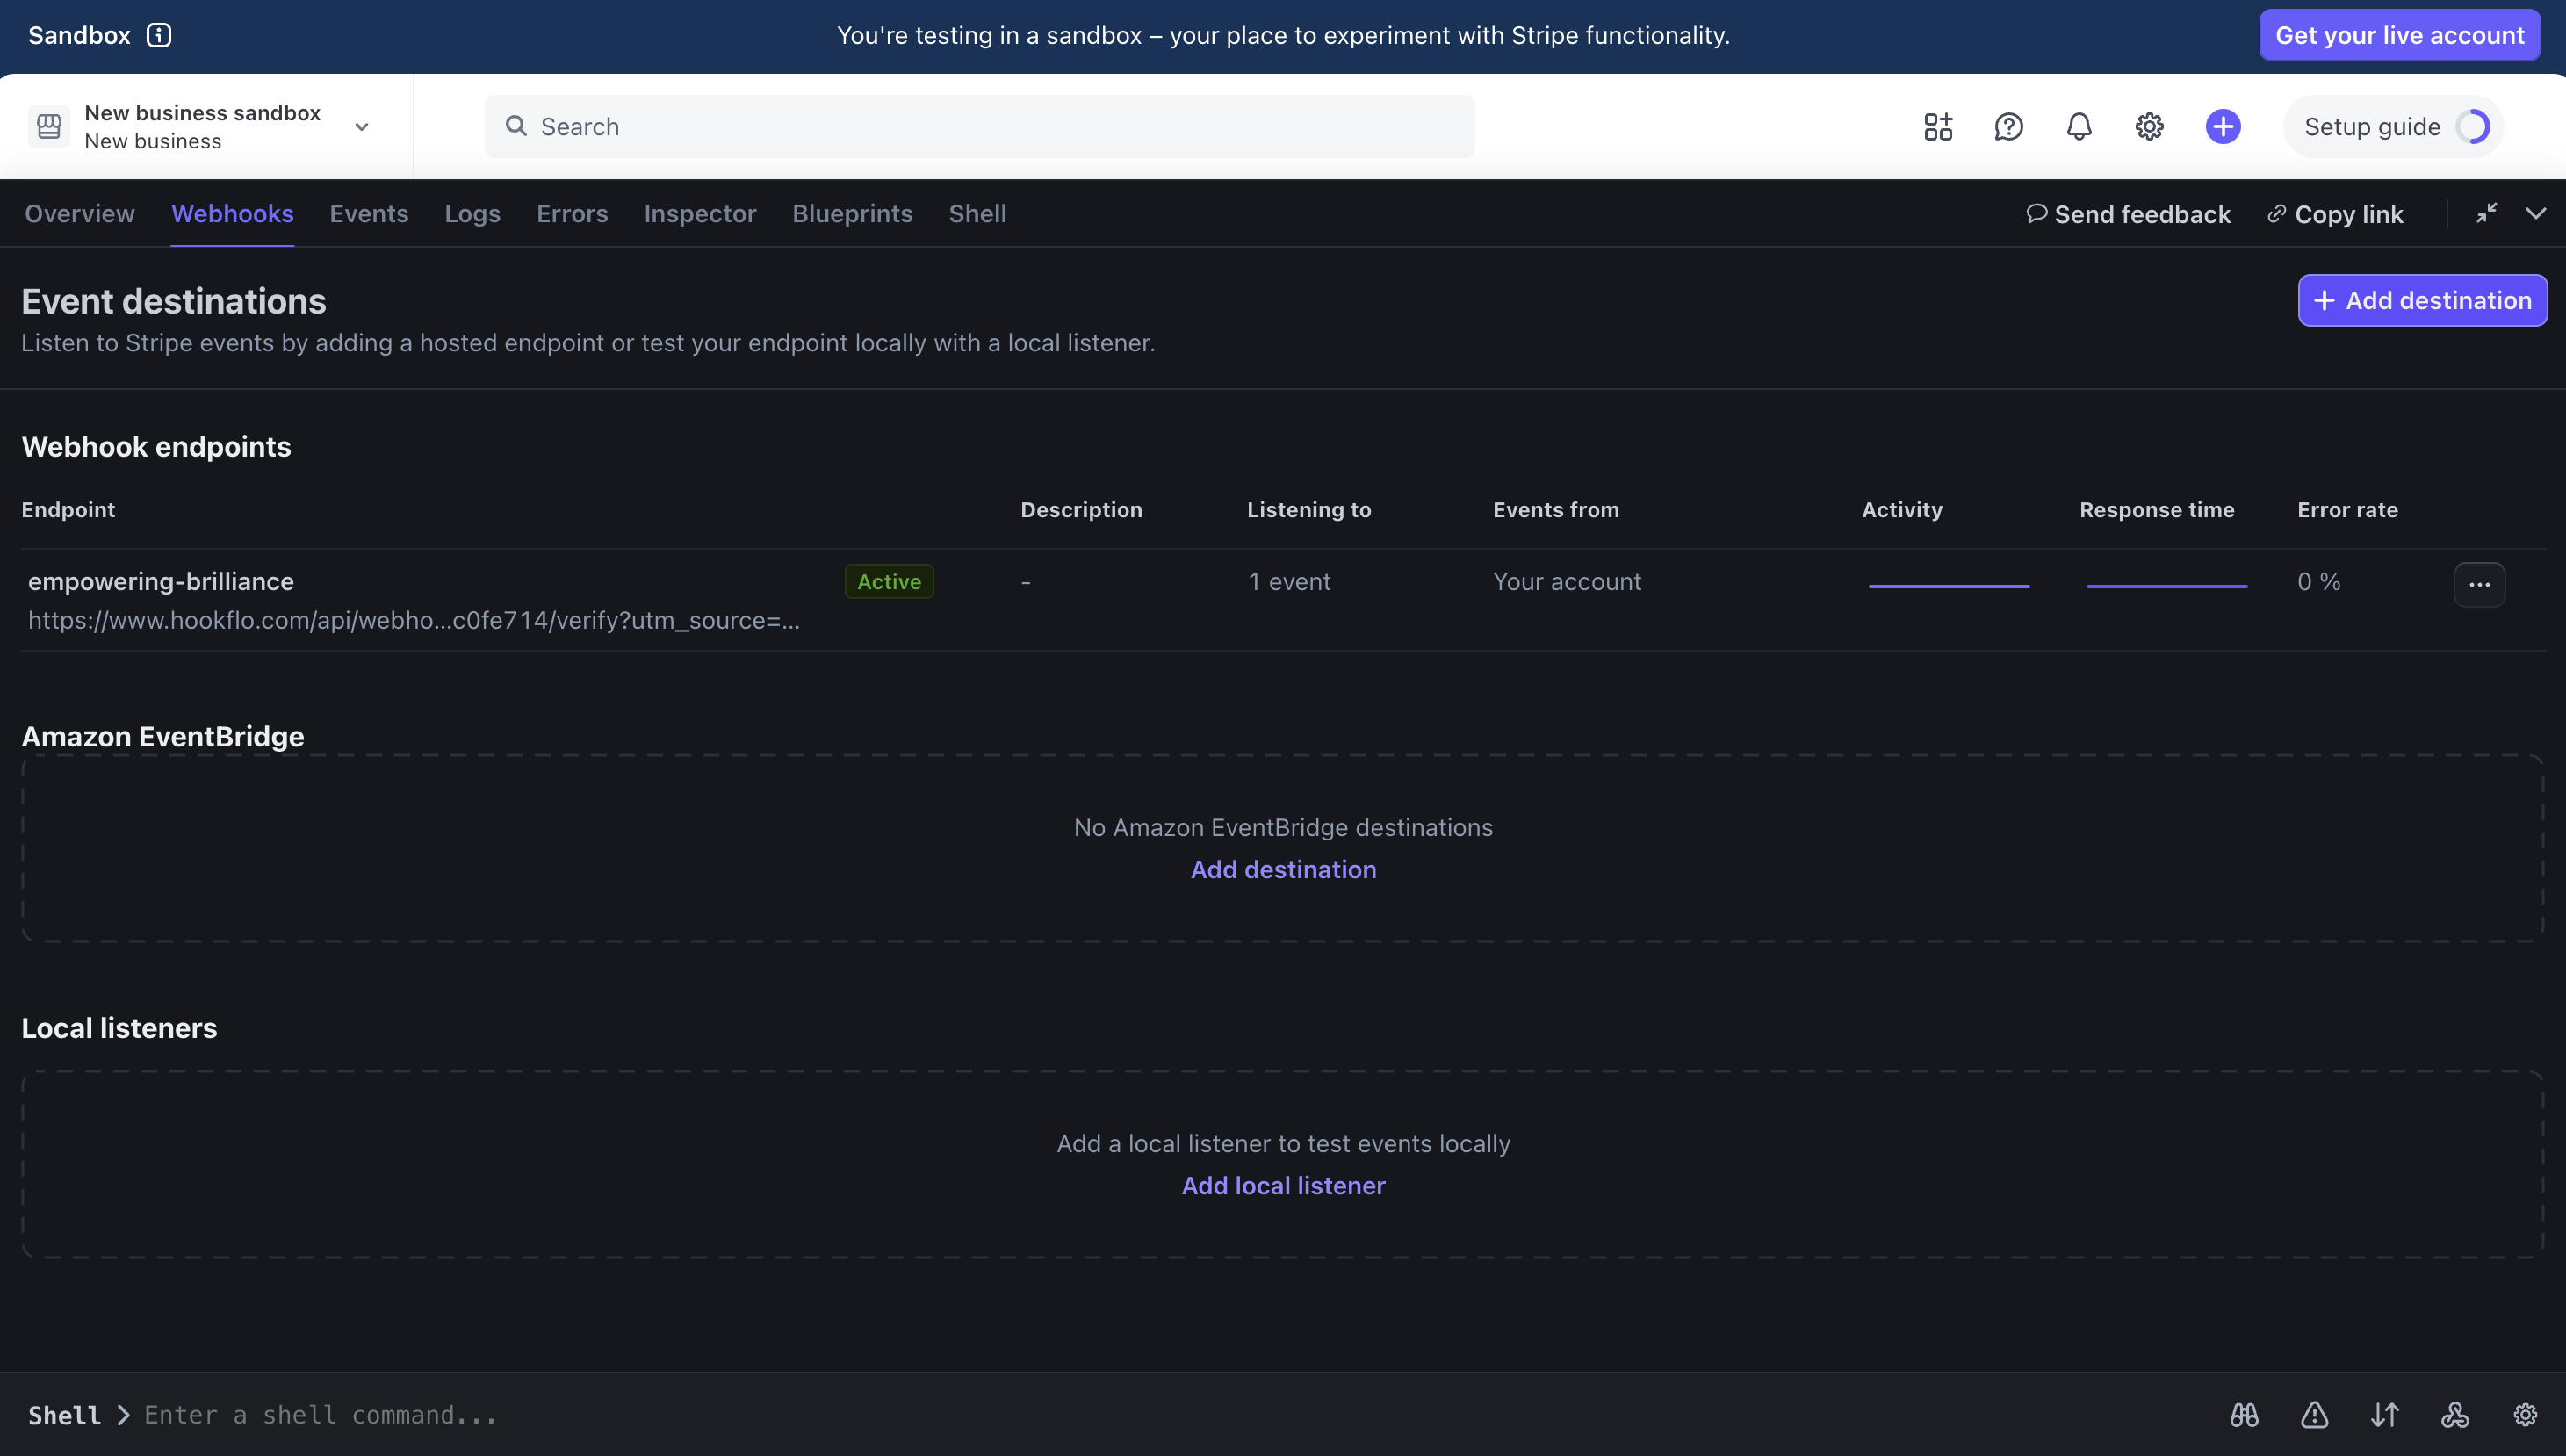
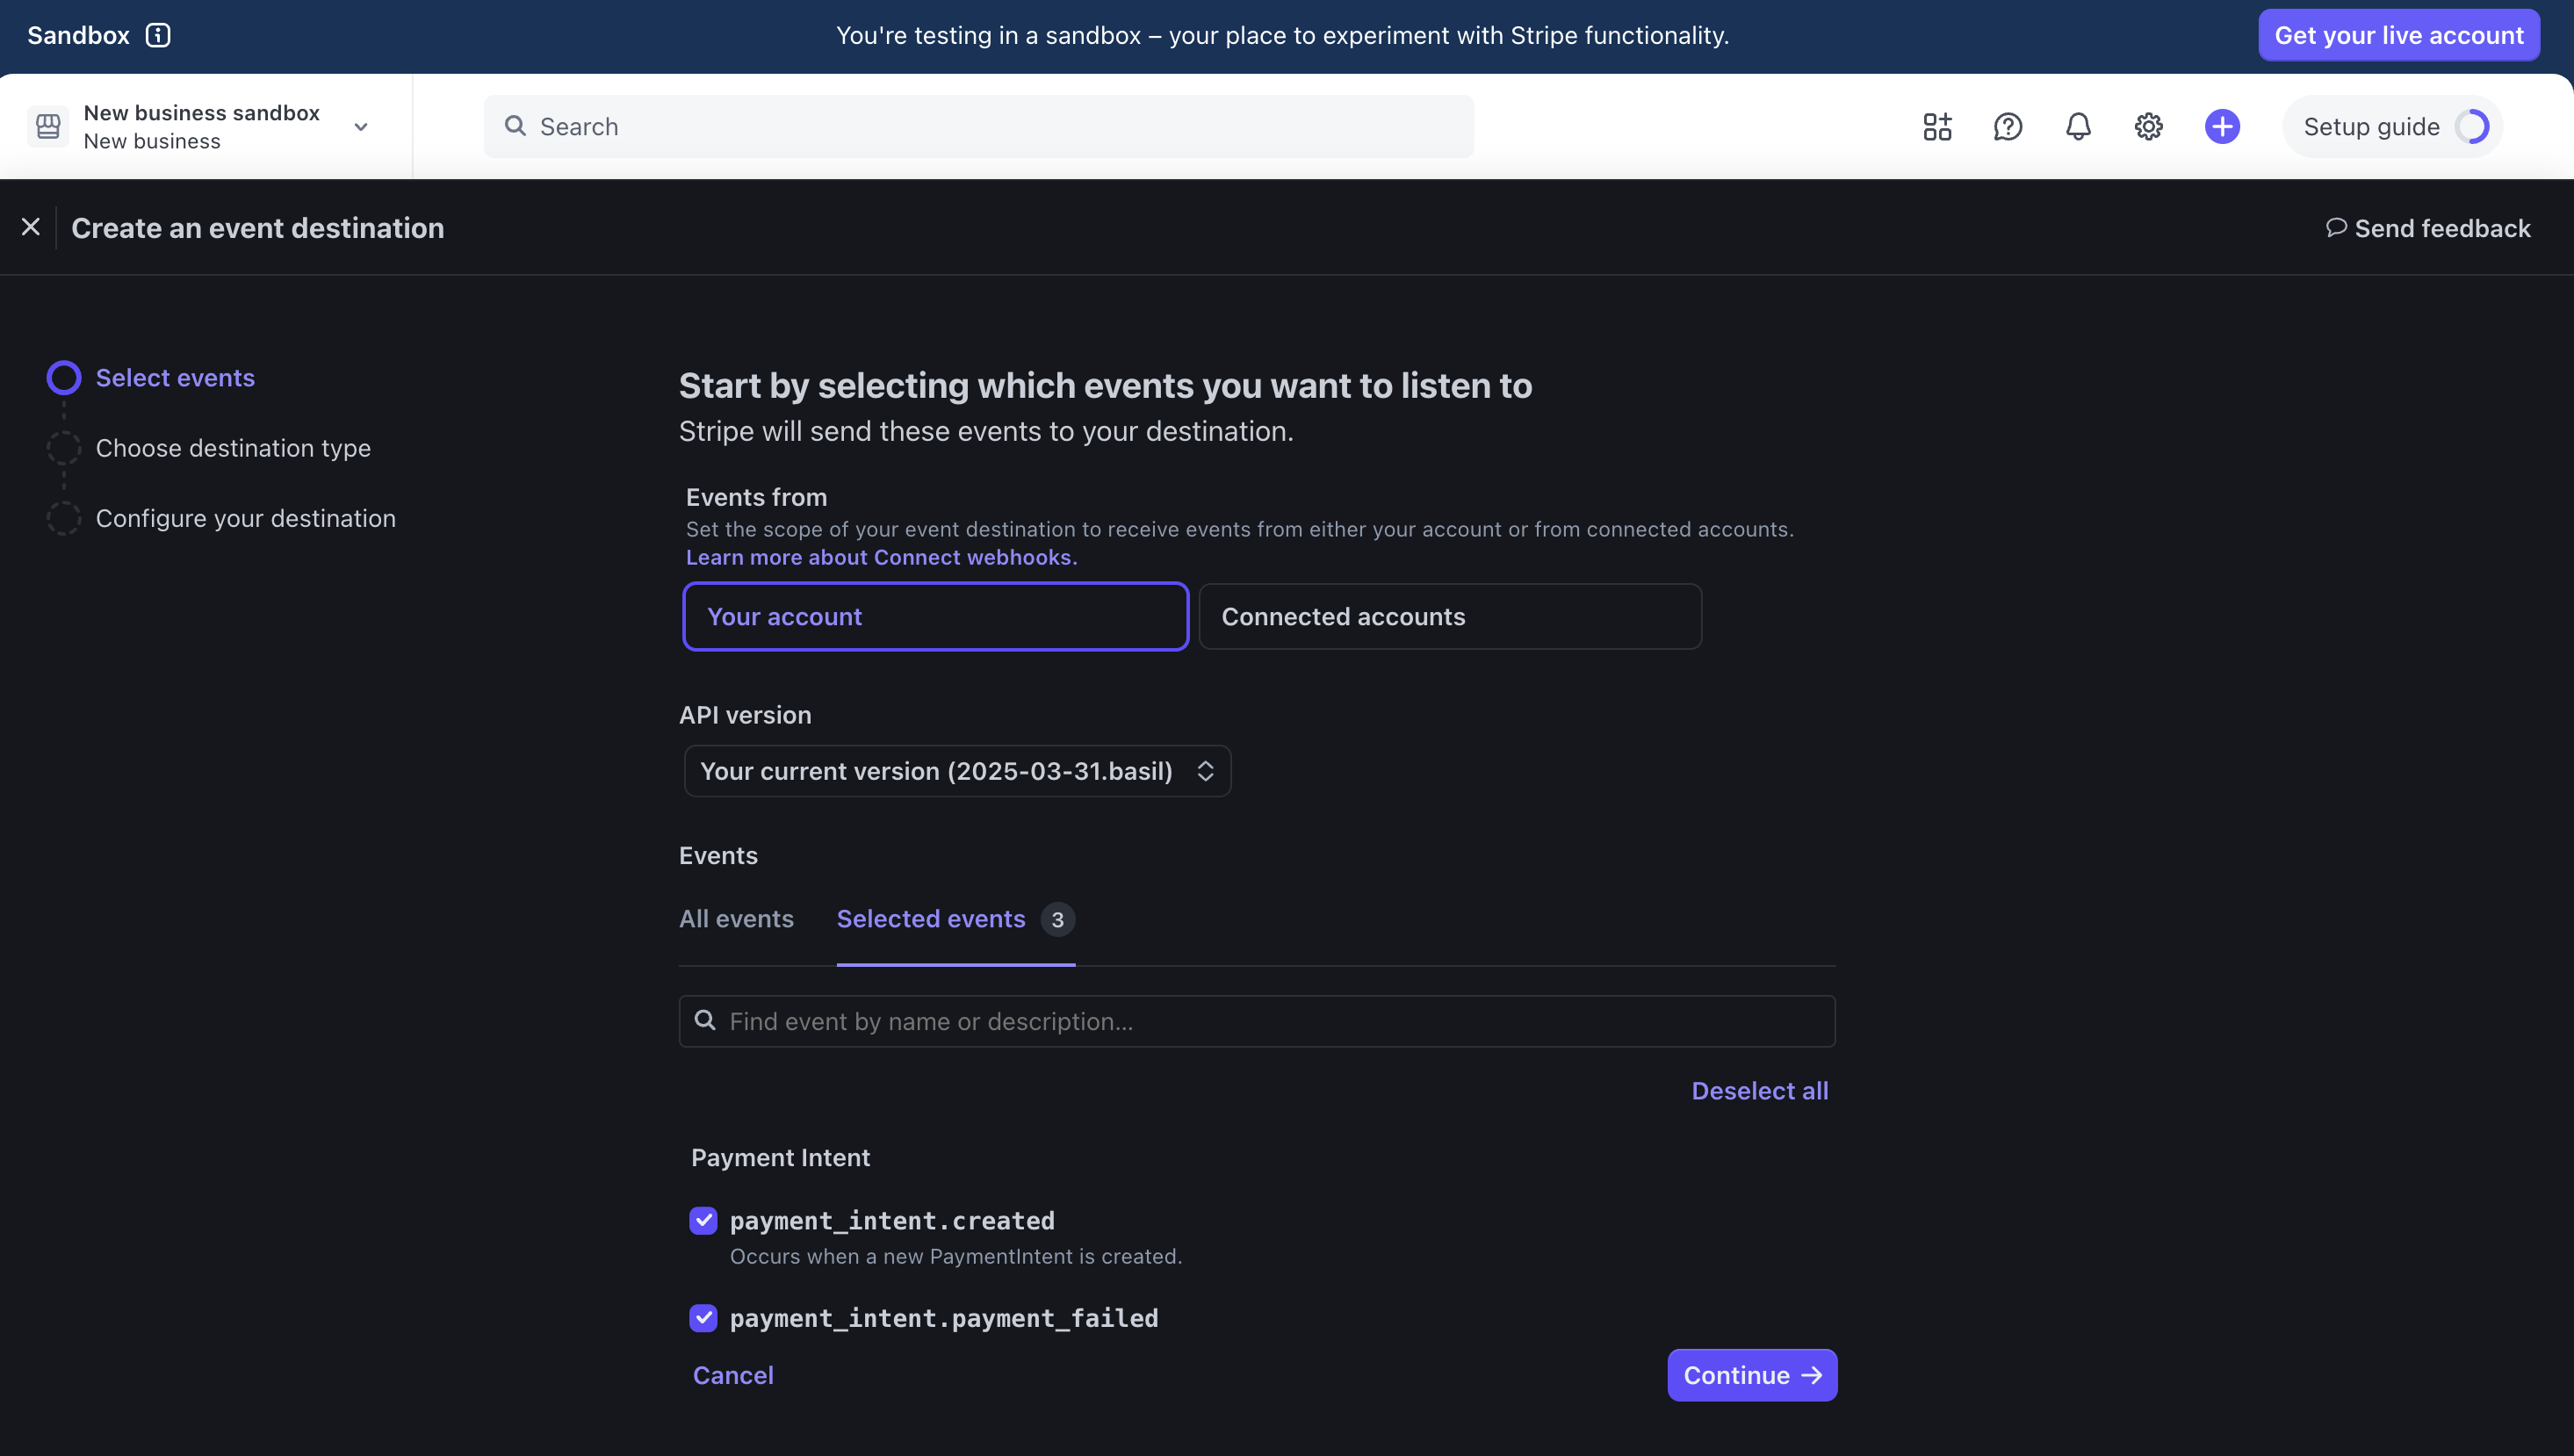
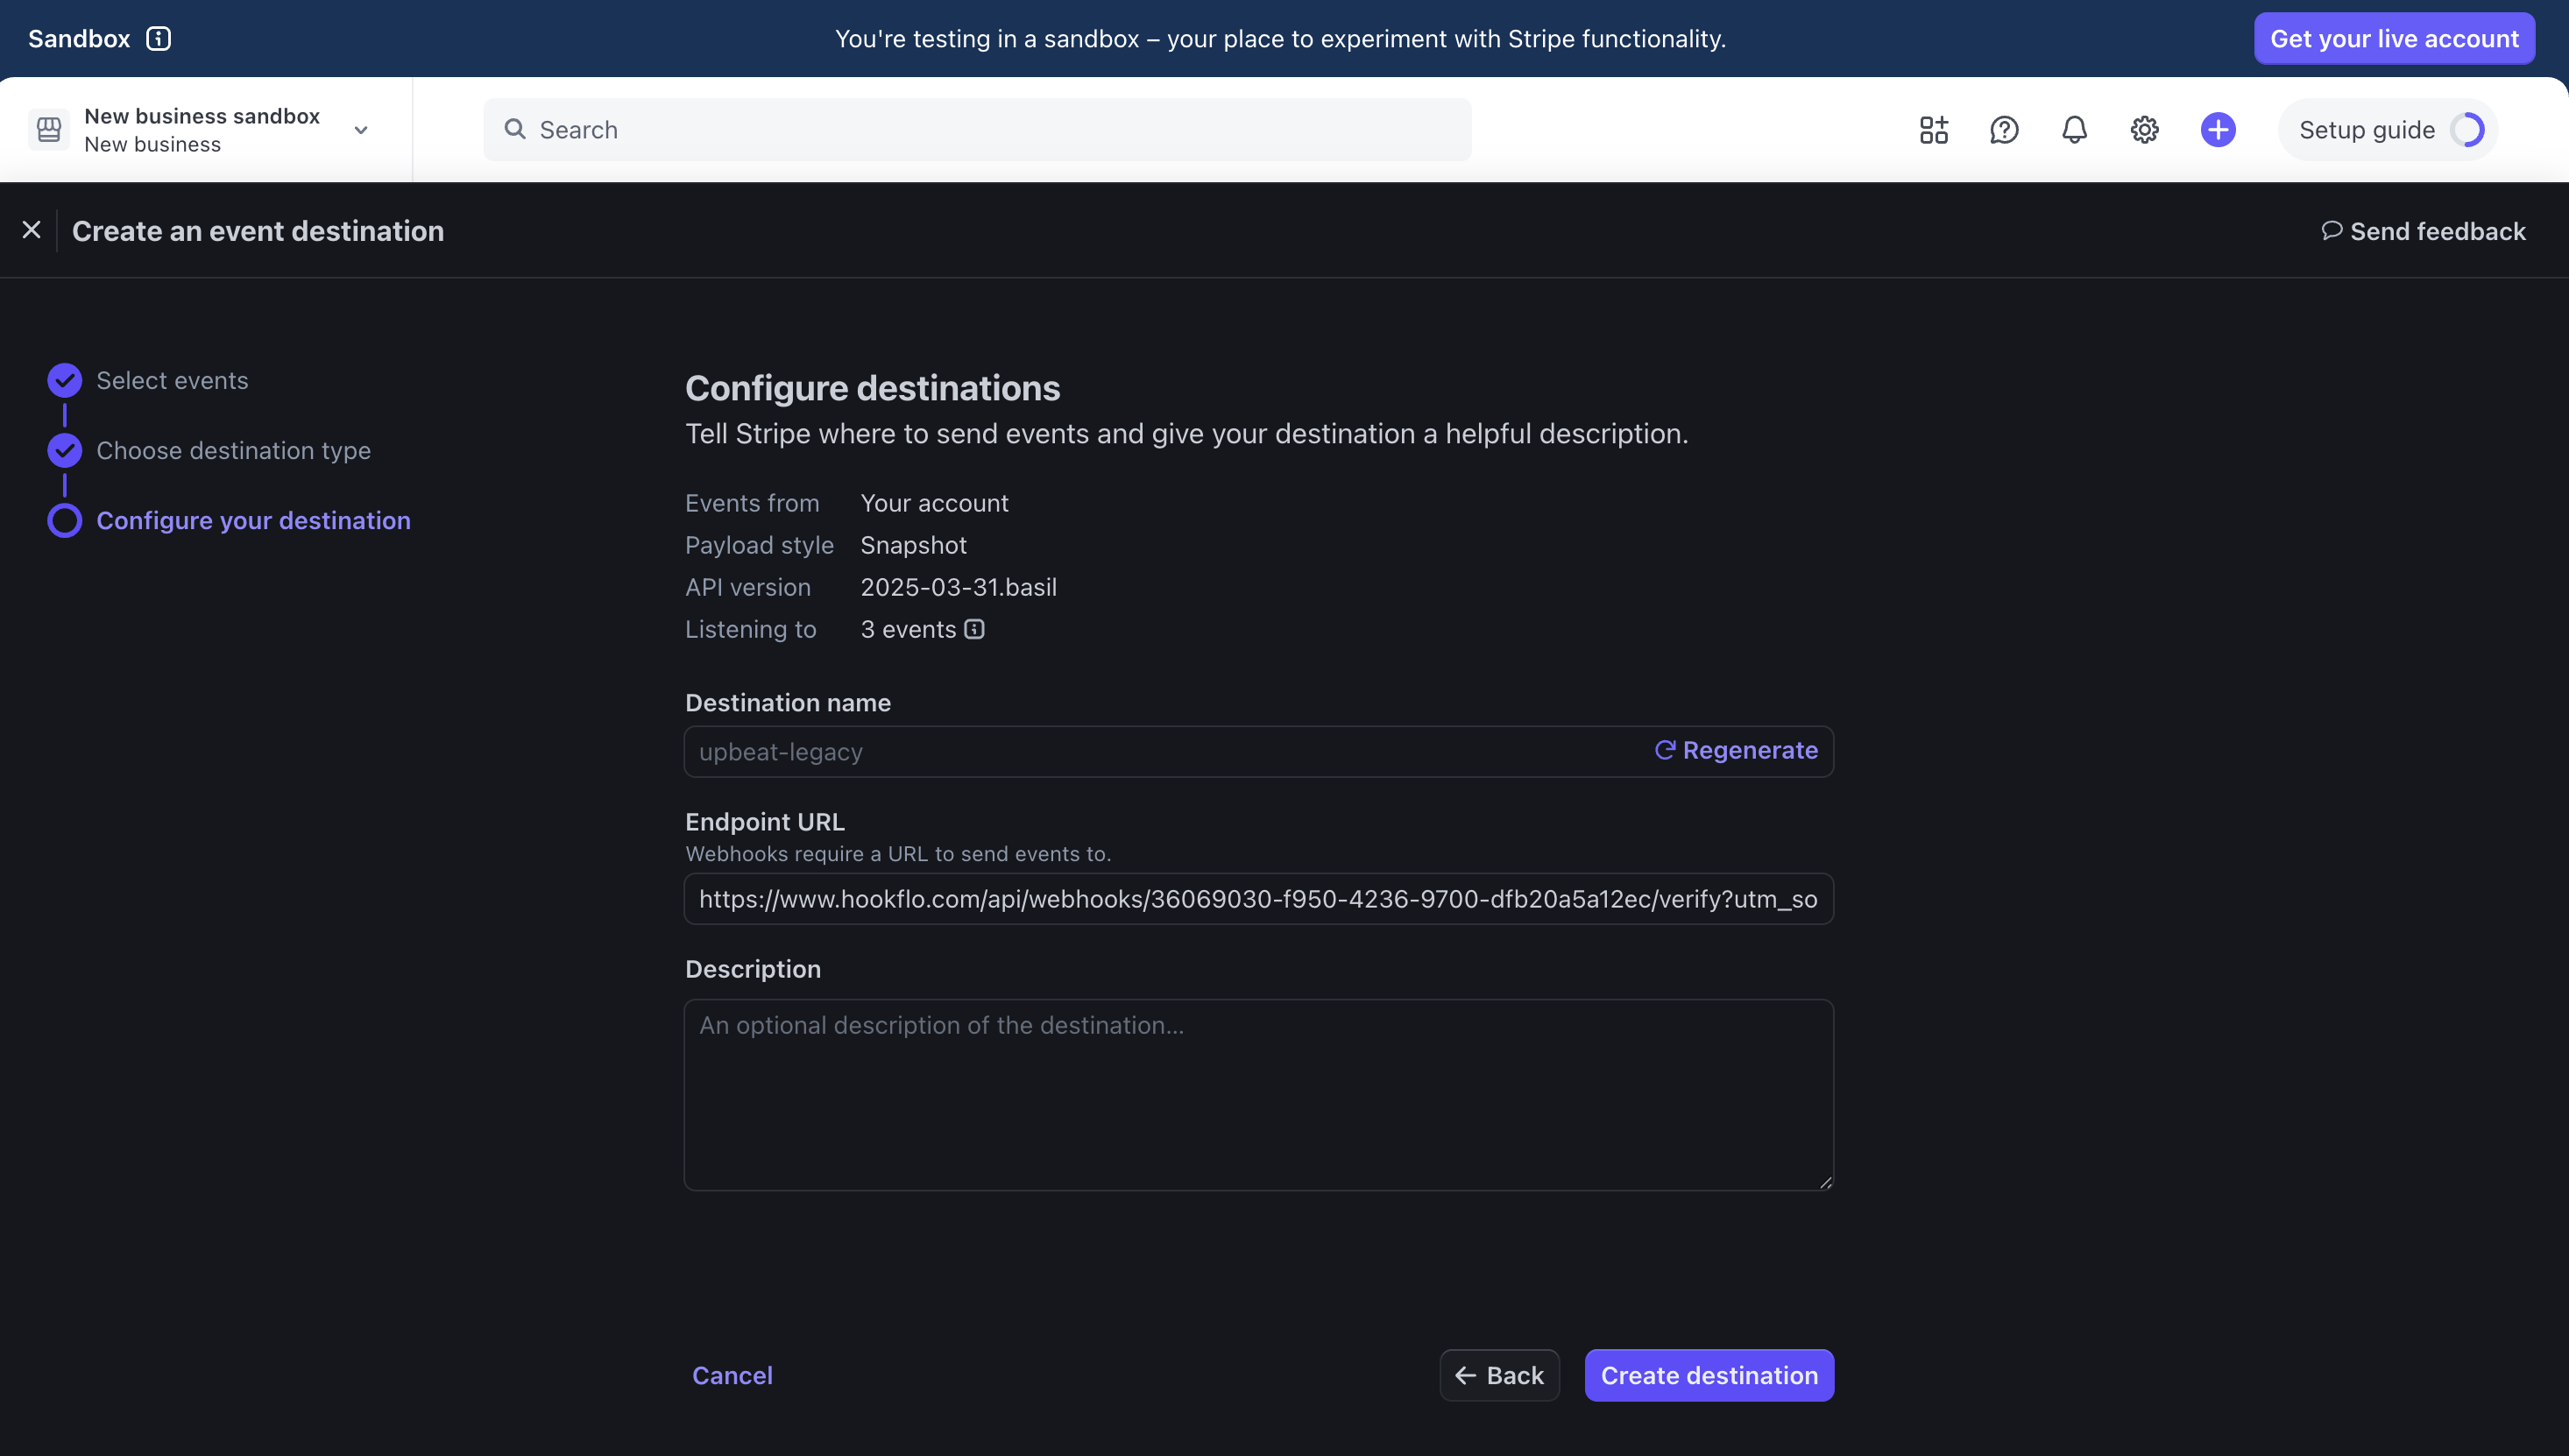
Now that your HookFlo webhook is set up, you need to configure Stripe to send events to it:Create a Webhook Endpoint in Stripe
Configuring Stripe to Send Webhooks
Configuring Stripe to Send Webhooks
- Log in to your Stripe Dashboard
- Navigate to Developers > Webhooks
- Click Add Destination
- Enter your HookFlo webhook URL that you copied from the previous step
-
Under Events to send, select the events you want to monitor
- For payment events:
payment_intent.succeeded,payment_intent.payment_failed, etc. - For subscription events:
customer.subscription.created,invoice.payment_succeeded, etc. - For customer events:
customer.created,customer.updated, etc.
- For payment events:
- Click Add endpoint Below screenshots are from Stripe Test Dashboard might differ in Live environment, But flow of integration with Hookflo will remains same.
Get Webhook Signing Secret from Stripe
Obtaining Your Webhook Signing Secret
Obtaining Your Webhook Signing Secret
After creating the webhook endpoint in Stripe:
- In your Stripe dashboard, find your newly created webhook endpoint
- Click Reveal next to the signing secret
- Copy the signing secret (it starts with
whsec_)
Configure Webhook Verification in HookFlo
Setting Up Webhook Verification
Setting Up Webhook Verification
- Return to the HookFlo dashboard
- Navigate to your Stripe webhook configuration
- Find the “Webhook Signing Secret” field
- Paste the Stripe signing secret you copied
- Click Save Configuration
Testing Your Integration
To ensure your integration is working properly:Test the Webhook in Stripe
Generating Test Events
Generating Test Events
- In the Stripe dashboard, find your webhook endpoint
- Click Send test webhook
- Select an event type (e.g.,
payment_intent.succeeded) - Click Send test webhook to deliver a sample webhook to HookFlo

Verify in HookFlo
Validate Alert Delivery
Validate Alert Delivery
- Return to your HookFlo dashboard
- Navigate to Notification Logs
- You should see the test events appear with details about the changes
- If you’ve configured notification channels, check your email or Slack for alerts

Supported Events
Stripe offers a comprehensive set of webhook events. Here are some of the most commonly used categories:Payment Events
payment_intent.succeeded: When a payment is successfully processedpayment_intent.payment_failed: When a payment attempt failscharge.succeeded: When a charge is successfulcharge.failed: When a charge failscharge.refunded: When a charge is refunded
Customer Events
customer.created: When a new customer is createdcustomer.updated: When customer details are updatedcustomer.deleted: When a customer is deleted
Subscription Events
customer.subscription.created: When a subscription is createdcustomer.subscription.updated: When a subscription is updatedcustomer.subscription.deleted: When a subscription is canceledinvoice.payment_succeeded: When a subscription payment succeedsinvoice.payment_failed: When a subscription payment fails
Product & Price Events
product.created: When a product is createdprice.created: When a price is createdproduct.updated: When a product is updated
Webhook Payload Structure
Here’s an example of what the webhook payload looks like for apayment_intent.succeeded event:
Advanced Configuration
Customizing Notification Templates
Customizing Notification Templates
Handling Test vs. Live Events
Handling Test vs. Live Events
Stripe has separate webhook endpoints for test and live modes. Best practices:
- Set up separate webhooks in HookFlo for test and live environments
- Use clear naming conventions to distinguish between test and production webhooks
- Configure different notification channels for test vs. live events
Troubleshooting
Webhook Signature Verification Failures
Webhook Signature Verification Failures
If you’re seeing signature verification errors:
- Double-check that you’ve entered the correct signing secret in HookFlo
- Ensure you’re using the signing secret for the specific webhook endpoint
- Check if the signing secret has been rotated in Stripe recently
- Verify your server’s clock is accurately synchronized (time drift can cause verification failures)
Missing Events
Missing Events
If certain events aren’t being received:
- Verify that you’ve selected those specific event types in Stripe’s webhook configuration
- Check Stripe’s webhook delivery logs to confirm they’re being sent
- Ensure your HookFlo webhook is active and properly configured
Webhook Timeouts
Webhook Timeouts
If webhook deliveries are timing out:
- Check Stripe’s webhook logs for timeout errors
- Stripe will automatically retry webhook deliveries that fail
- You can manually trigger a retry from the Stripe dashboard
Example: Monitoring Successful Payments
Here’s a complete example of setting up HookFlo to alert your team when payments succeed:Create the Webhook in HookFlo
Follow the steps above to create a Stripe webhook in HookFlo and configure your notification channels.
Configure Stripe to Send Payment Events
- In your Stripe dashboard, go to Developers > Webhooks
- Create a new webhook using your HookFlo webhook URL
- Select the
payment_intent.succeededevent type - Copy your webhook signing secret
- Add the signing secret to your HookFlo Stripe configuration
Security Considerations
When setting up webhook integrations between Stripe and HookFlo, keep these security best practices in mind:- Protect your signing secret: Never expose the Stripe signing secret in client-side code
- Validate all webhooks: Always use the signing secret to verify webhook authenticity
- Use HTTPS only: Ensure all webhook URLs use encrypted connections
- Implement proper access controls: Limit who can view sensitive payment information
- PCI compliance: Be careful about storing or logging complete payment details