> ## Documentation Index
> Fetch the complete documentation index at: https://docs.hookflo.com/llms.txt
> Use this file to discover all available pages before exploring further.

# Supabase

> Connect Hookflo with Supabase to receive alerts for database and authentication events

## Integration Guide

This guide will help you set up a webhook integration between Supabase and Hookflo, allowing you to receive real-time alerts when database changes, authentication events, and other activities occur in your Supabase project.

<img src="https://mintcdn.com/hookflo/FVKCx30l3CvlX69H/supabase-logo-wordmark--dark.png?fit=max&auto=format&n=FVKCx30l3CvlX69H&q=85&s=94f225987a669f74e4aed85da878ba86" width="500px" height="400px" data-path="supabase-logo-wordmark--dark.png" />

<Note>
  Supabase uses a combination of database triggers and Postgres functions to deliver webhook events. Hookflo seamlessly integrates with both Supabase's built-in webhooks and custom webhook implementations.
</Note>

## Prerequisites

* A Hookflo account with an active project
* A Supabase project with admin access
* Basic understanding of Supabase database and functions

## Integration Overview

The integration process follows these key steps:

1. Set up a webhook in Hookflo
2. Configure notification channels (email/Slack)
3. Connect Supabase to Hookflo
4. Test the integration

## Setting Up Your Hookflo Webhook

After logging into Hookflo, follow these steps to create and configure your Supabase webhook:

<Steps>
  <Step title="Create a Webhook">
    <Accordion title="Setting Up Your Webhook Endpoint">
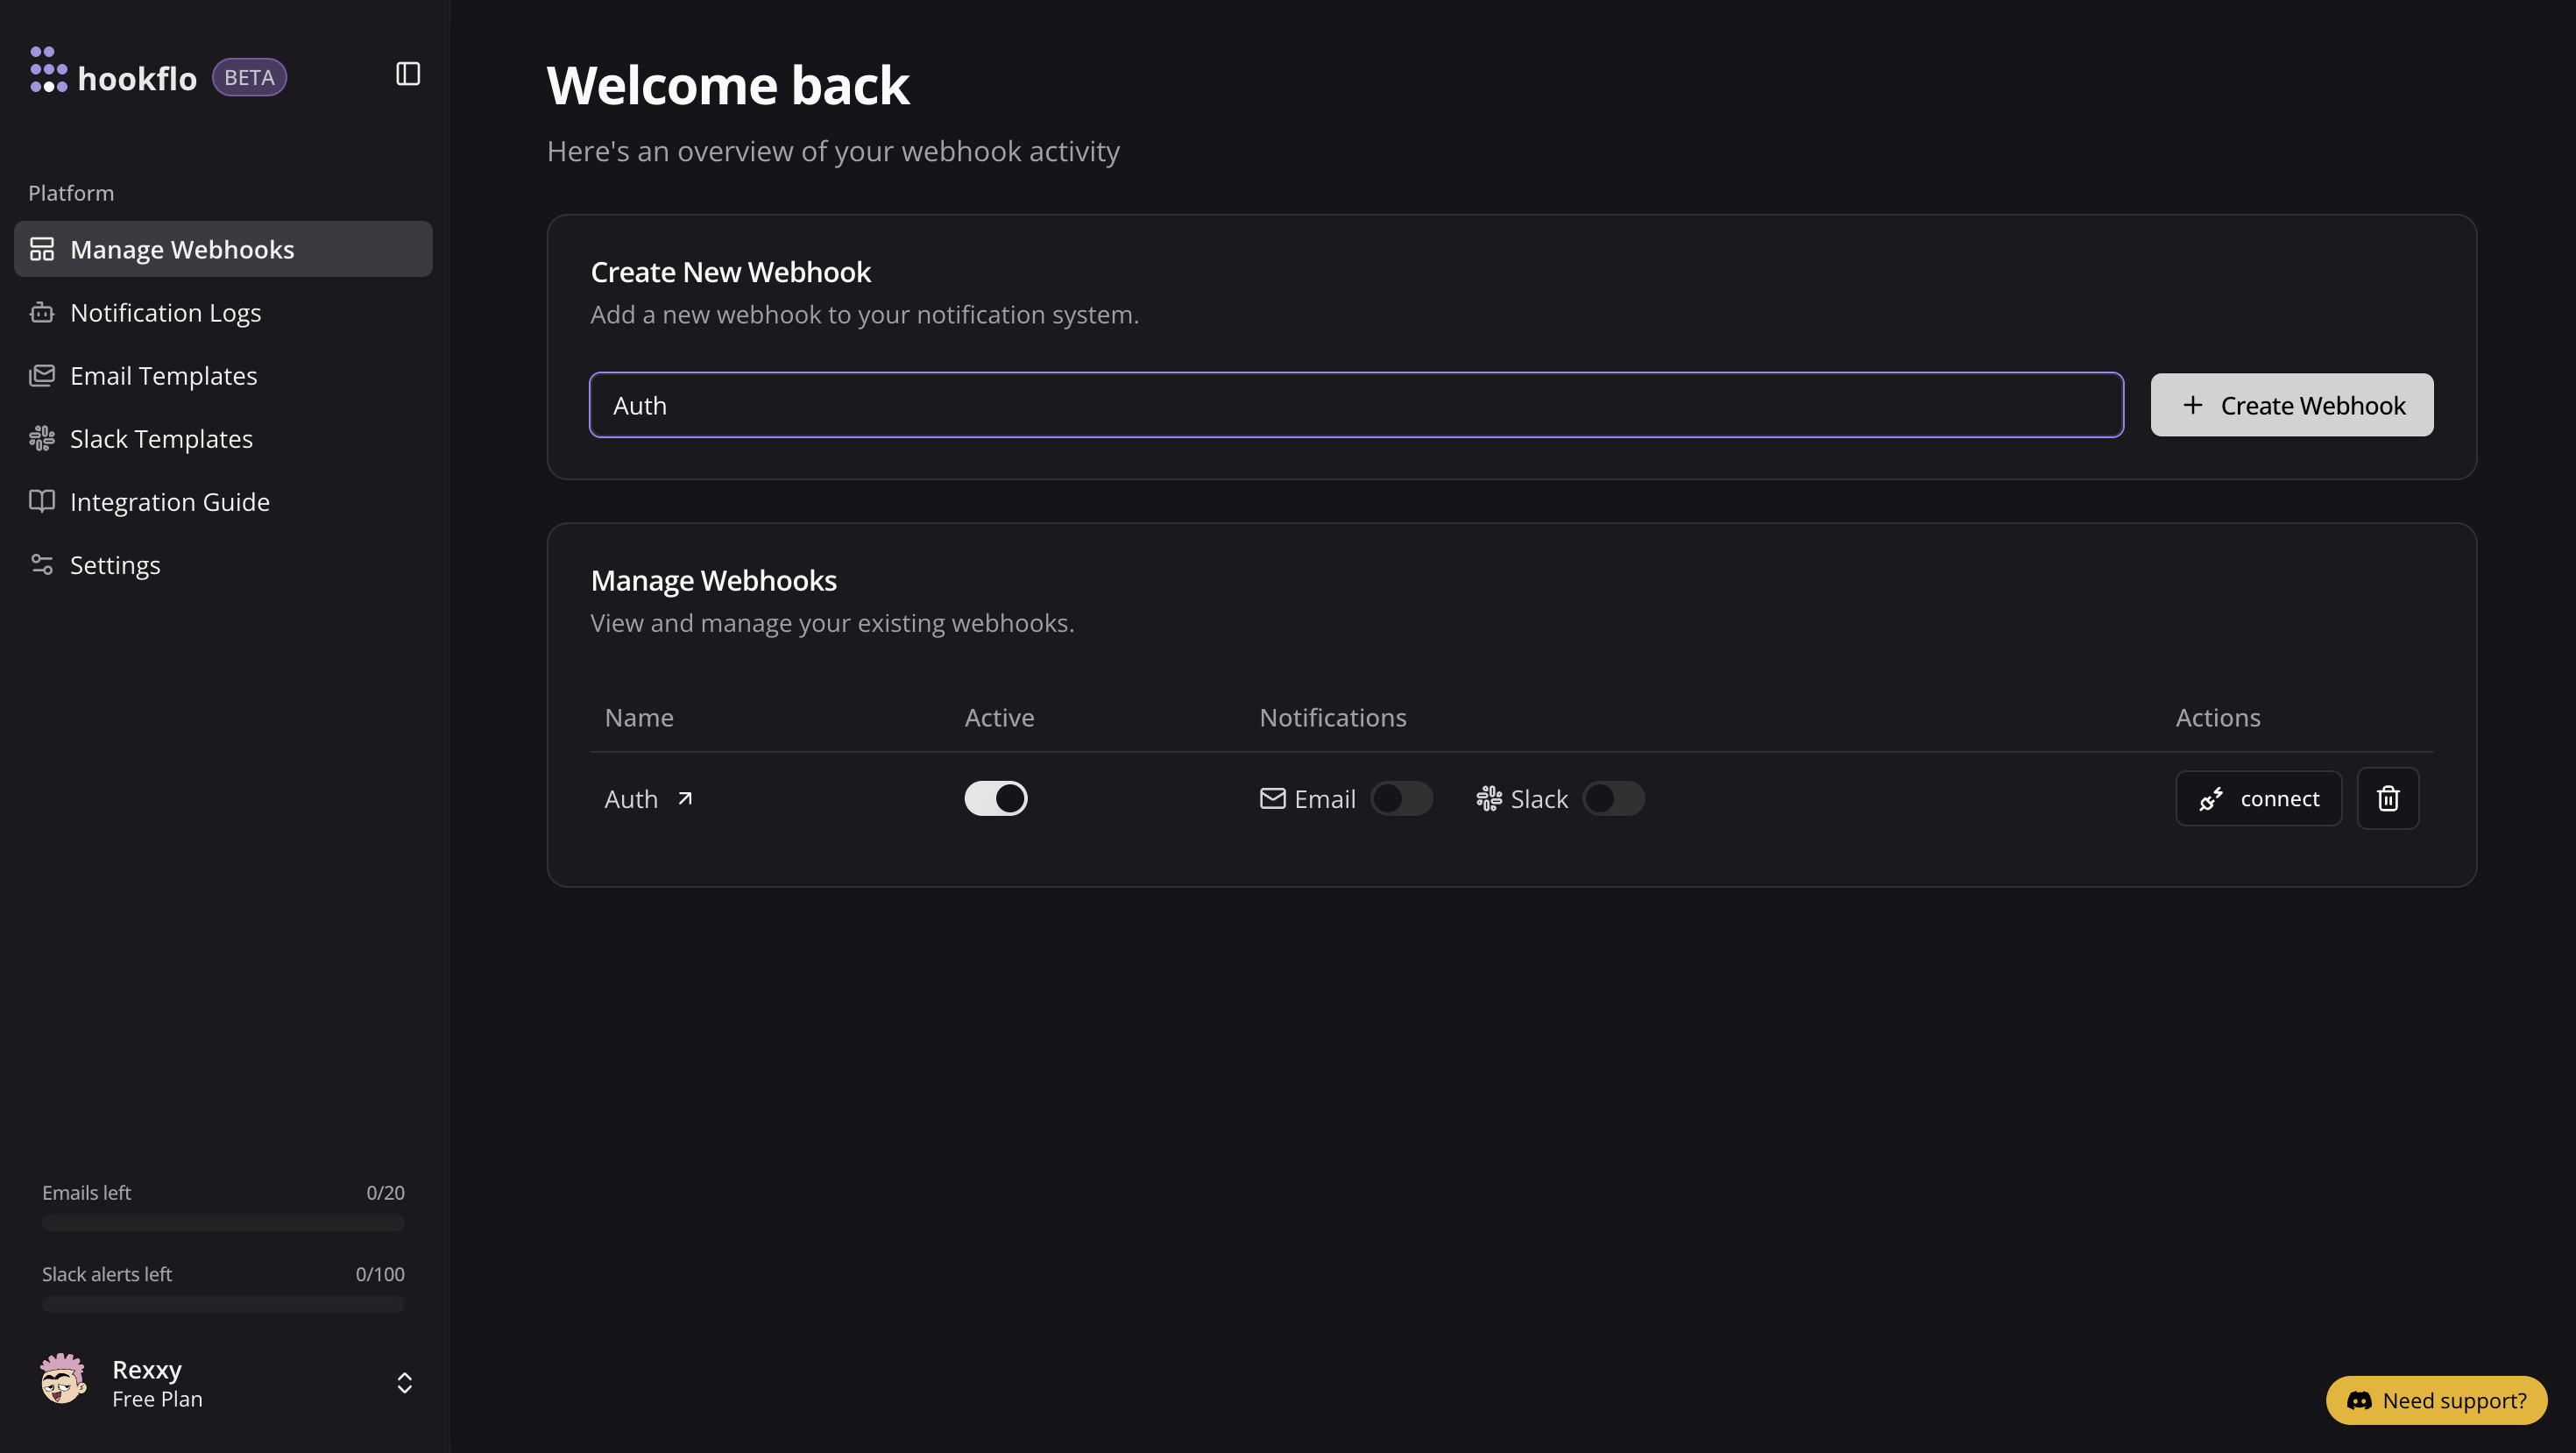
      1. From your [Hookflo Dashboard](https://www.hookflo.com/dashboard/webhooks), navigate to > **Manage Webhooks**
      2. Click on **+ Create Webhook**
      3. Your webhook will be created in an inactive state by default

      Once created, you'll see your webhook in manage webhooks table.

      <div className="w-full">
        <img src="https://mintcdn.com/hookflo/FVKCx30l3CvlX69H/supabase/create-webhook-hookflo.png?fit=max&auto=format&n=FVKCx30l3CvlX69H&q=85&s=760db365c8dc70eea027c9de9643fe55" alt="Create Webhook Screen" width="2940" height="1658" data-path="supabase/create-webhook-hookflo.png" />
      </div>
    </Accordion>
  </Step>

  <Step title="Setup Notification Channel">
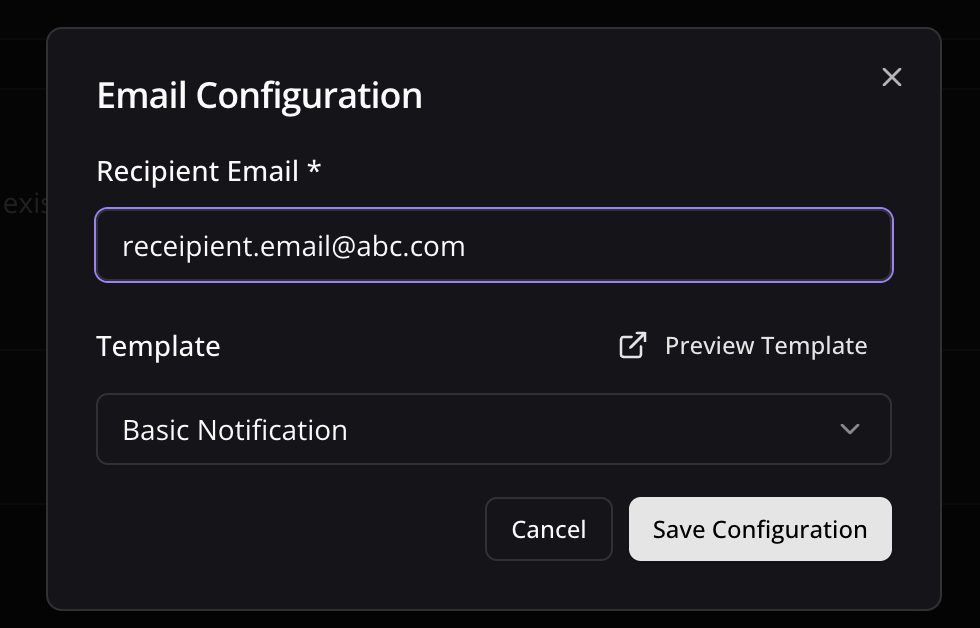
    <Accordion title="Configure Email Notifications">
      1. Toggle the **Email Notifications** switch to enable email alerts
      2. In the dialog box that appears, enter the email address where you want to receive notifications
      3. Select an email template from the dropdown menu
      4. Click **Preview Template** to see how your notifications will look
      5. Use the editor to customize the template if needed
      6. Click **Save Configuration** to confirm your settings

      Email notifications are perfect for critical alerts that require immediate attention and have lower usage limits, Use it for critical Alerts.

      <div className="w-full">
        <img src="https://mintcdn.com/hookflo/FVKCx30l3CvlX69H/supabase/email-configuration.png?fit=max&auto=format&n=FVKCx30l3CvlX69H&q=85&s=041f33a2f6d8eeb3542c69b8dd4643a4" alt="Email Configuration Dialog" width="980" height="628" data-path="supabase/email-configuration.png" />
      </div>
    </Accordion>

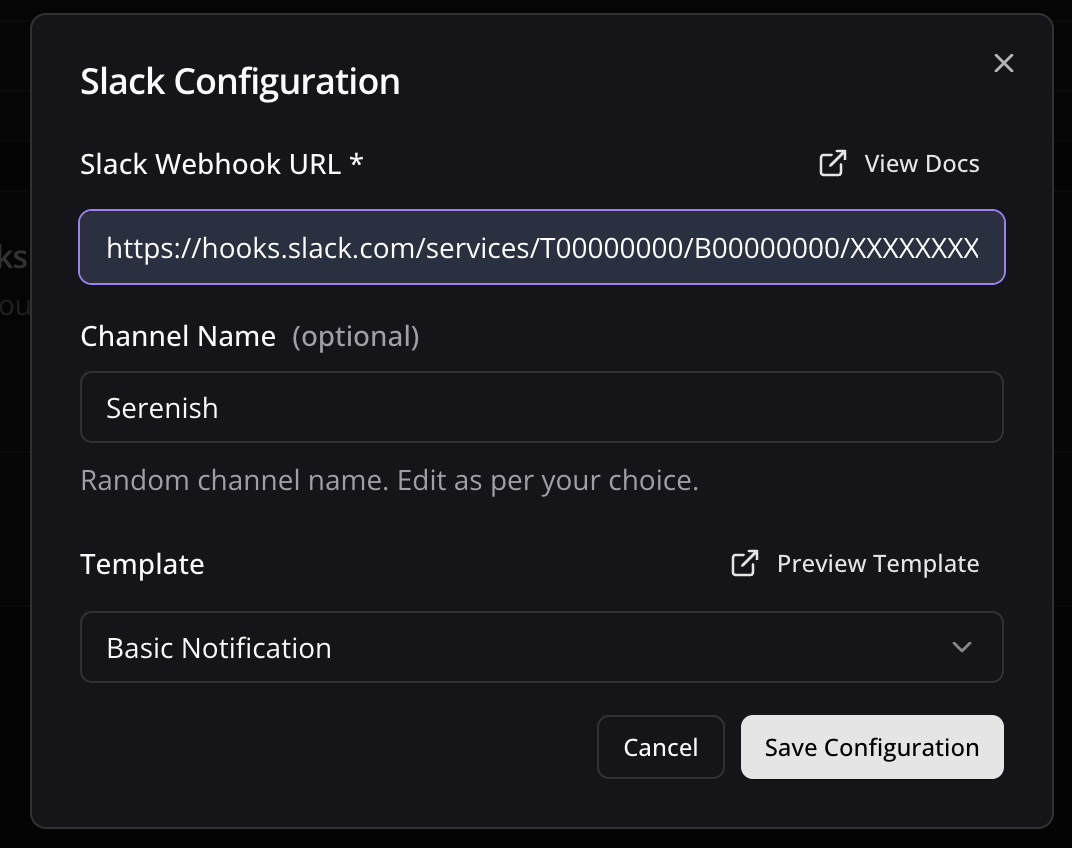
    <Accordion title="Configure Slack Notifications">
      1. Toggle the **Slack Notifications** switch to enable Slack alerts
      2. In the dialog box, paste your Slack webhook URL (see
      3. )
      4. Keep the random generated name or enter a custom one (optional)
      5. Select a notification template from the available options
      6. Preview and edit the template as needed
      7. Click **Save Configuration** to confirm your settings

      Slack notifications are ideal for team collaboration and awareness, Highly recommended to use Slack and this has 3x Usage limits than email.

      <div className="w-full">
        <img src="https://mintcdn.com/hookflo/FVKCx30l3CvlX69H/supabase/slack-configuration.png?fit=max&auto=format&n=FVKCx30l3CvlX69H&q=85&s=b93dde6c8c71eb14a3191202f6e4644c" alt="Slack Configuration Dialog" width="1072" height="848" data-path="supabase/slack-configuration.png" />
      </div>
    </Accordion>
  </Step>

  <Step title="Connect your Webhook with application">
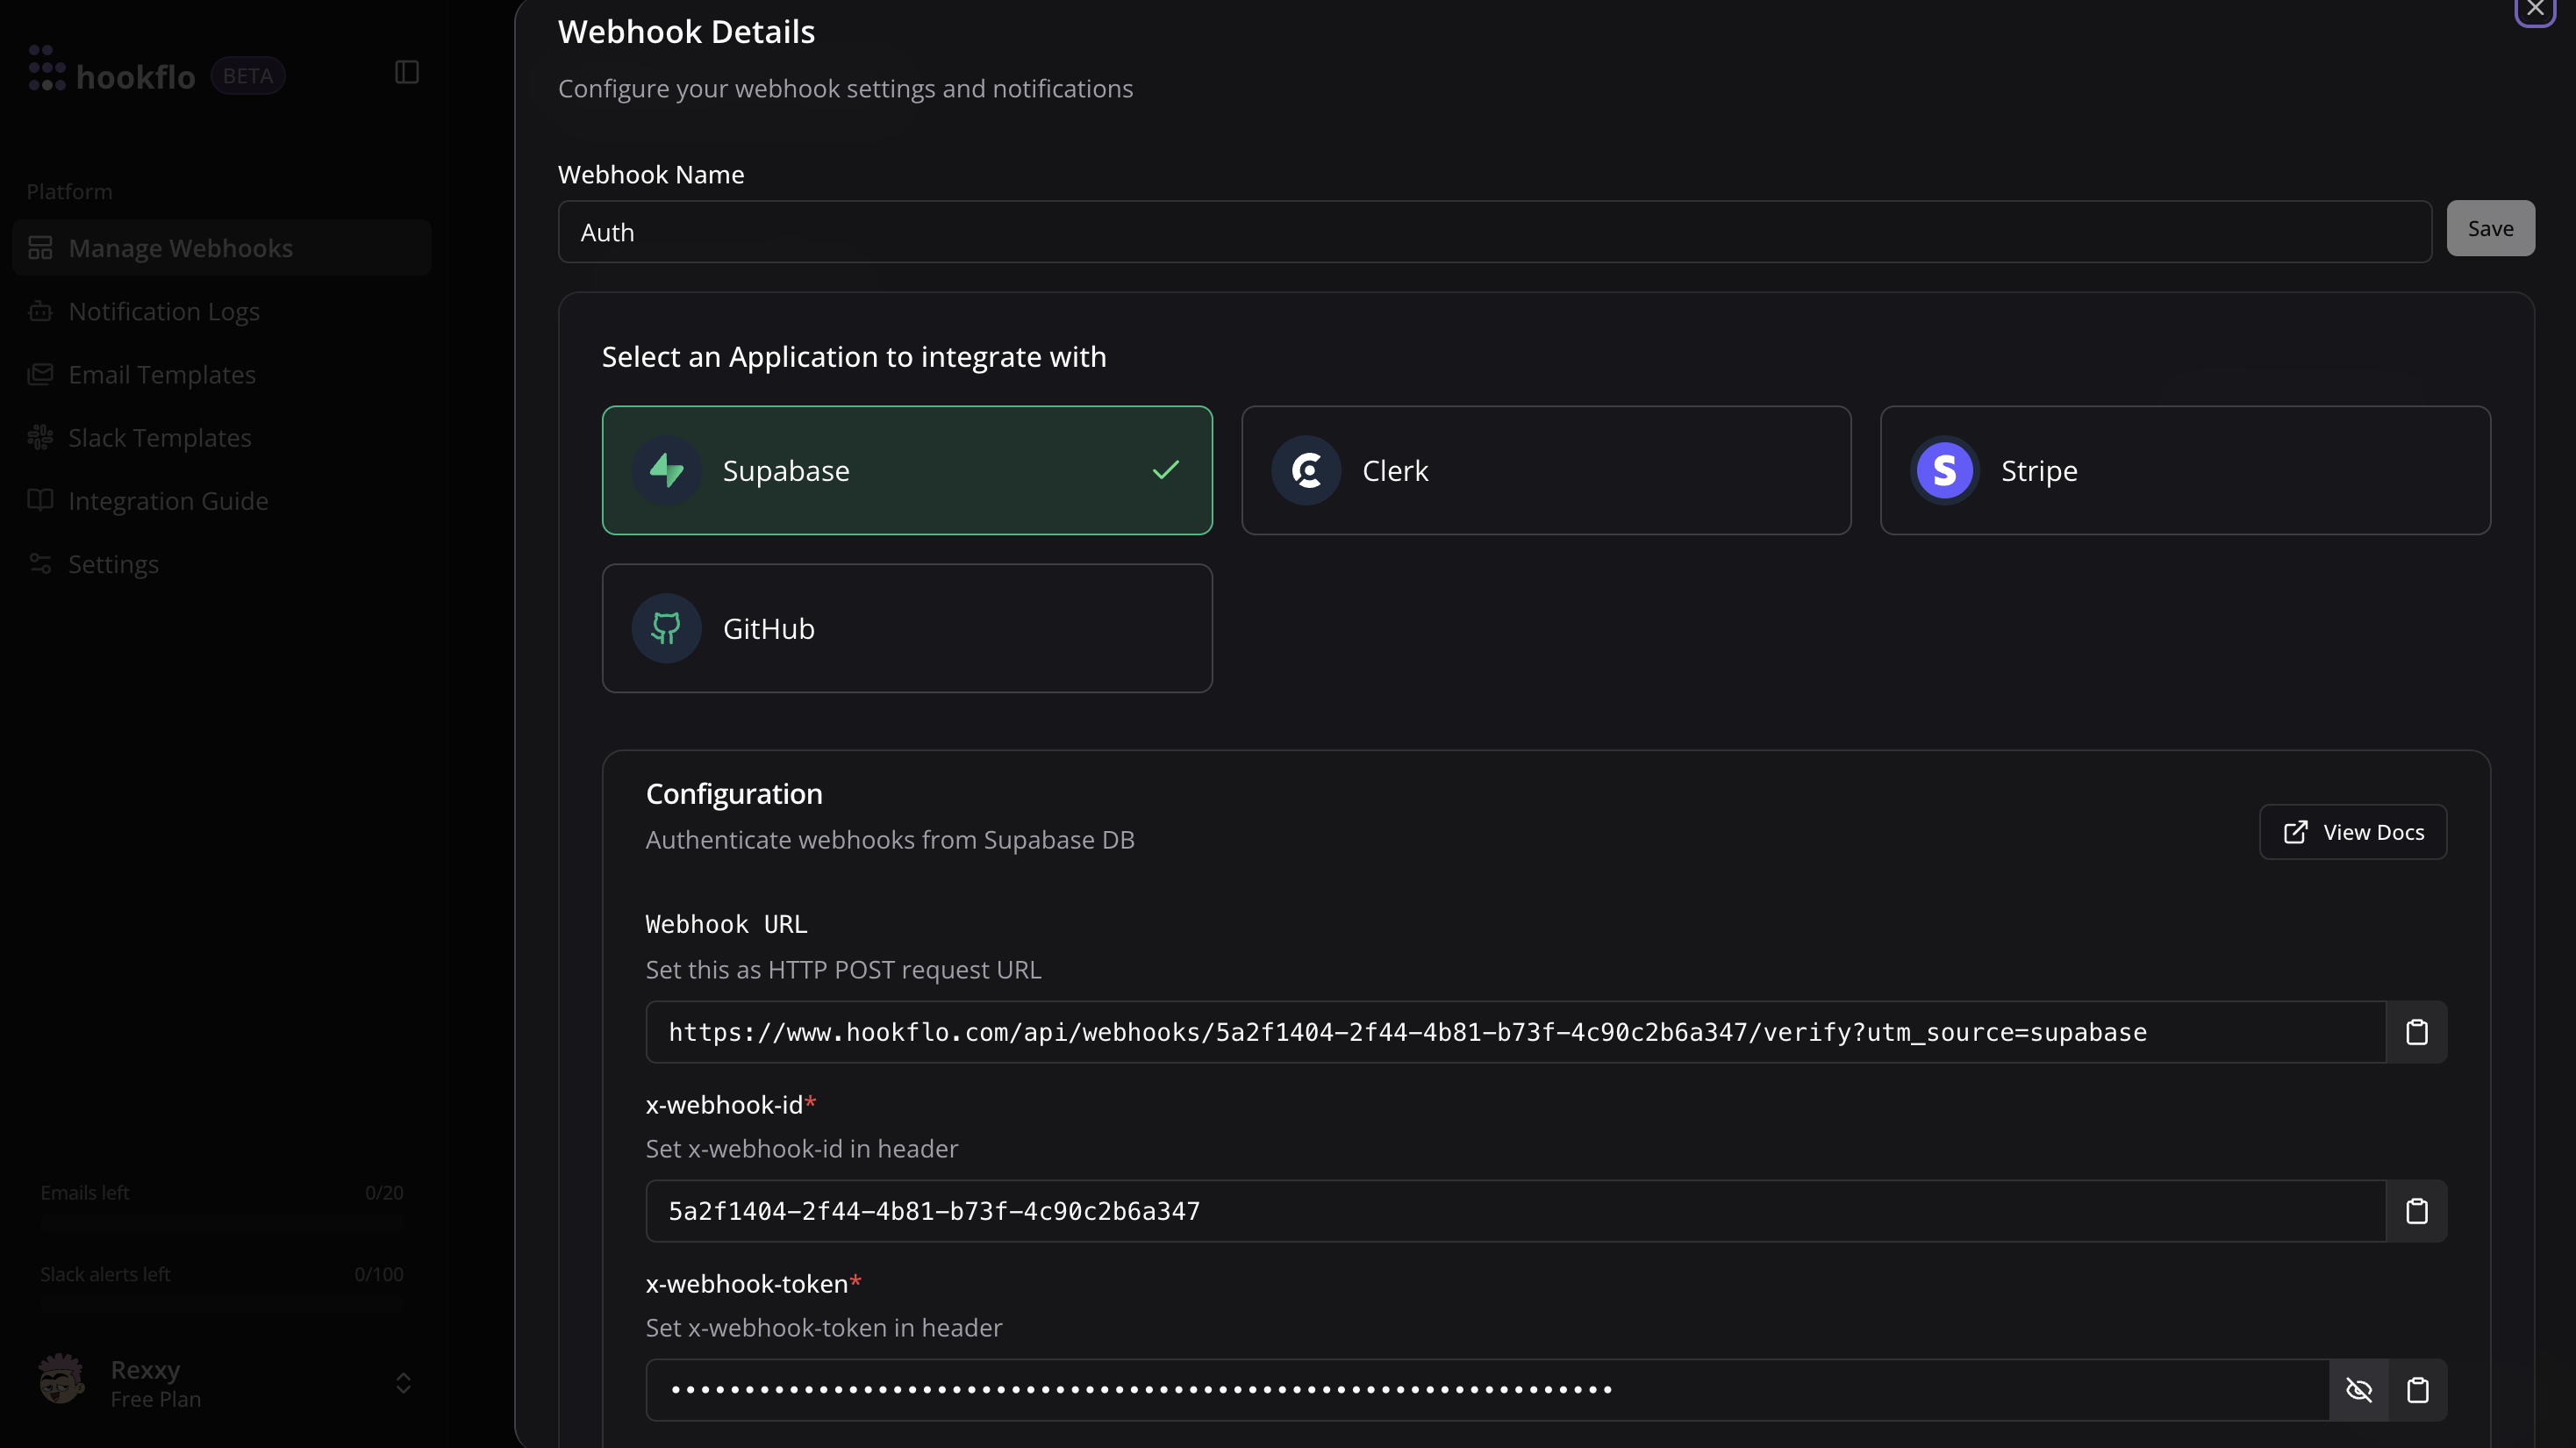
    <Accordion title="Configure Application">
      1. Click the **Connect** button to activate your webhook
      2. Select **Supabase** as application to integrate
      3. A configuration panel will appear with your webhook credentials:
         * **Webhook URL**: The HTTP POST request endpoint Supabase will send events to
         * **x-webhook-id**: Your unique webhook identifier
         * **x-webhook-token**: Your security token for authentication
      4. Copy these values for the next section

      You can also configure notification channels from this panel if you haven't done so already.

      <div className="w-full">
        <img src="https://mintcdn.com/hookflo/FVKCx30l3CvlX69H/supabase/configure-application.png?fit=max&auto=format&n=FVKCx30l3CvlX69H&q=85&s=e18b72b3180224857745b62c659a7ae4" alt="Connection Configuration Panel" width="2936" height="1650" data-path="supabase/configure-application.png" />
      </div>
    </Accordion>
  </Step>
</Steps>

## Configuring Supabase

Now that your HookFlo webhook is set up, you need to configure Supabase to send events to it:

<Steps>
  <Step title="Setup Supabase Webhook">
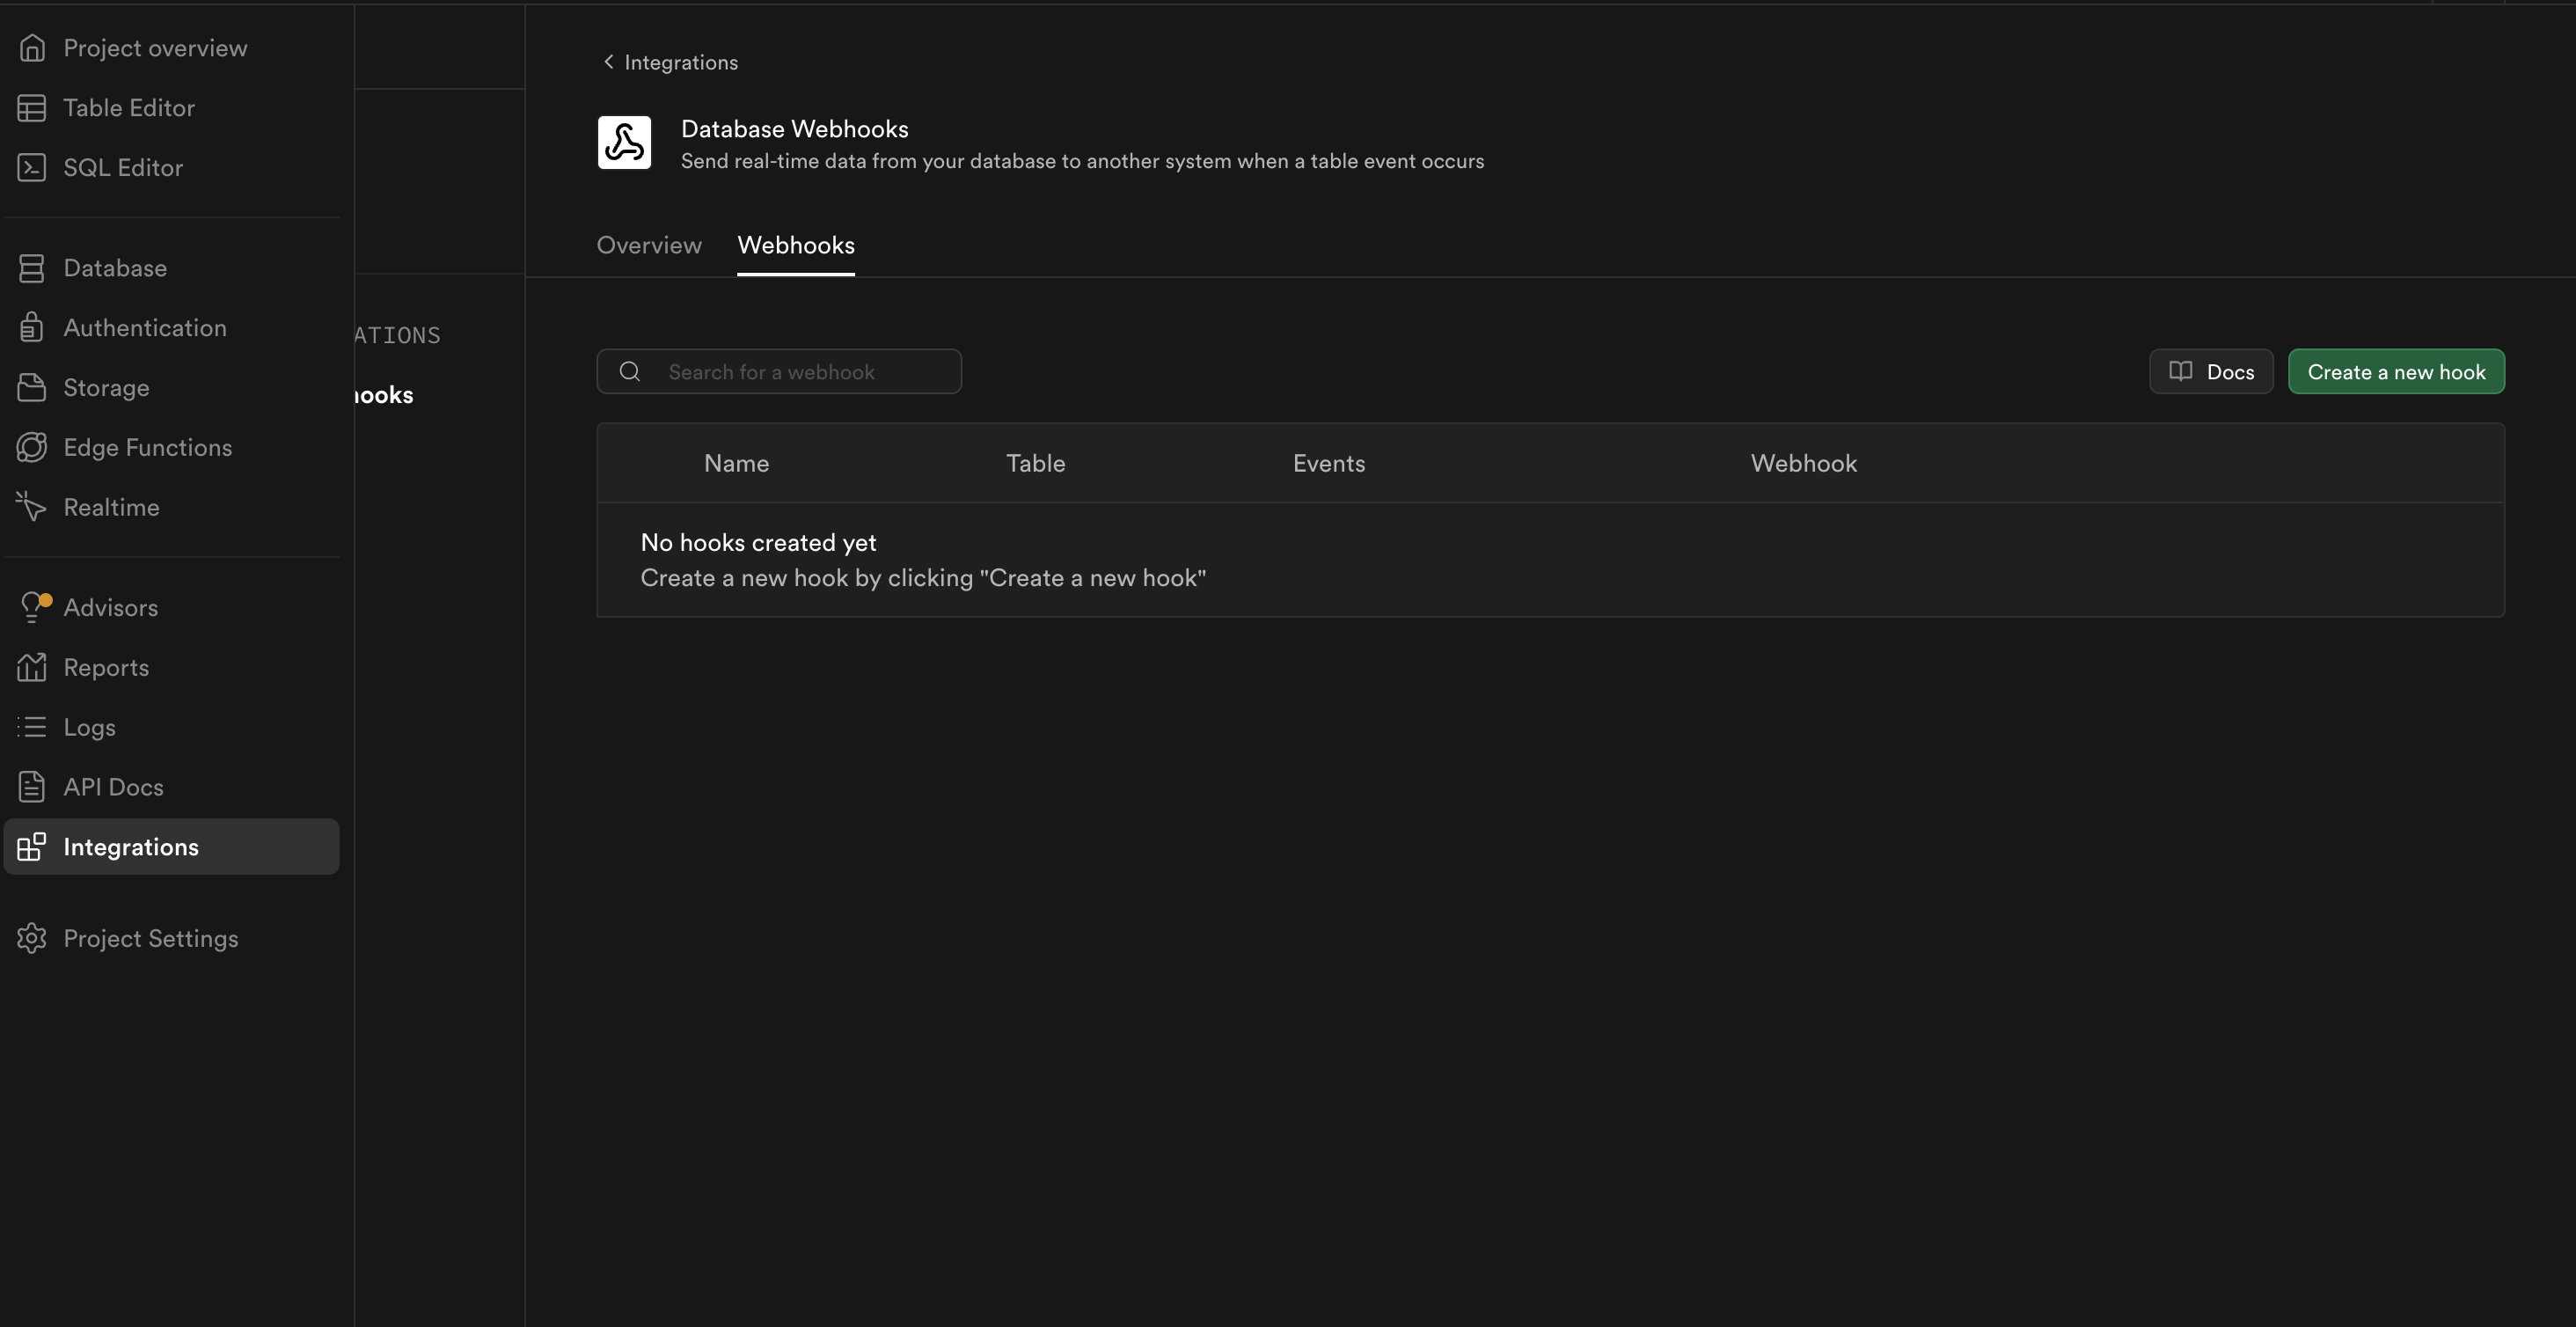
    <Accordion title="Access Supabase Webhooks">
      1. Log in to your [Supabase Dashboard](https://supabase.com/dashboard)
      2. Select your [Project](https://supabase.com/dashboard/projects)
      3. Select **Integrations** option in the left sidebar
      4. Choose Database Webhooks (Official) app from panel, Install it if not already done.
      5. After Clicking Database Webhooks app you will see 2 tabs Overview and Webhooks choose Webhooks and proceed with next step.

      This is where you'll create database webhooks that trigger on table events.

      <div className="w-full">
        <img src="https://mintcdn.com/hookflo/FVKCx30l3CvlX69H/supabase/choose-database-webhooks.png?fit=max&auto=format&n=FVKCx30l3CvlX69H&q=85&s=7279872003f7398000bd5f7d532f0a8a" alt="Supabase Dashboard Navigation" width="2928" height="1508" data-path="supabase/choose-database-webhooks.png" />
      </div>
    </Accordion>
  </Step>

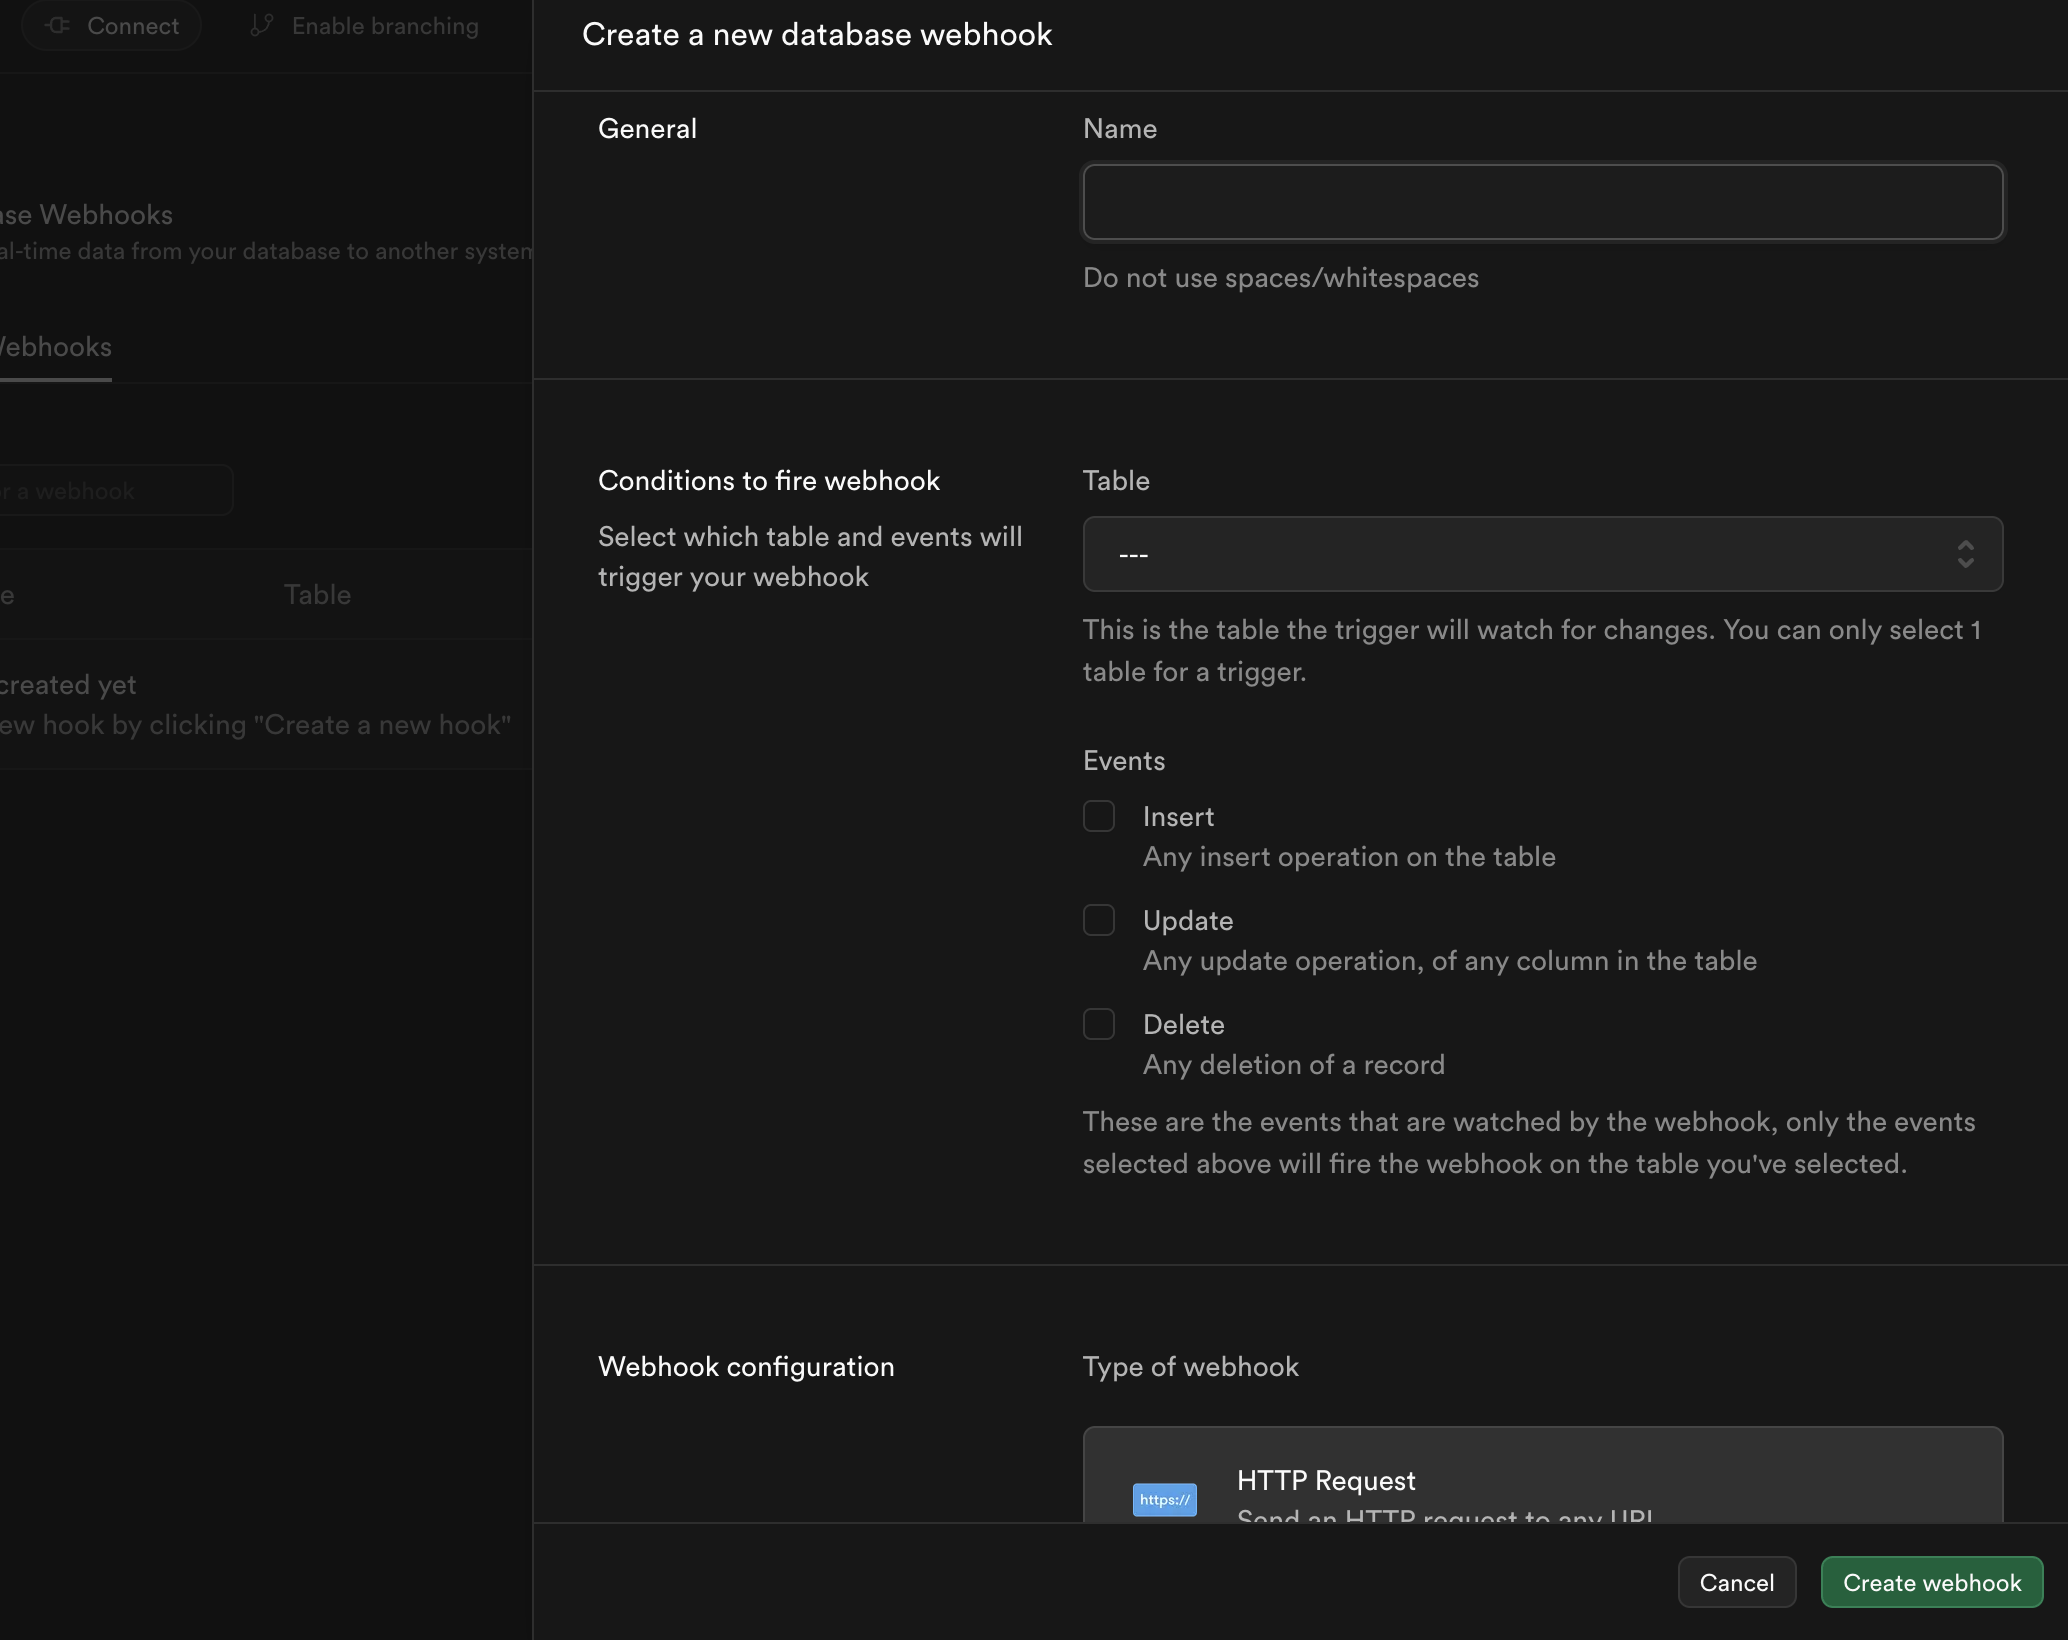
  <Step title="Create a Database Webhook">
    <Accordion title="Configure Webhook Details">
      1. Click **Create a new webhook**
      2. Provide a descriptive name for your webhook (e.g., `hookflo-users-events`)
      3. Select the table you want to monitor from the dropdown
      4. Choose which events to trigger the webhook:
         * **INSERT**: When new records are created
         * **UPDATE**: When existing records are modified
         * **DELETE**: When records are removed
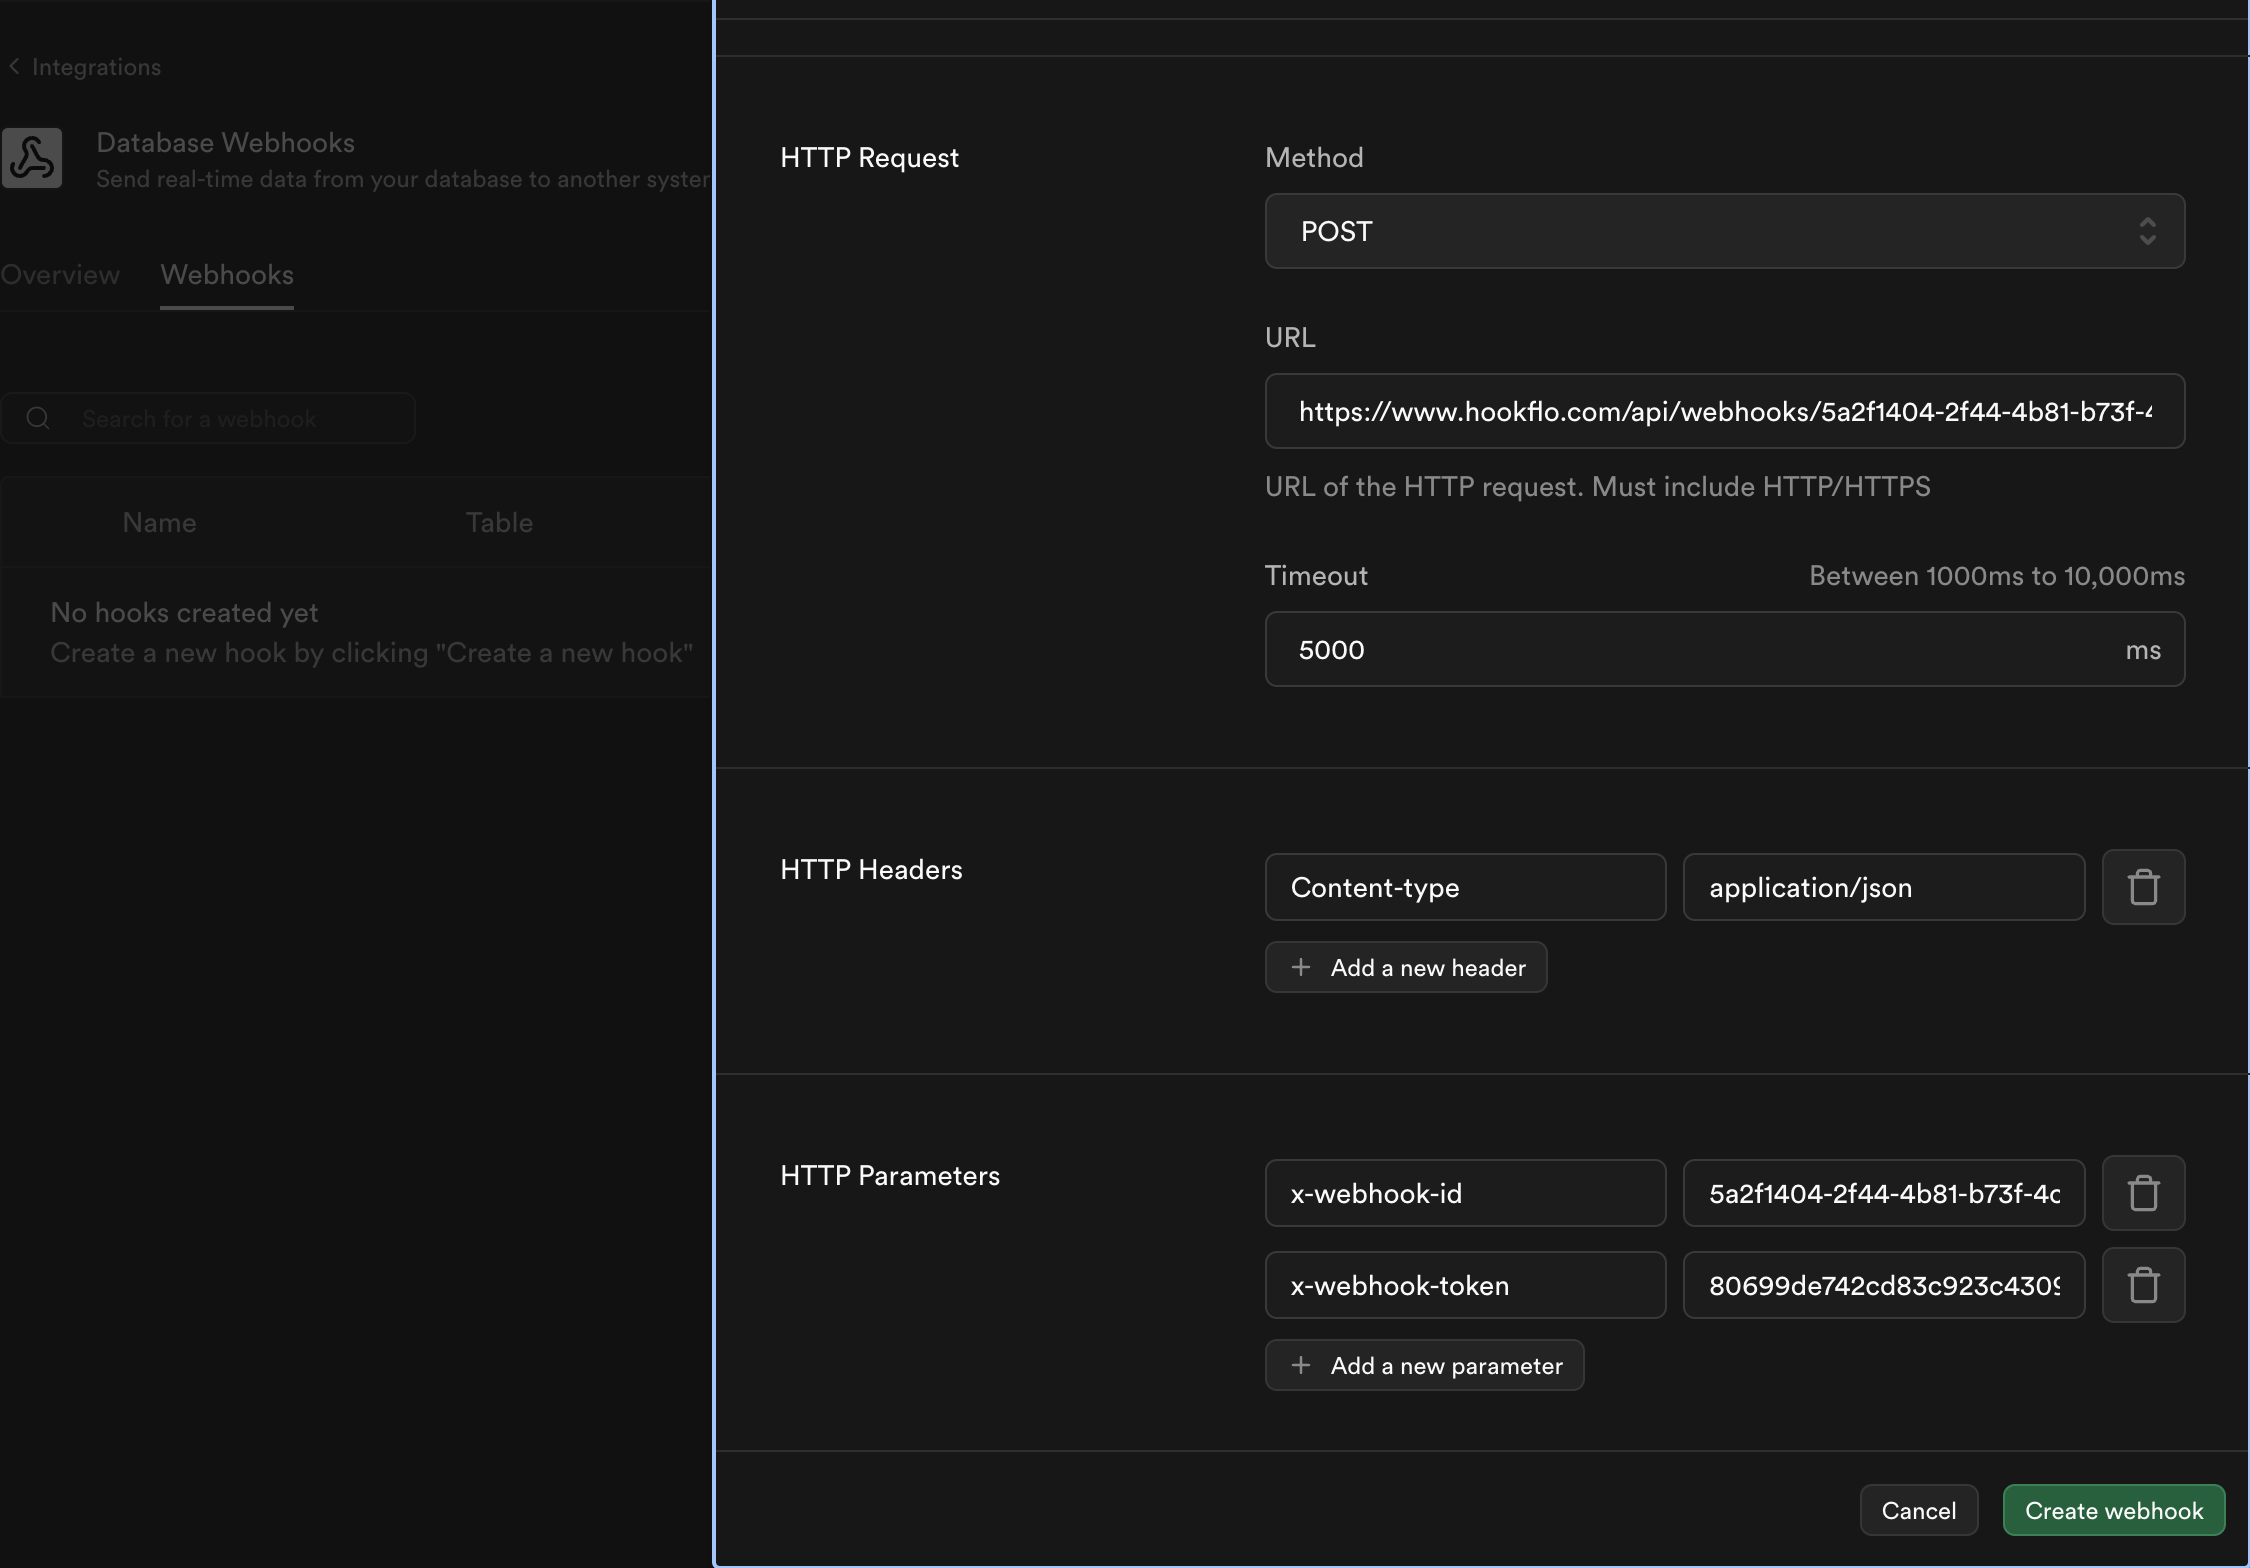
      5. Under **Webhook configuration** choose Type of webhook as **HTTP Request**
      6. In the URL field, paste your HookFlo webhook URL
      7. Add the following HTTP headers:
         * `x-webhook-id`: \[Your webhook ID from HookFlo]
         * `x-webhook-token`: \[Your webhook token from HookFlo]
      8. Click **Save** to create the webhook

      <div className="w-full">
        <img src="https://mintcdn.com/hookflo/FVKCx30l3CvlX69H/supabase/create-webhook.png?fit=max&auto=format&n=FVKCx30l3CvlX69H&q=85&s=39e96cb8d8a595a2038243b7c15c1fe2" alt="Create Database Webhook Form" width="2068" height="1640" data-path="supabase/create-webhook.png" />
      </div>

      <div className="w-full">
        <img src="https://mintcdn.com/hookflo/FVKCx30l3CvlX69H/supabase/configure-secret-url-values.png?fit=max&auto=format&n=FVKCx30l3CvlX69H&q=85&s=3ec0ac5999ca33d254062e41c3bb34d7" alt="Create Database Webhook Form" width="2250" height="1568" data-path="supabase/configure-secret-url-values.png" />
      </div>
    </Accordion>
  </Step>

  <Step title="Enable HTTP Extension (If Needed)">
    <Accordion title="Configure Http Extension">
      <div className="flex-1">
        For webhooks to function correctly, Supabase needs the HTTP extension enabled. Most projects created after December 2022 have this extension enabled by default.

        To check or enable it:

        1. Go to the **SQL Editor** in your Supabase dashboard
        2. Run the following SQL command:

        ```sql theme={null}
        create extension if not exists http with schema extensions;
        ```

        3. Click **Run** to execute the command
      </div>
    </Accordion>
  </Step>

  <Step title="Select Tables to Monitor">
    <Accordion title="Choose Database Tables">
      <div className="flex-1">
        When creating your database webhook in Supabase, you can monitor any table:

        * **Public schema tables**: Your application's main tables
        * **Auth schema tables**: Supabase authentication tables to track user-related events
        * **Any other schema**: Custom schemas you've created

        Simply select the appropriate table from the dropdown when creating your webhook. Supabase will send events to HookFlo whenever the selected events (INSERT, UPDATE, DELETE) occur on that table.
      </div>
    </Accordion>
  </Step>
</Steps>

## Testing Your Integration

To ensure your integration is working properly:

<Steps>
  <Step title="Generate Test Events">
    <Accordion title="Run Test Events">
      1. In your Supabase project, make a change to the monitored table:
         * Insert a new record
         * Update an existing record
         * Delete a record

      For authentication events, perform the corresponding action (e.g., create a new user).
    </Accordion>
  </Step>

  <Step title="Verify in HookFlo">
    <Accordion title="Validate Alert Delivery">
      <div className="flex gap-8">
        <div className="flex-1">
          1. Return to your HookFlo dashboard
          2. Navigate to [Notification Logs](https://www.hookflo.com/dashboard/logs)
          3. You should see the test events appear with details about the changes
          4. If you've configured notification channels, check your email or Slack for alerts

          This confirms that your Supabase webhook is correctly sending events to HookFlo, and your notification channels are properly configured.
        </div>

        <div className="w-2/5">
          <img src="https://mintlify.s3.us-west-1.amazonaws.com/hookflo/event-logs.png" alt="Event Logs in HookFlo" />
        </div>
      </div>
    </Accordion>
  </Step>
</Steps>

## Advanced Configuration

<AccordionGroup>
  <Accordion title="Using SQL for Custom Webhook Triggers">
    For more control over your webhooks, you can use SQL to create custom triggers:

    ```sql theme={null}
    -- Create a function that will trigger the webhook
    create or replace function public.handle_webhook_event()
    returns trigger as $$
    declare
      webhook_url text := 'https://api.hookflo.dev/webhook/supabase/[your-webhook-id]';
    begin
      perform net.http_post(
        webhook_url,
        json_build_object(
          'table', TG_TABLE_NAME,
          'schema', TG_TABLE_SCHEMA,
          'event', TG_OP,
          'record', case when TG_OP = 'DELETE' then old else new end,
          'old_record', case when TG_OP = 'UPDATE' then old else null end
        )::text,
        'application/json',
        array[
          ('x-webhook-id', '[Your webhook ID from HookFlo]'),
          ('x-webhook-token', '[Your webhook token from HookFlo]')
        ]
      );
      return new;
    end;
    $$ language plpgsql security definer;

    -- Create a trigger on your table
    create trigger on_users_changed
      after insert or update or delete on public.users
      for each row execute procedure public.handle_webhook_event();
    ```

    This approach gives you fine-grained control over what data is sent and when.
  </Accordion>

  <Accordion title="Customizing Notification Templates">
    HookFlo allows you to fully customize your notification templates:

    ### Email Template Example:

    ```
    Subject: [{{event}}] New activity on {{table}}

    Hello,

    The following {{event}} event occurred on the {{table}} table:

    Record ID: {{record.id}}
    Time: {{timestamp}}

    Details:
    {{#each record}}
    - {{@key}}: {{this}}
    {{/each}}

    Best regards,
    The HookFlo Team
    ```

    ### Slack Template Example:

    ```
    *{{event}} Event on {{table}}*

    Record ID: {{record.id}}
    Time: {{timestamp}}

    *Details:*
    {{#each record}}
    • {{@key}}: {{this}}
    {{/each}}
    ```

    You can use any data from the webhook payload in your templates.
  </Accordion>
</AccordionGroup>

## Webhook Payload Structure

Here's an example of what the webhook payload looks like for different events:

### Database Event Payload

```json theme={null}
{
  "table": "users",
  "schema": "public",
  "event": "INSERT",
  "record": {
    "id": "d9be2f69-5d13-4ac3-8f77-1193e9b1bfe3",
    "email": "user@example.com",
    "created_at": "2023-04-01T12:00:00Z"
  },
  "old_record": null
}
```

### Authentication Event Payload

```json theme={null}
{
  "event": "SIGNED_UP",
  "instance": "your-project-ref",
  "timestamp": "2023-04-01T12:00:00Z",
  "user": {
    "id": "d9be2f69-5d13-4ac3-8f77-1193e9b1bfe3",
    "email": "user@example.com"
  }
}
```

## Troubleshooting

<AccordionGroup>
  <Accordion title="Webhook Not Firing">
    If your webhook isn't sending events to HookFlo:

    1. Check that the `http` extension is enabled in your Supabase project
    2. Verify that your trigger is correctly set up on the table
    3. Check the Supabase logs for any errors related to the webhook function
    4. Ensure the webhook URL and headers are correctly configured
    5. Verify that your HookFlo webhook is in the active state
  </Accordion>

  <Accordion title="Events Received but No Notifications">
    If HookFlo is receiving events but you're not getting notifications:

    1. Check your notification channel configurations in HookFlo
    2. Verify that your email/Slack webhooks are correctly set up
    3. Check if you have any conditional rules that might be filtering out your events
    4. Look for any errors in the HookFlo event logs
    5. Try a test notification from the HookFlo dashboard
  </Accordion>

  <Accordion title="Performance Considerations">
    For tables with high-frequency changes:

    1. Consider adding conditions to your triggers to only fire on specific records
    2. Implement rate limiting in your webhook function
    3. Use batch processing for high-volume tables
    4. Set up more specific alert rules to filter out noise
  </Accordion>
</AccordionGroup>

## Example: Monitoring New User Signups

Here's a complete example of setting up HookFlo to alert your team when new users sign up:

<Steps>
  <Step title="Create the Webhook in HookFlo">
    Follow the steps above to create a Supabase webhook in HookFlo and configure your notification channels.
  </Step>

  <Step title="Configure the Database Webhook in Supabase">
    1. In your Supabase dashboard, go to **Database** > **Webhooks**
    2. Create a new webhook named "user-signups"
    3. Select the `auth.users` table (or your custom users table)
    4. Choose the **INSERT** event type to trigger on new user creations
    5. Add your HookFlo webhook URL and headers (x-webhook-id and x-webhook-token)
    6. Save the webhook
  </Step>
</Steps>

# Security Considerations

When setting up webhook integrations between Supabase and HookFlo, keep these security best practices in mind:

* **Protect your webhook credentials**: Keep your x-webhook-id and x-webhook-token secure
* **Use row-level security**: Limit what data can be included in webhook payloads
* **Implement data minimization**: Only send the fields you actually need
* **Regular audits**: Remove webhooks from tables that no longer need monitoring
* **Use HTTPS only**: Ensure all webhook communications use secure protocols

## Congratulations! 🎉

You've successfully set up real-time event tracking and alerting between Supabase and HookFlo in just few minutes. Your team can now receive immediate notifications about important database and authentication events, helping you respond quickly to critical situations.

Need more help? [Contact our support team](mailto:team.hookflo@gmail.com) or join our [Discord forum](https://discord.gg/SNmCjU97nr)
or [DM me directly on X](https://x.com/Prateek53788134).