> ## Documentation Index
> Fetch the complete documentation index at: https://docs.hookflo.com/llms.txt
> Use this file to discover all available pages before exploring further.
# Stripe
> Set up webhooks to receive notifications for payment and subscription events from Stripe
## Integration Guide
This guide will walk you through setting up a webhook integration between Stripe and Hookflo, enabling you to receive alerts for payment, subscription, and other financial events.
Stripe webhooks are secured using a signing secret that verifies the authenticity of each webhook event. Hookflo uses this signature to validate that incoming requests are genuinely from Stripe.
## Prerequisites
* A Hookflo account with an active project
* A Stripe account with admin access
* Basic understanding of Stripe's payment processing system
## Integration Overview
The integration process follows these key steps:
1. Set up a webhook in Hookflo
2. Configure notification channels (email/Slack)
3. Connect Stripe to Hookflo
4. Configure Stripe to send webhooks
5. Test the integration
## Setting Up Your Hookflo Webhook
After logging into Hookflo, follow these steps to create and configure your Stripe webhook:
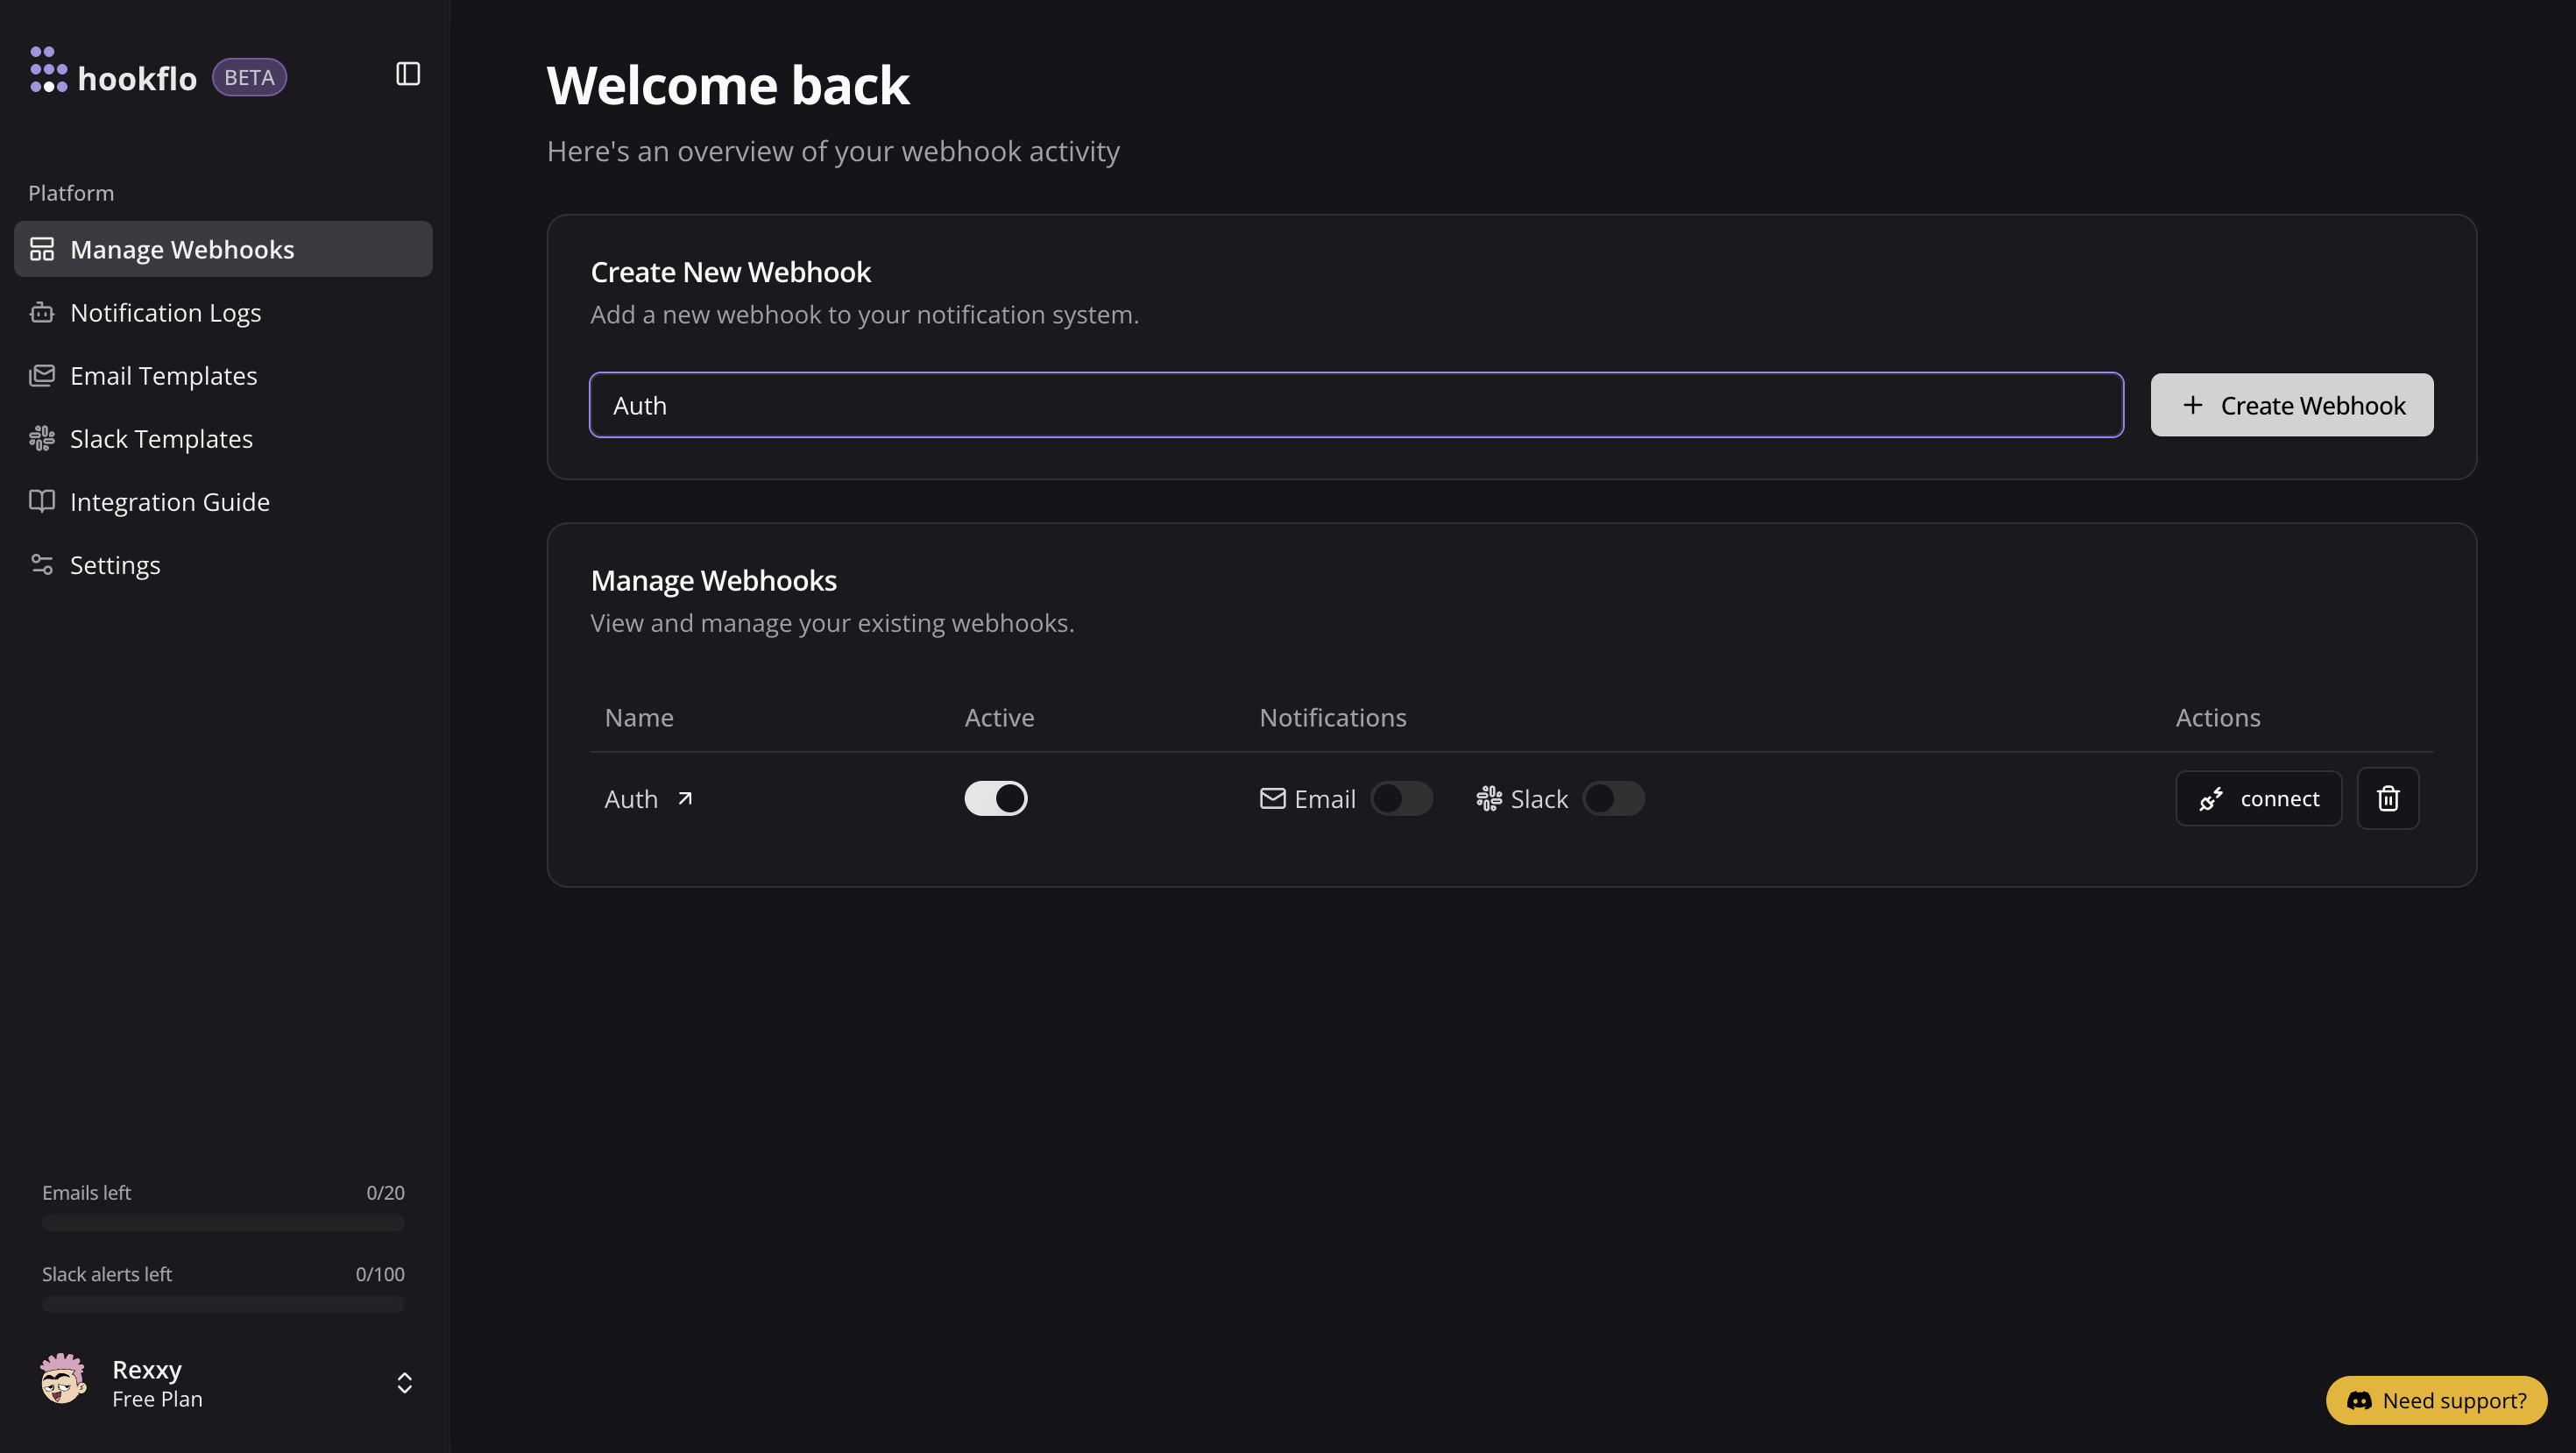
1. From your [Hookflo Dashboard](https://www.hookflo.com/dashboard/webhooks), navigate to > **Manage Webhooks**
2. Click on **+ Create Webhook**
3. Your webhook will be created in an inactive state by default
Once created, you'll see your webhook in manage webhooks table.
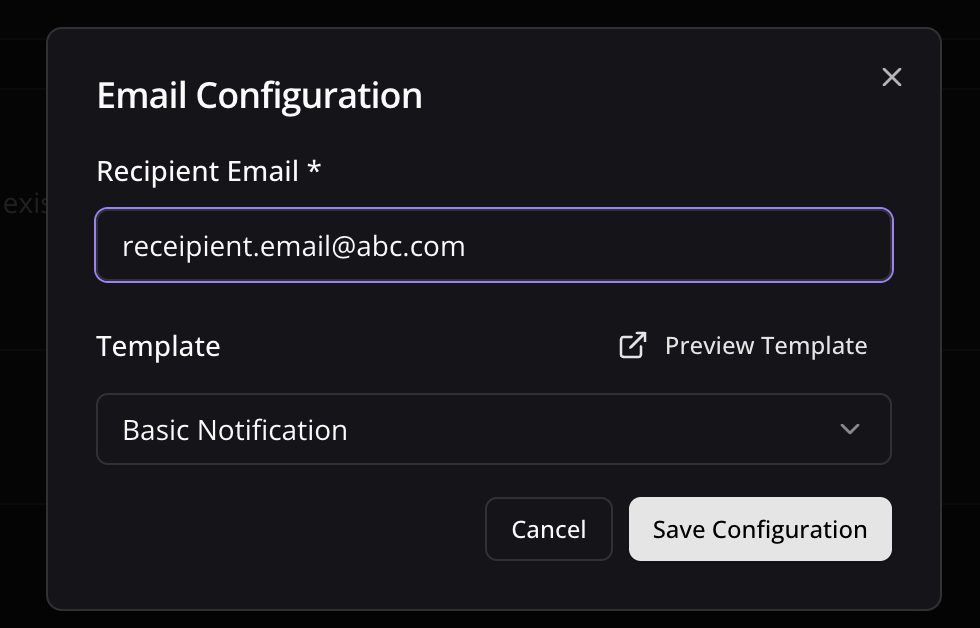
1. Toggle the **Email Notifications** switch to enable email alerts
2. In the dialog box that appears, enter the email address where you want to receive notifications
3. Select an email template from the dropdown menu
4. Click **Preview Template** to see how your notifications will look
5. Use the editor to customize the template if needed
6. Click **Save Configuration** to confirm your settings
Email notifications are perfect for critical alerts that require immediate attention and have lower usage limits. Use it for critical Alerts.
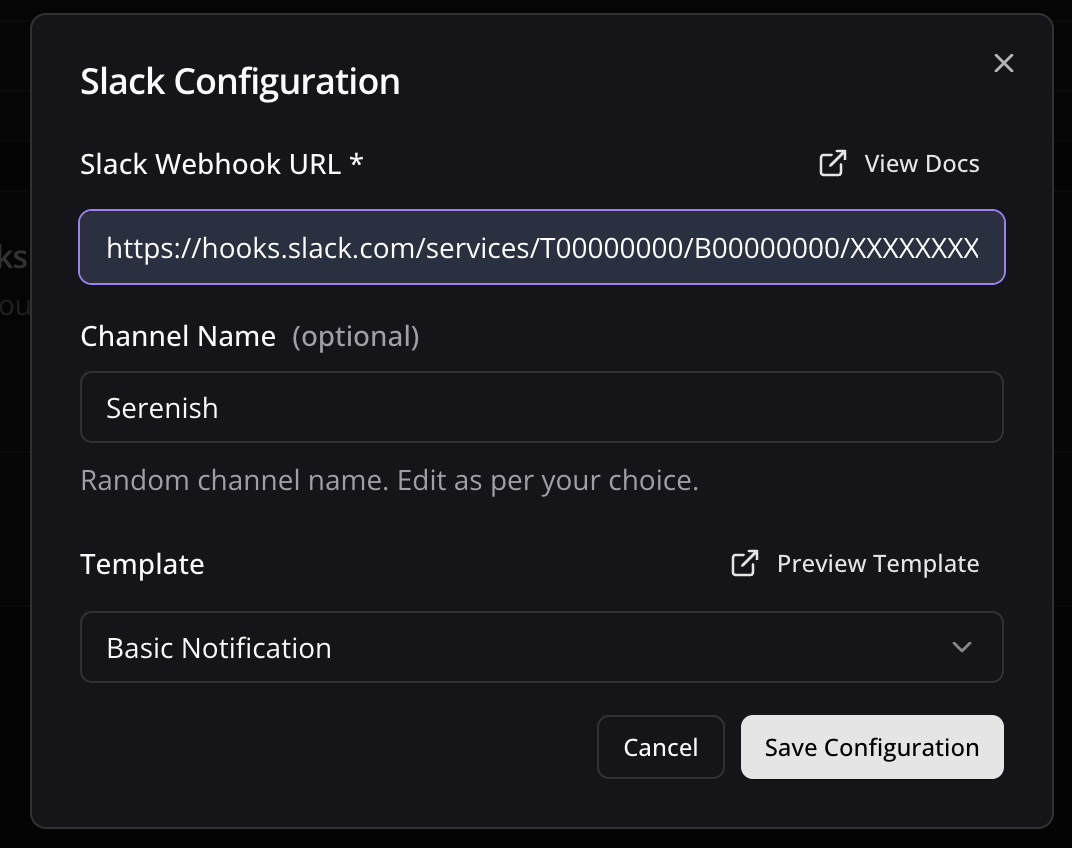
1. Toggle the **Slack Notifications** switch to enable Slack alerts
2. In the dialog box, paste your Slack webhook URL (see
3. )
4. Keep the random generated name or enter a custom one (optional)
5. Select a notification template from the available options
6. Preview and edit the template as needed
7. Click **Save Configuration** to confirm your settings
Slack notifications are ideal for team collaboration and awareness. Highly recommended to use Slack as it has 3x usage limits compared to email.
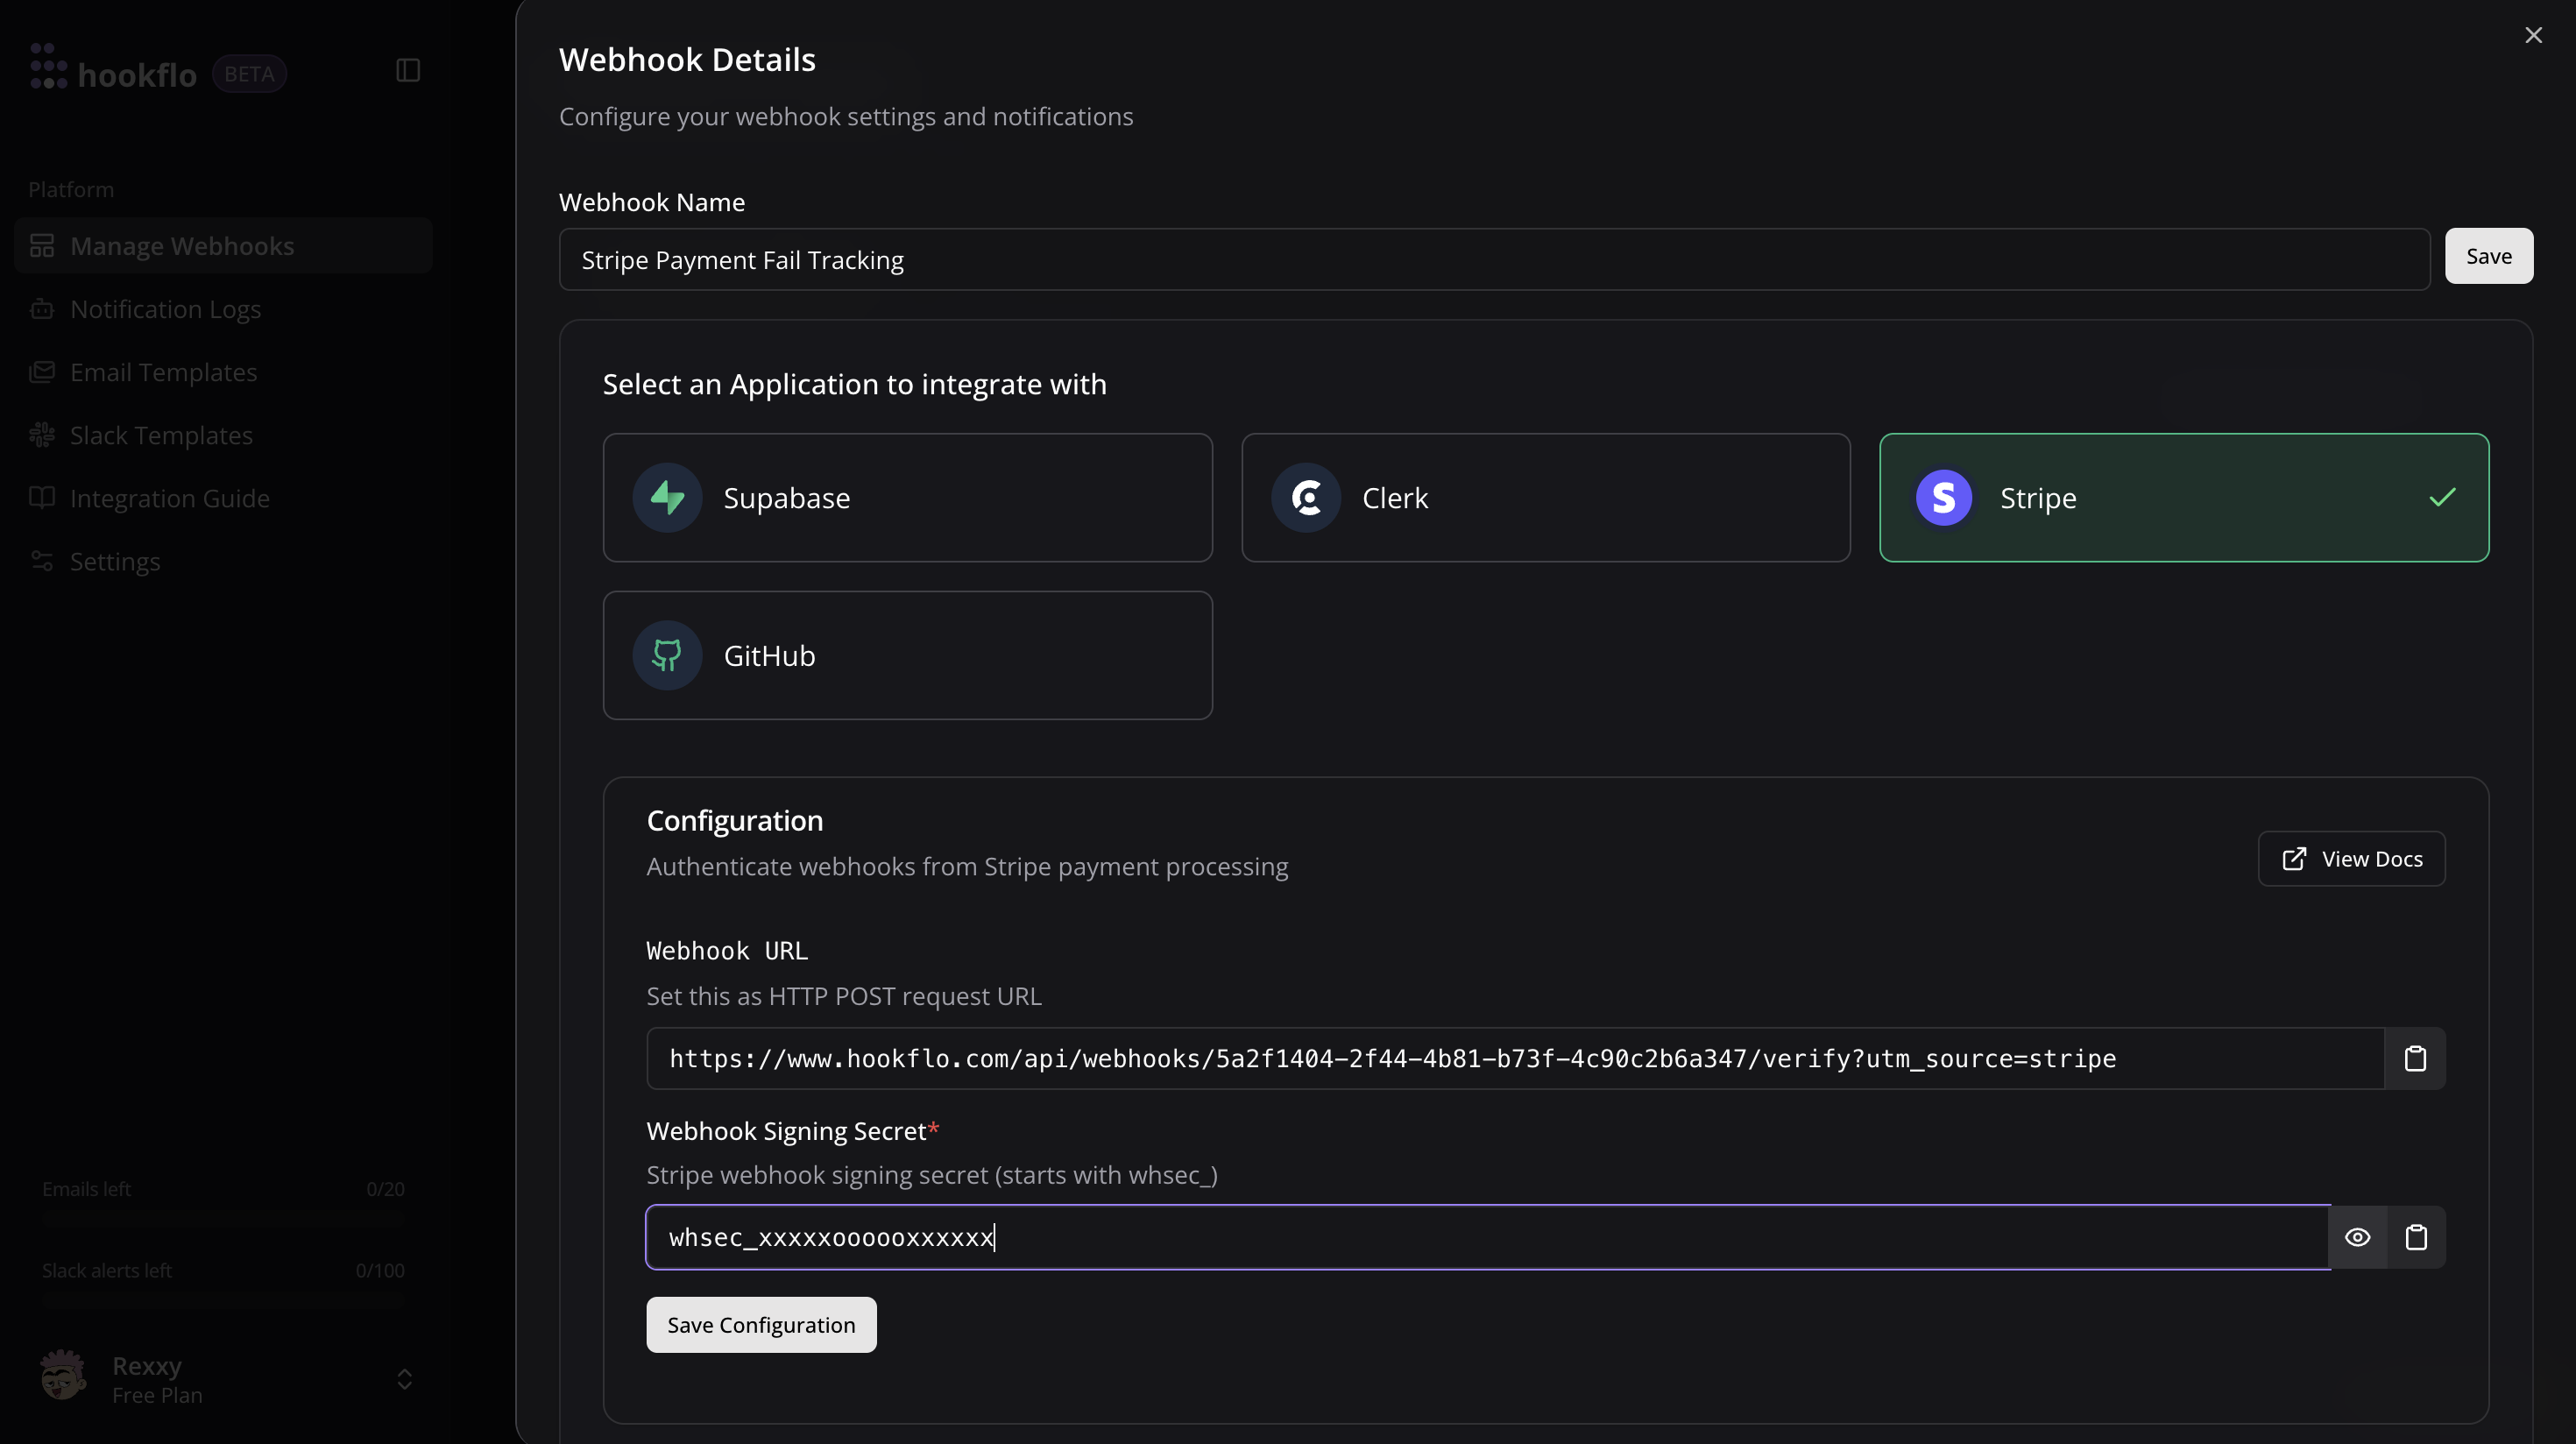
1. Click the **Connect** button to activate your webhook
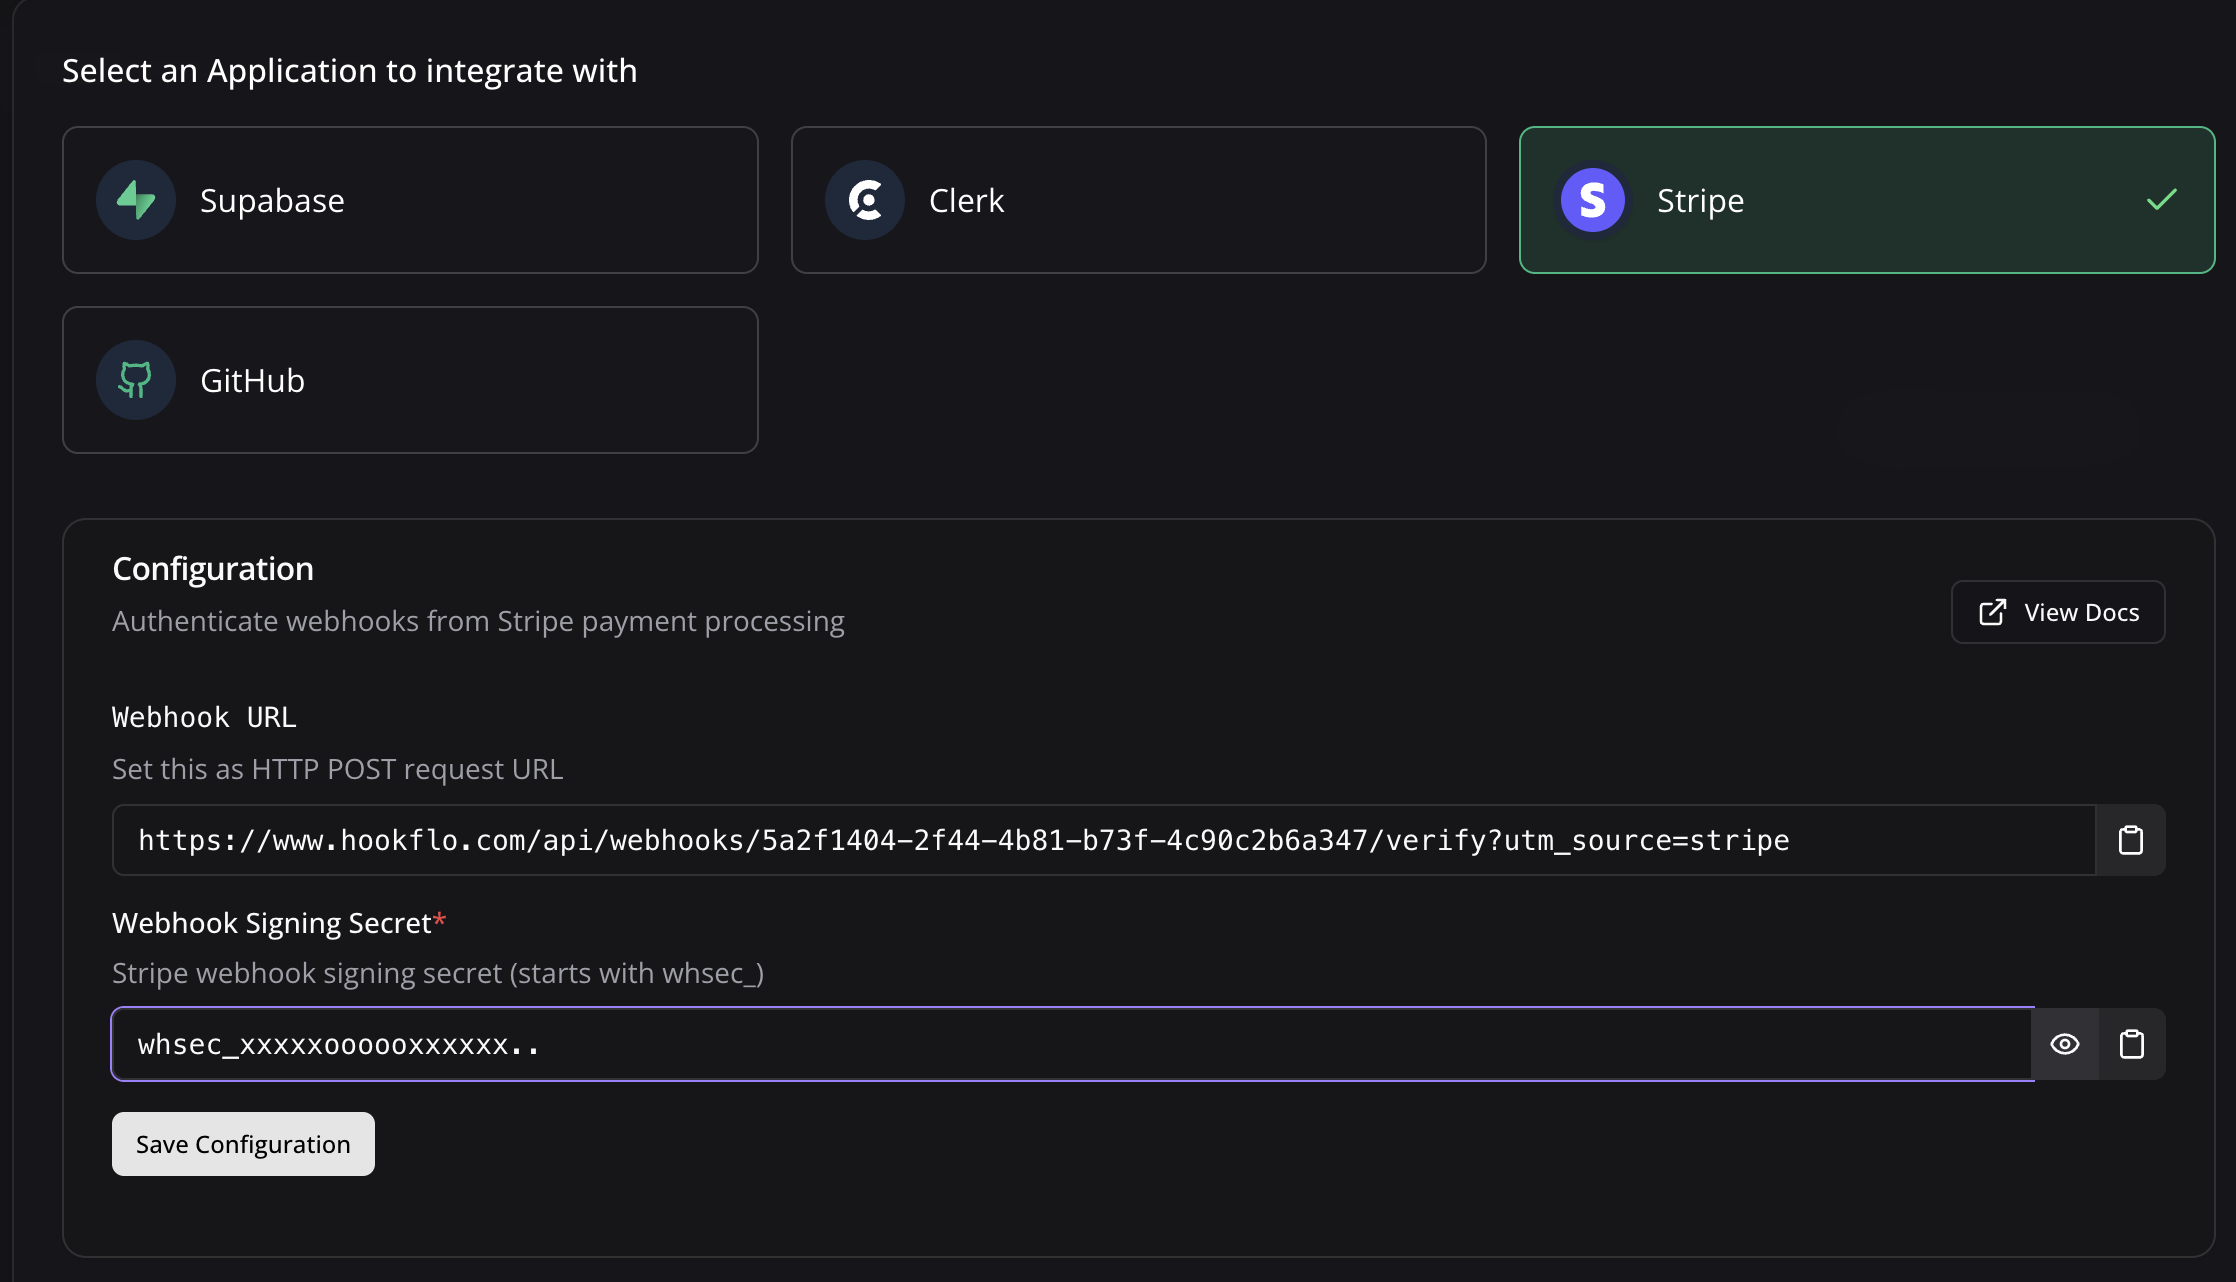
2. Select **Stripe** as application to integrate
3. A configuration panel will appear with your webhook configurations:
* **Webhook URL**: The HTTP POST request endpoint Stripe will send events to
* **Webhook Signing Secret**: Signing Secret generated by Stripe
4. You'll need to add your Stripe Webhook Signing Secret in the next steps
5. Copy the **Webhook URL** for the next section
You can also configure notification channels from this panel if you haven't done so already.
## Configuring Stripe
Now that your HookFlo webhook is set up, you need to configure Stripe to send events to it:
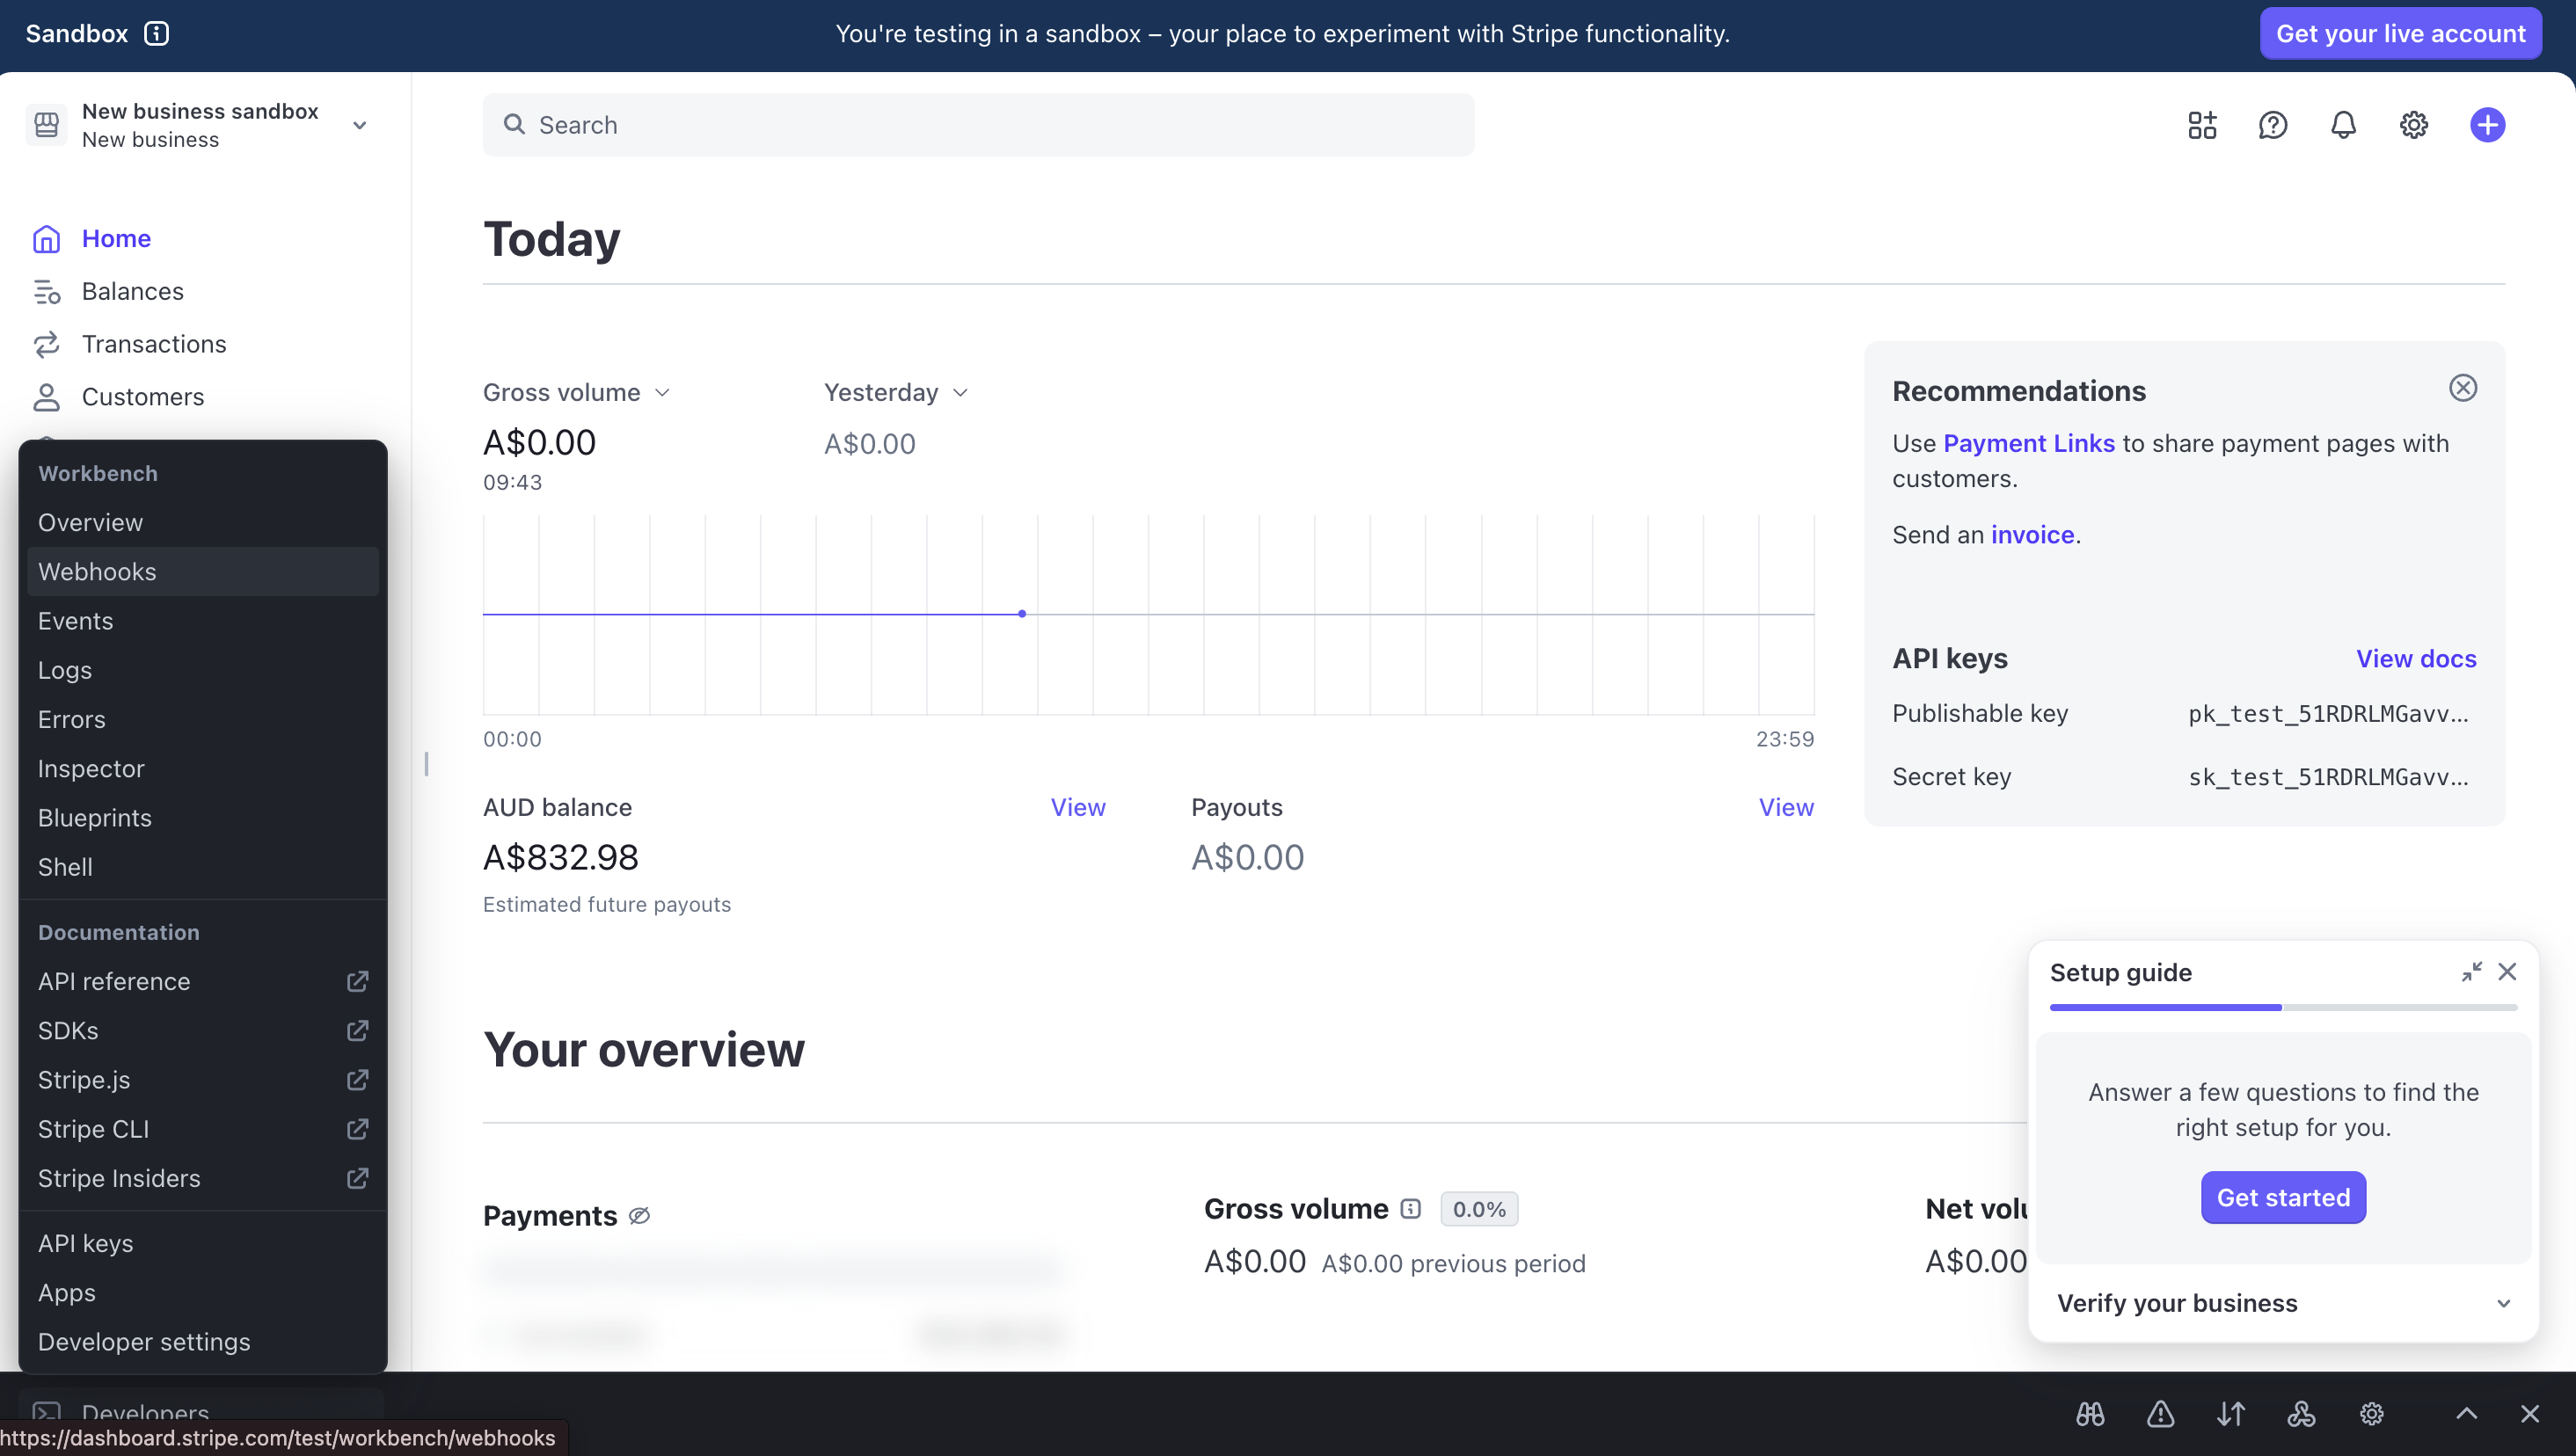
1. Log in to your [Stripe Dashboard](https://dashboard.stripe.com/)
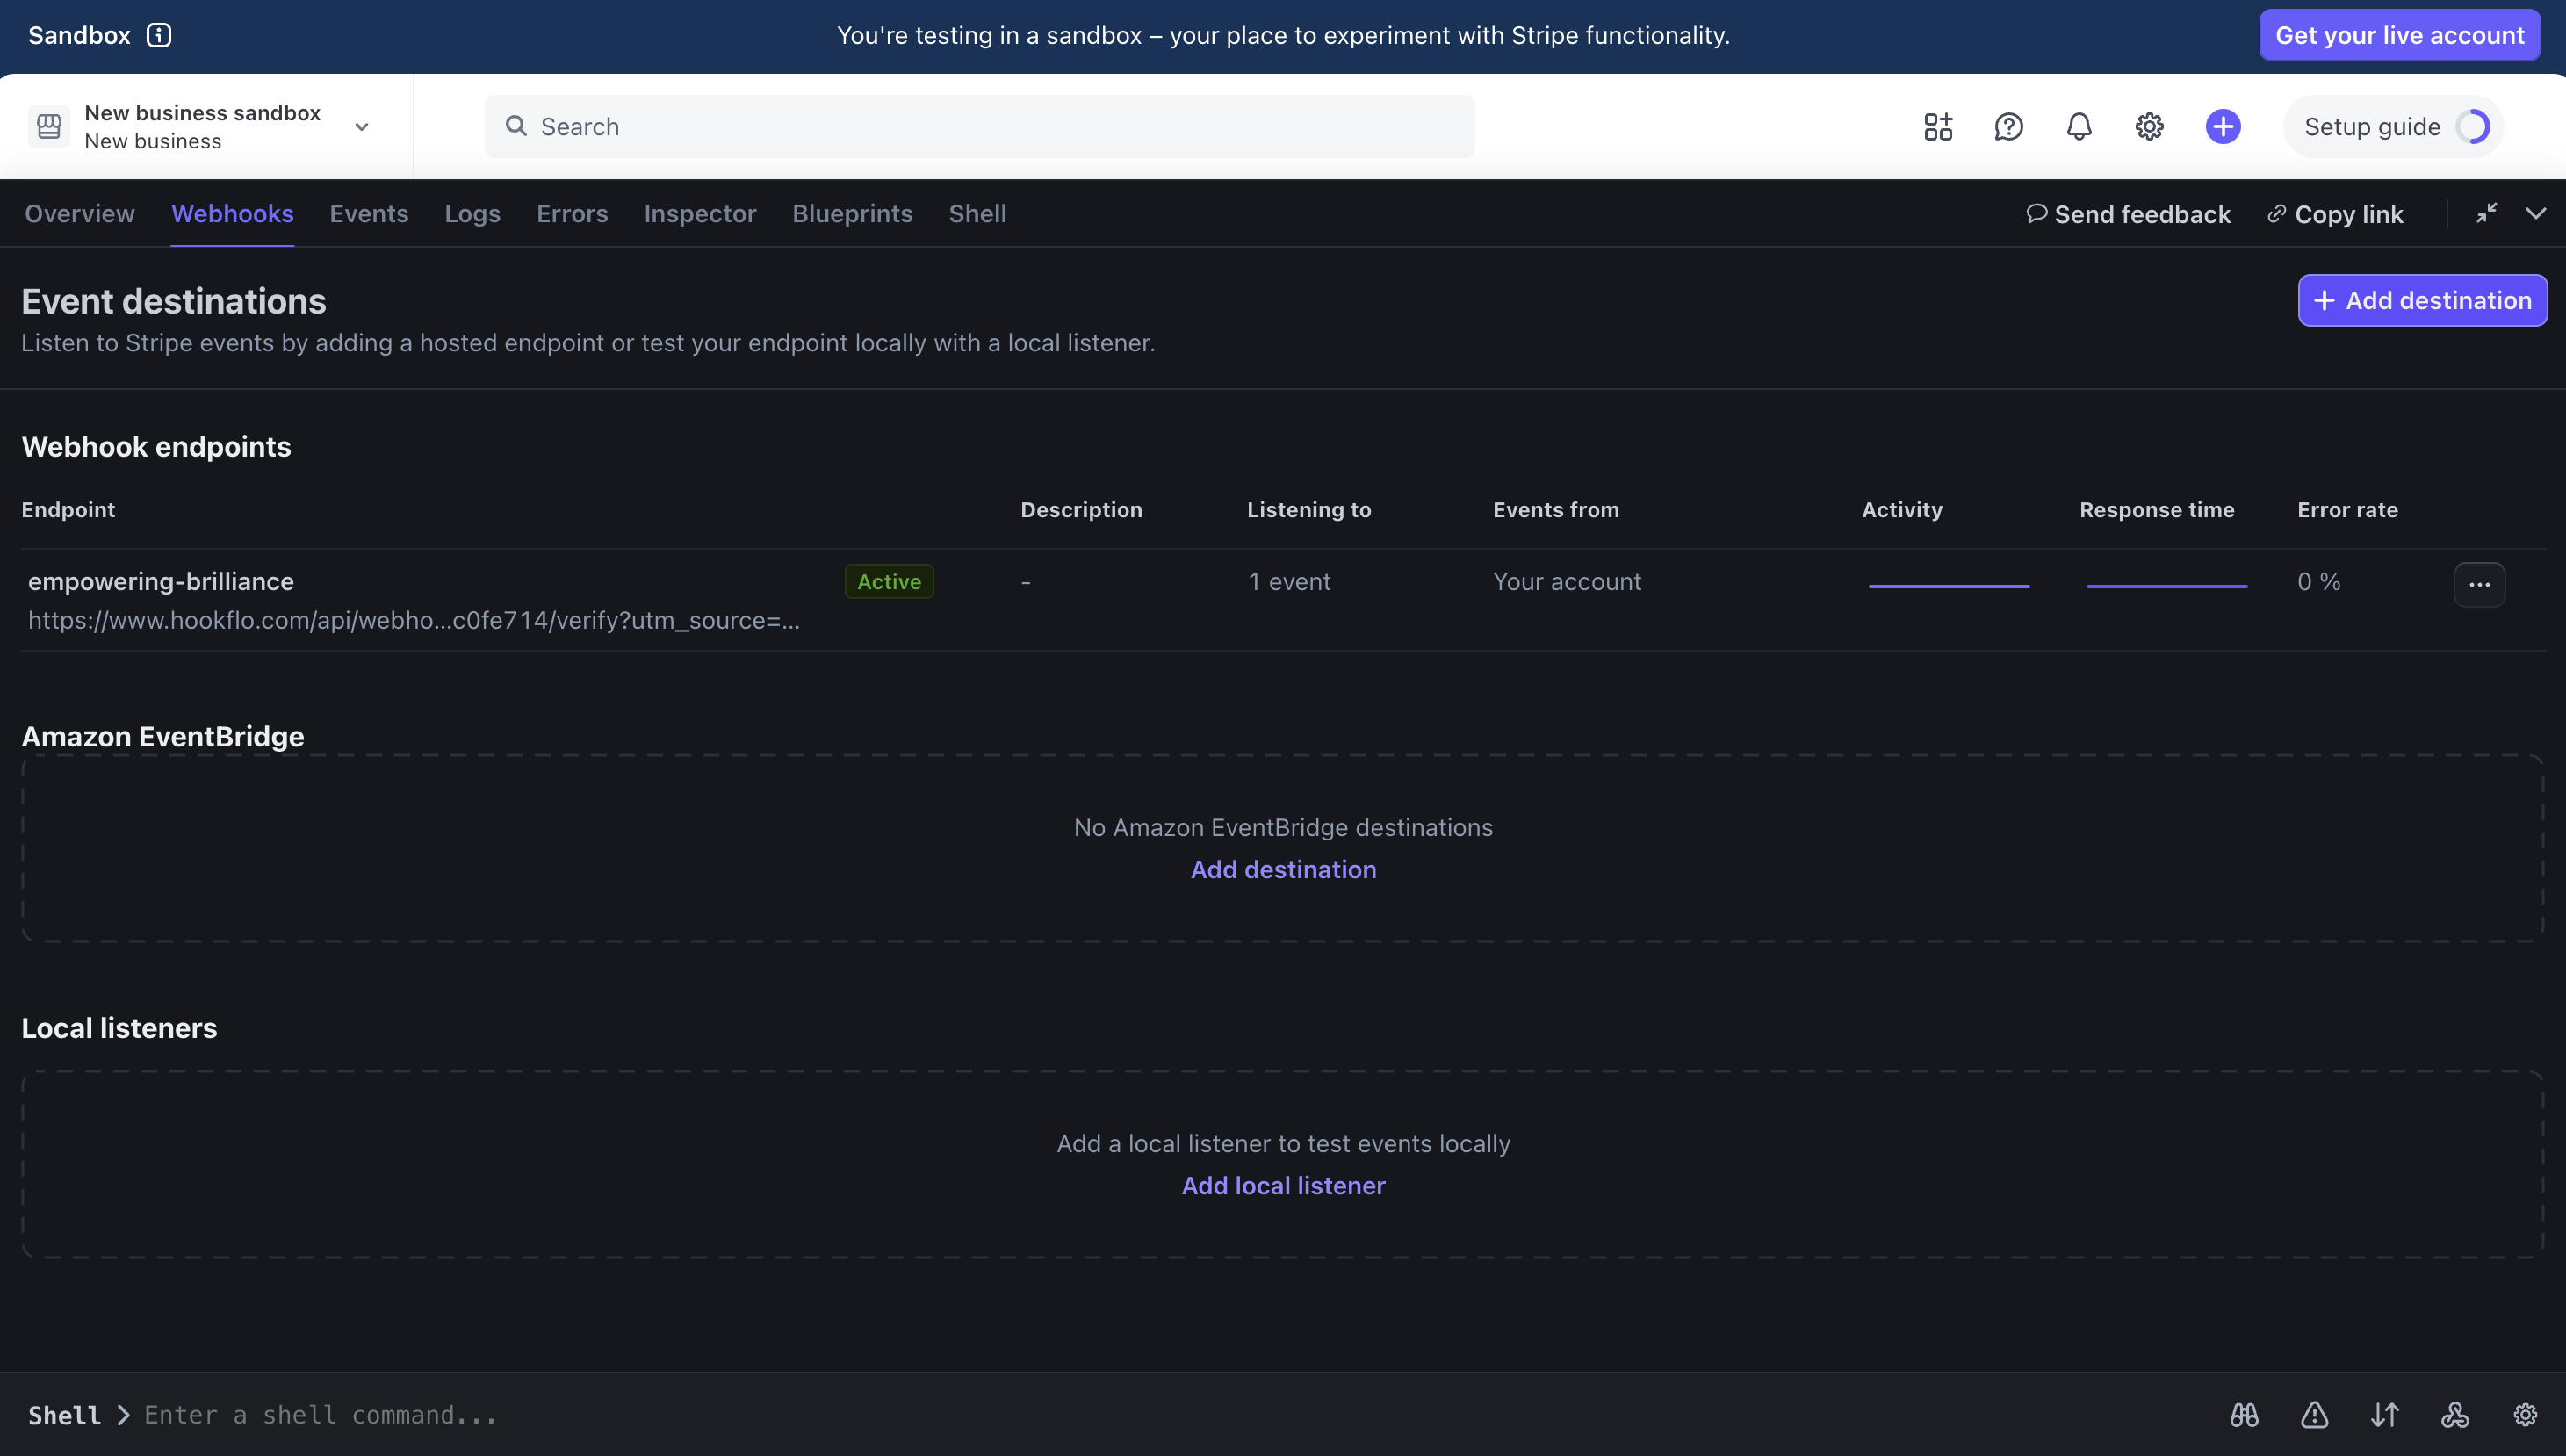
2. Navigate to **Developers** > **Webhooks**
3. Click **Add Destination**
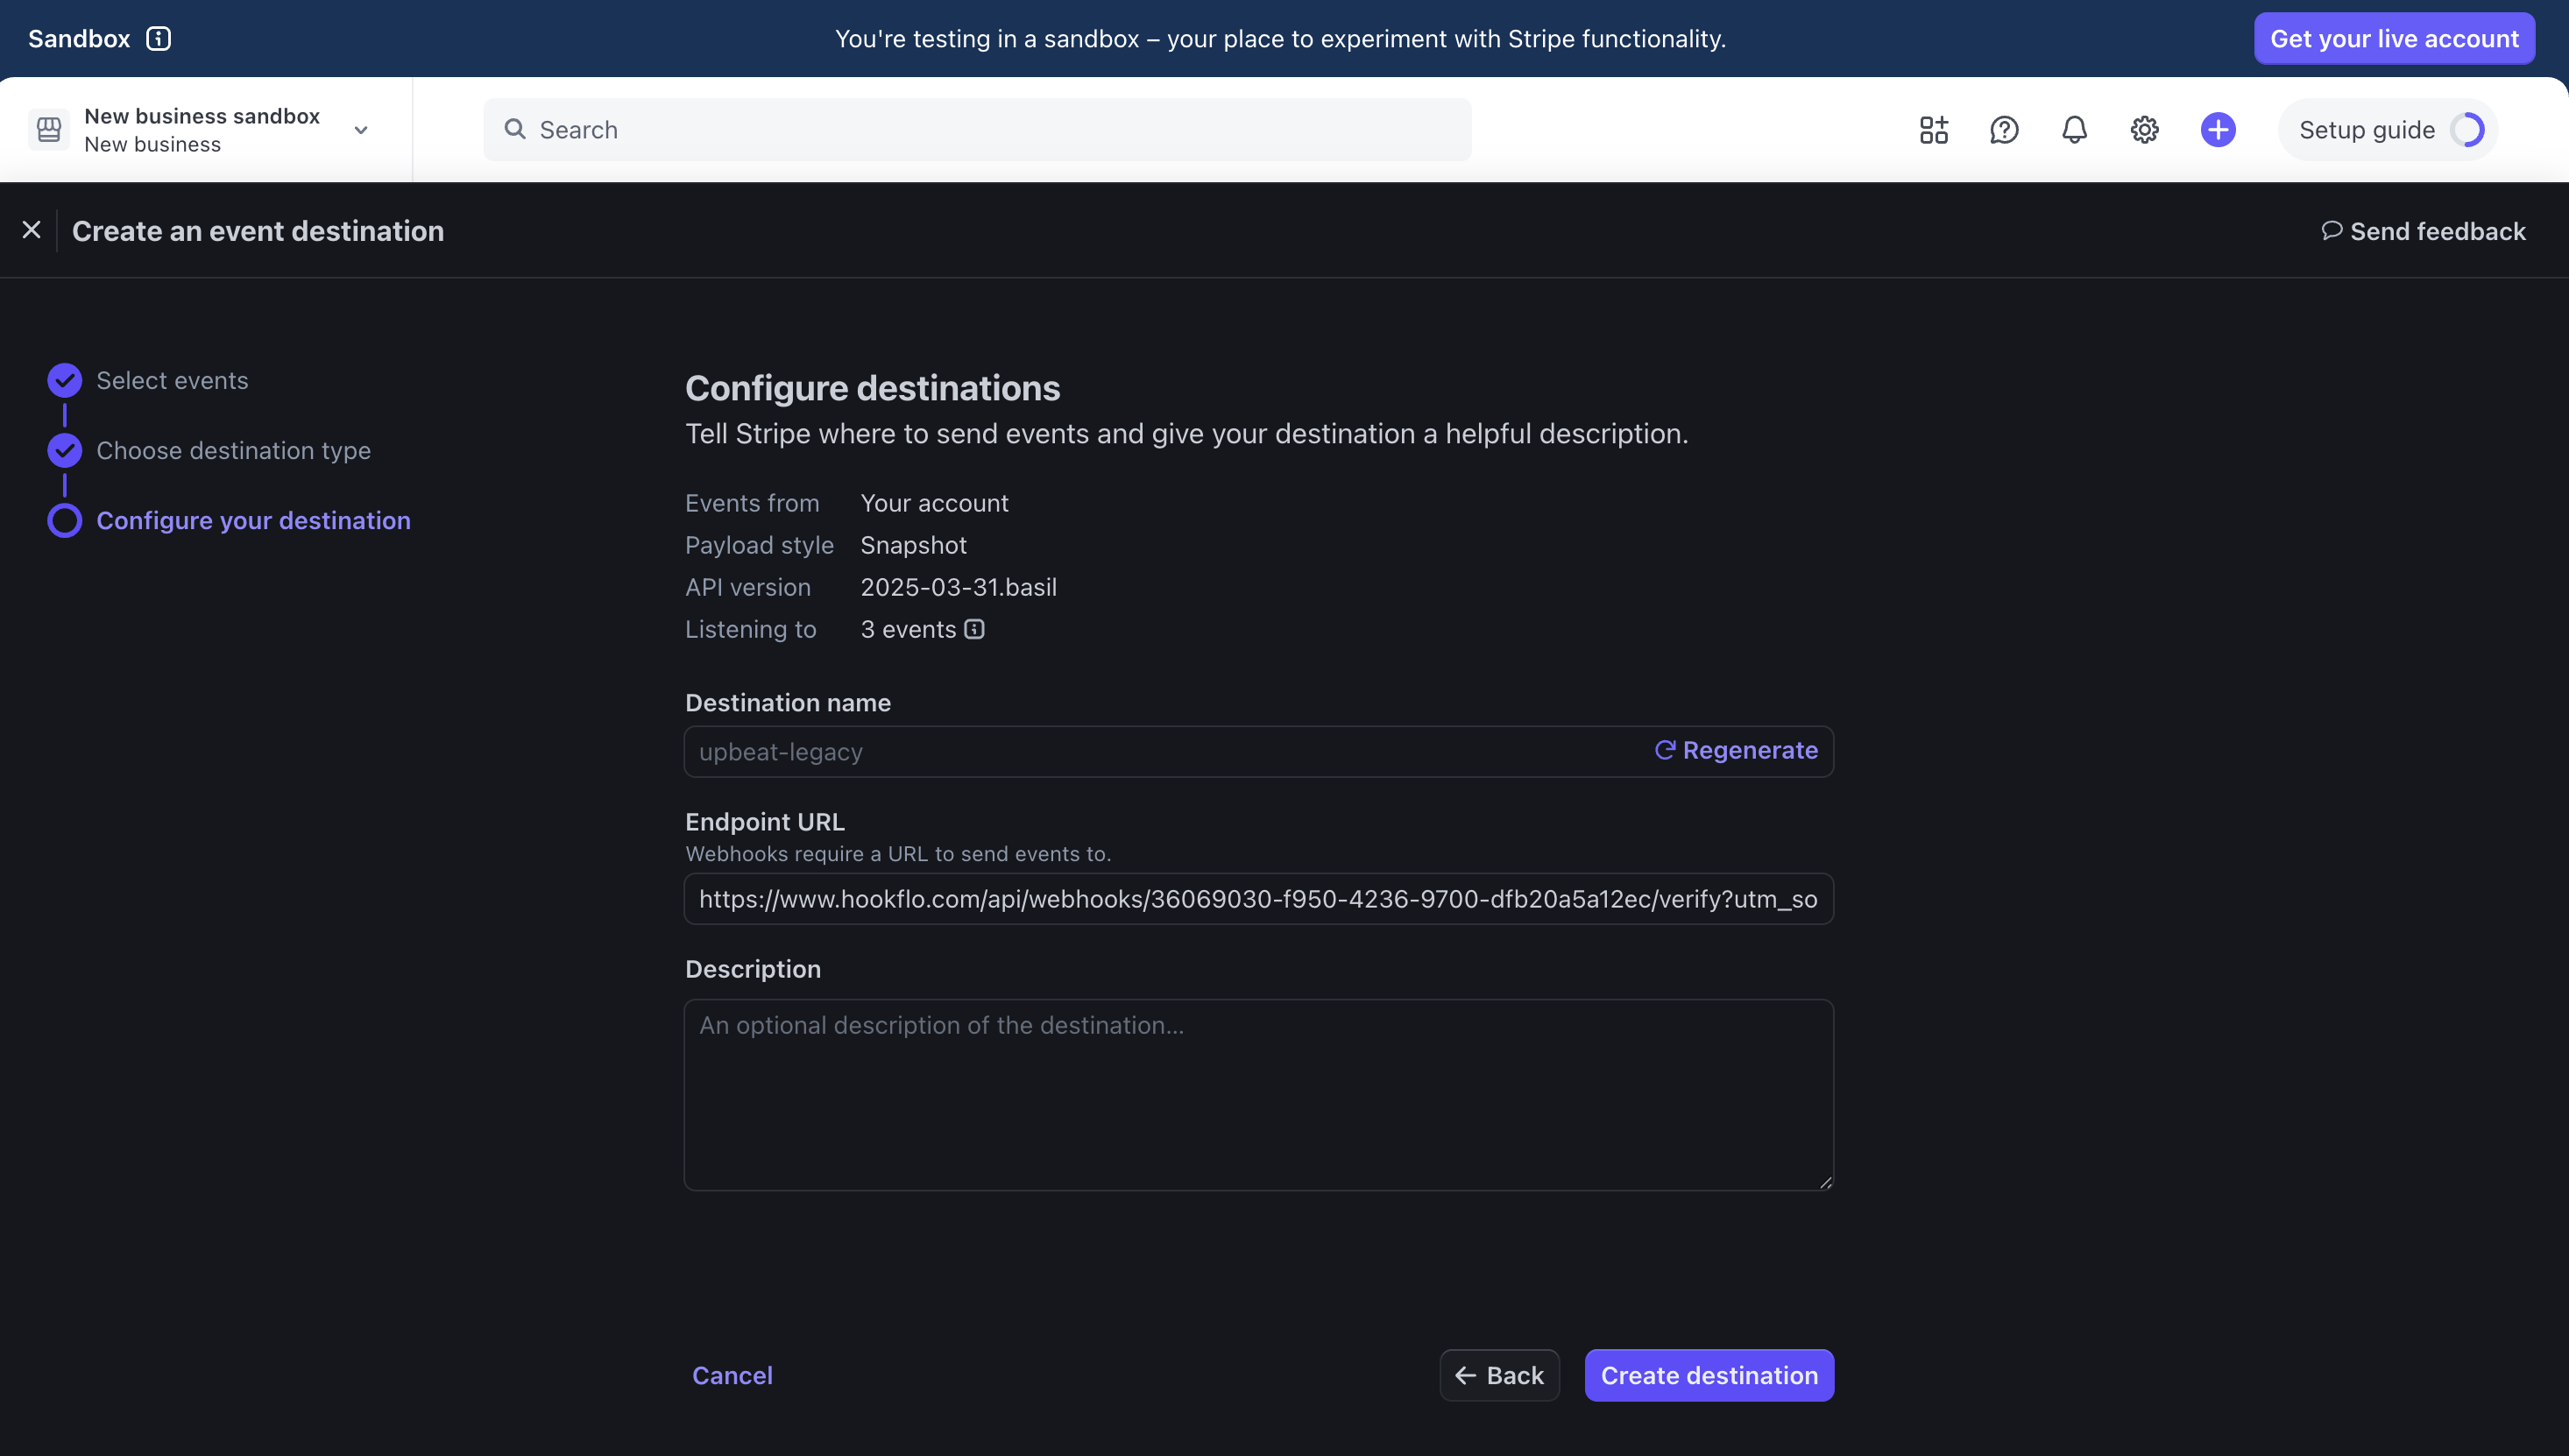
4. Enter your HookFlo webhook URL that you copied from the previous step
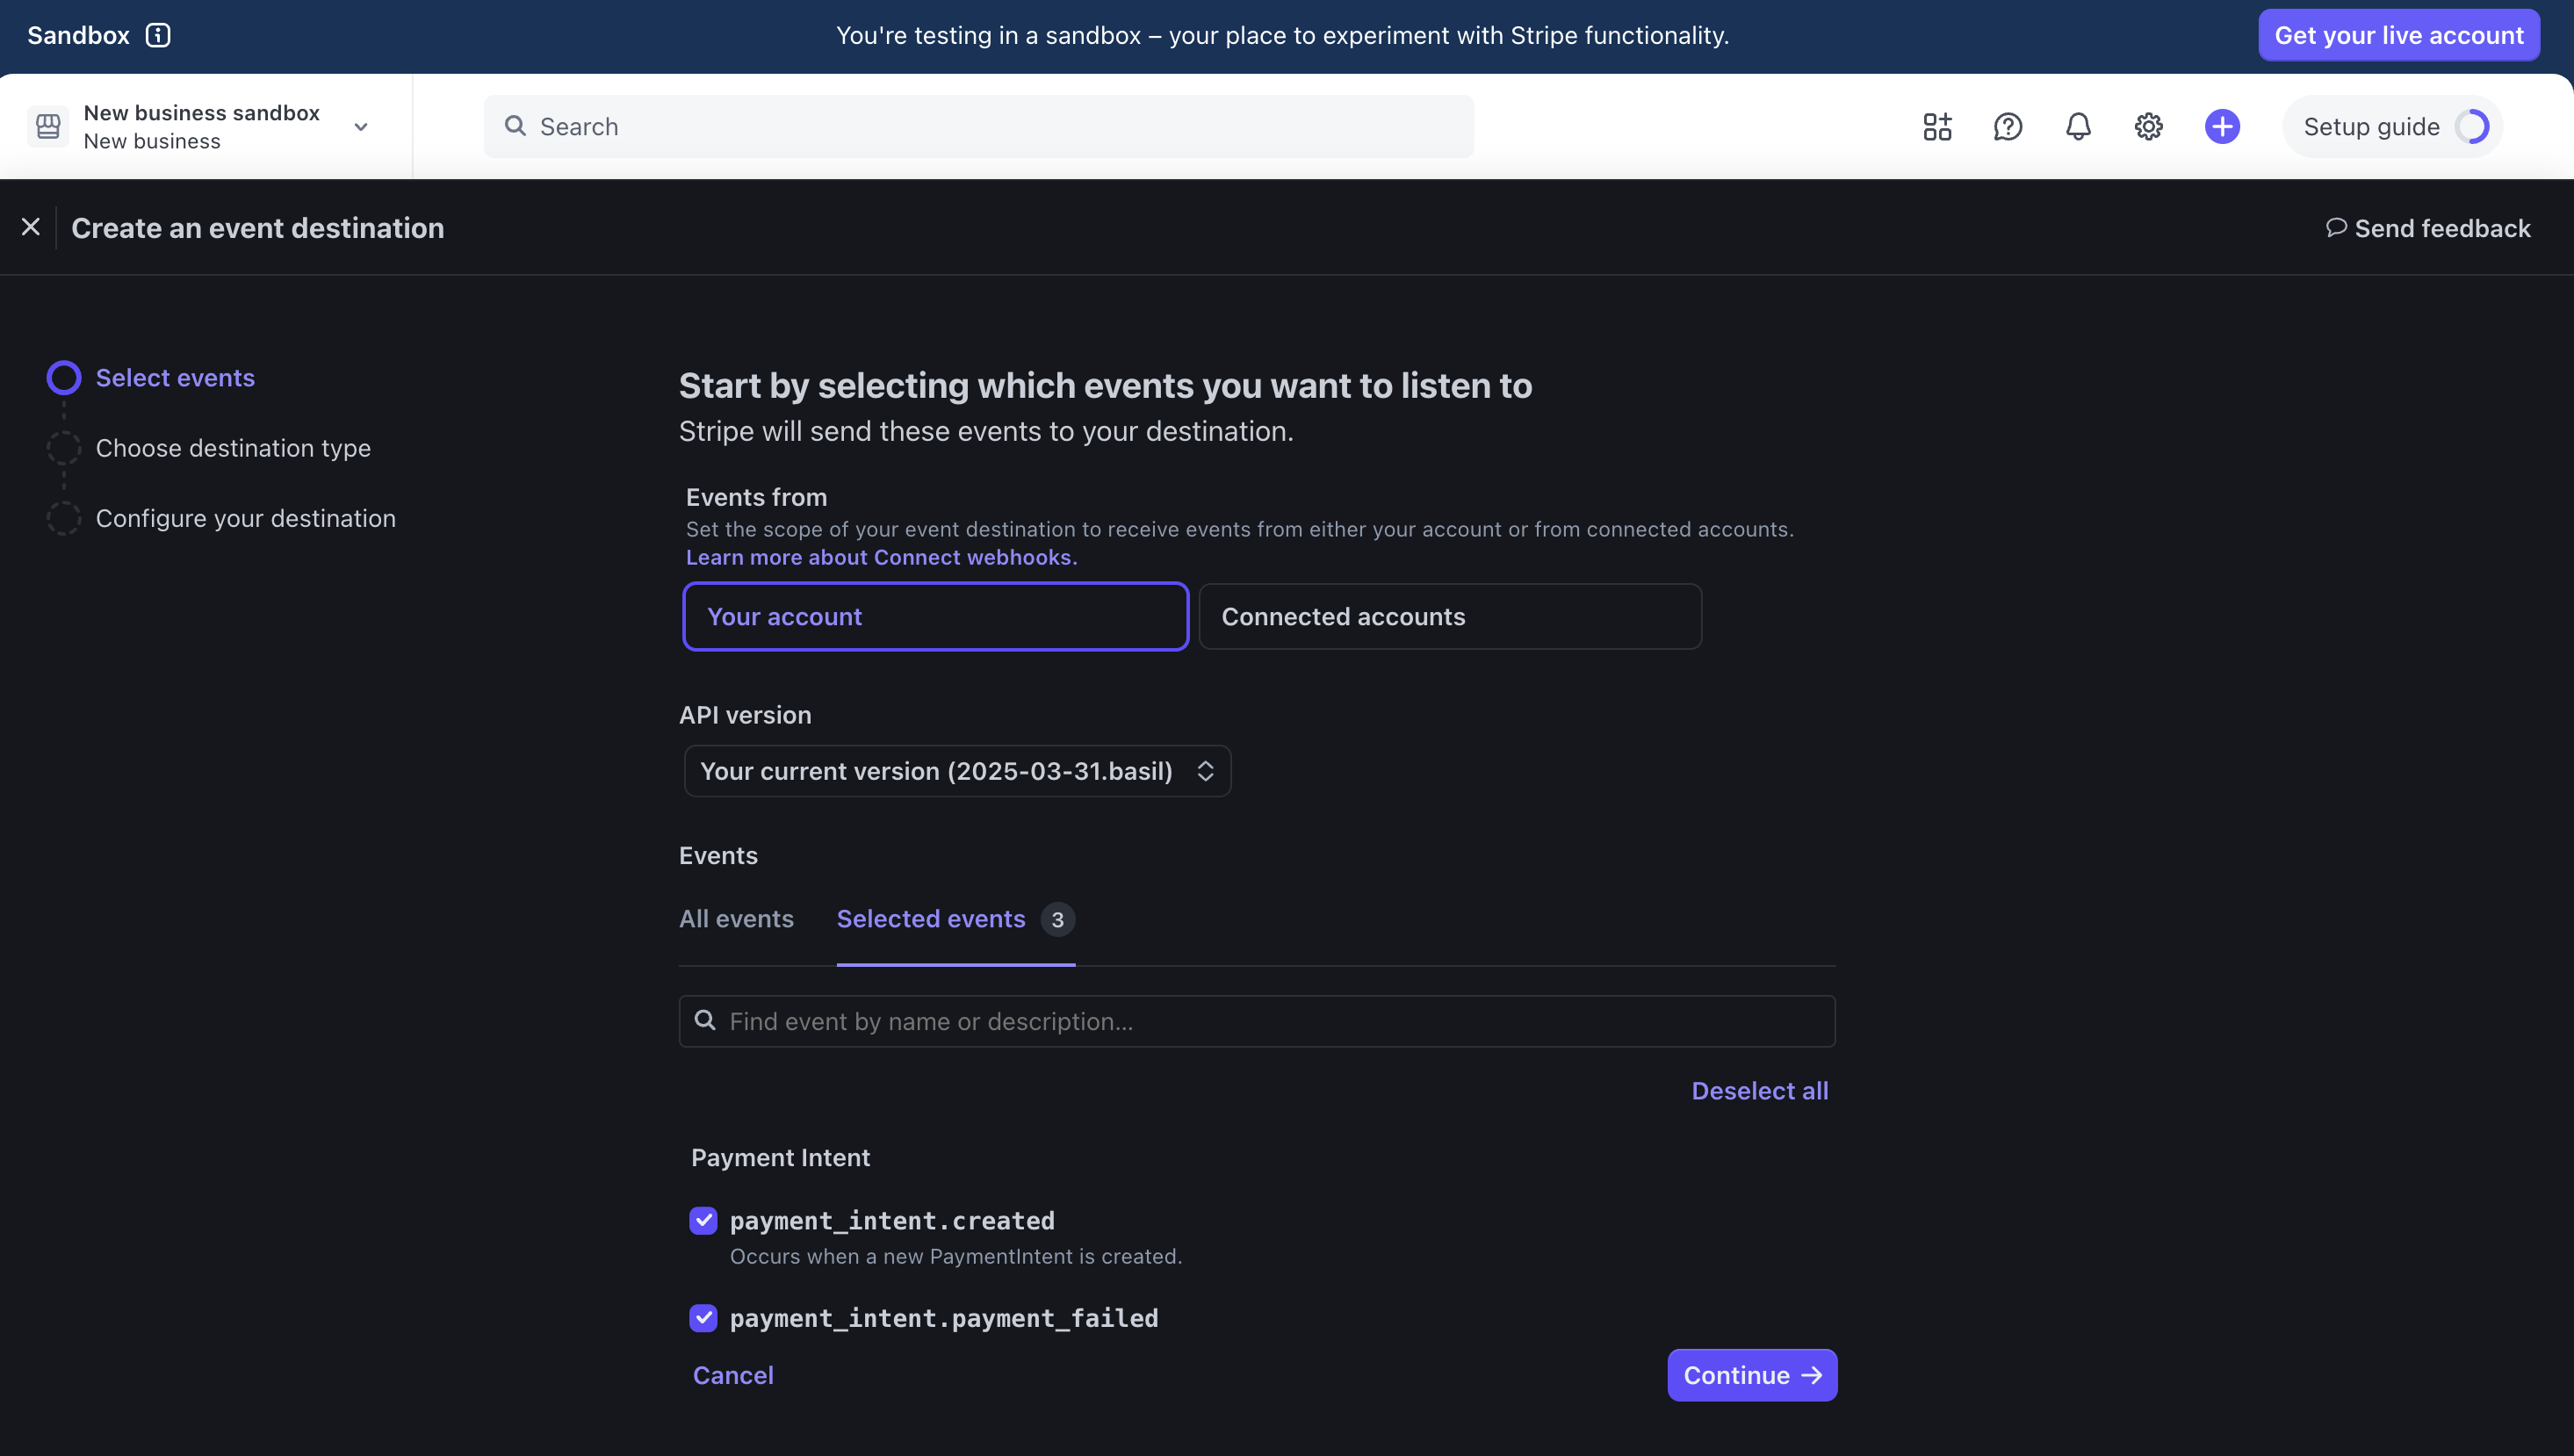
5. Under **Events to send**, select the events you want to monitor
* For payment events: `payment_intent.succeeded`, `payment_intent.payment_failed`, etc.
* For subscription events: `customer.subscription.created`, `invoice.payment_succeeded`, etc.
* For customer events: `customer.created`, `customer.updated`, etc.
6. Click **Add endpoint**
*Below screenshots are from Stripe Test Dashboard might differ in Live environment, But flow of integration with Hookflo will remains same.*
After creating the webhook endpoint in Stripe:
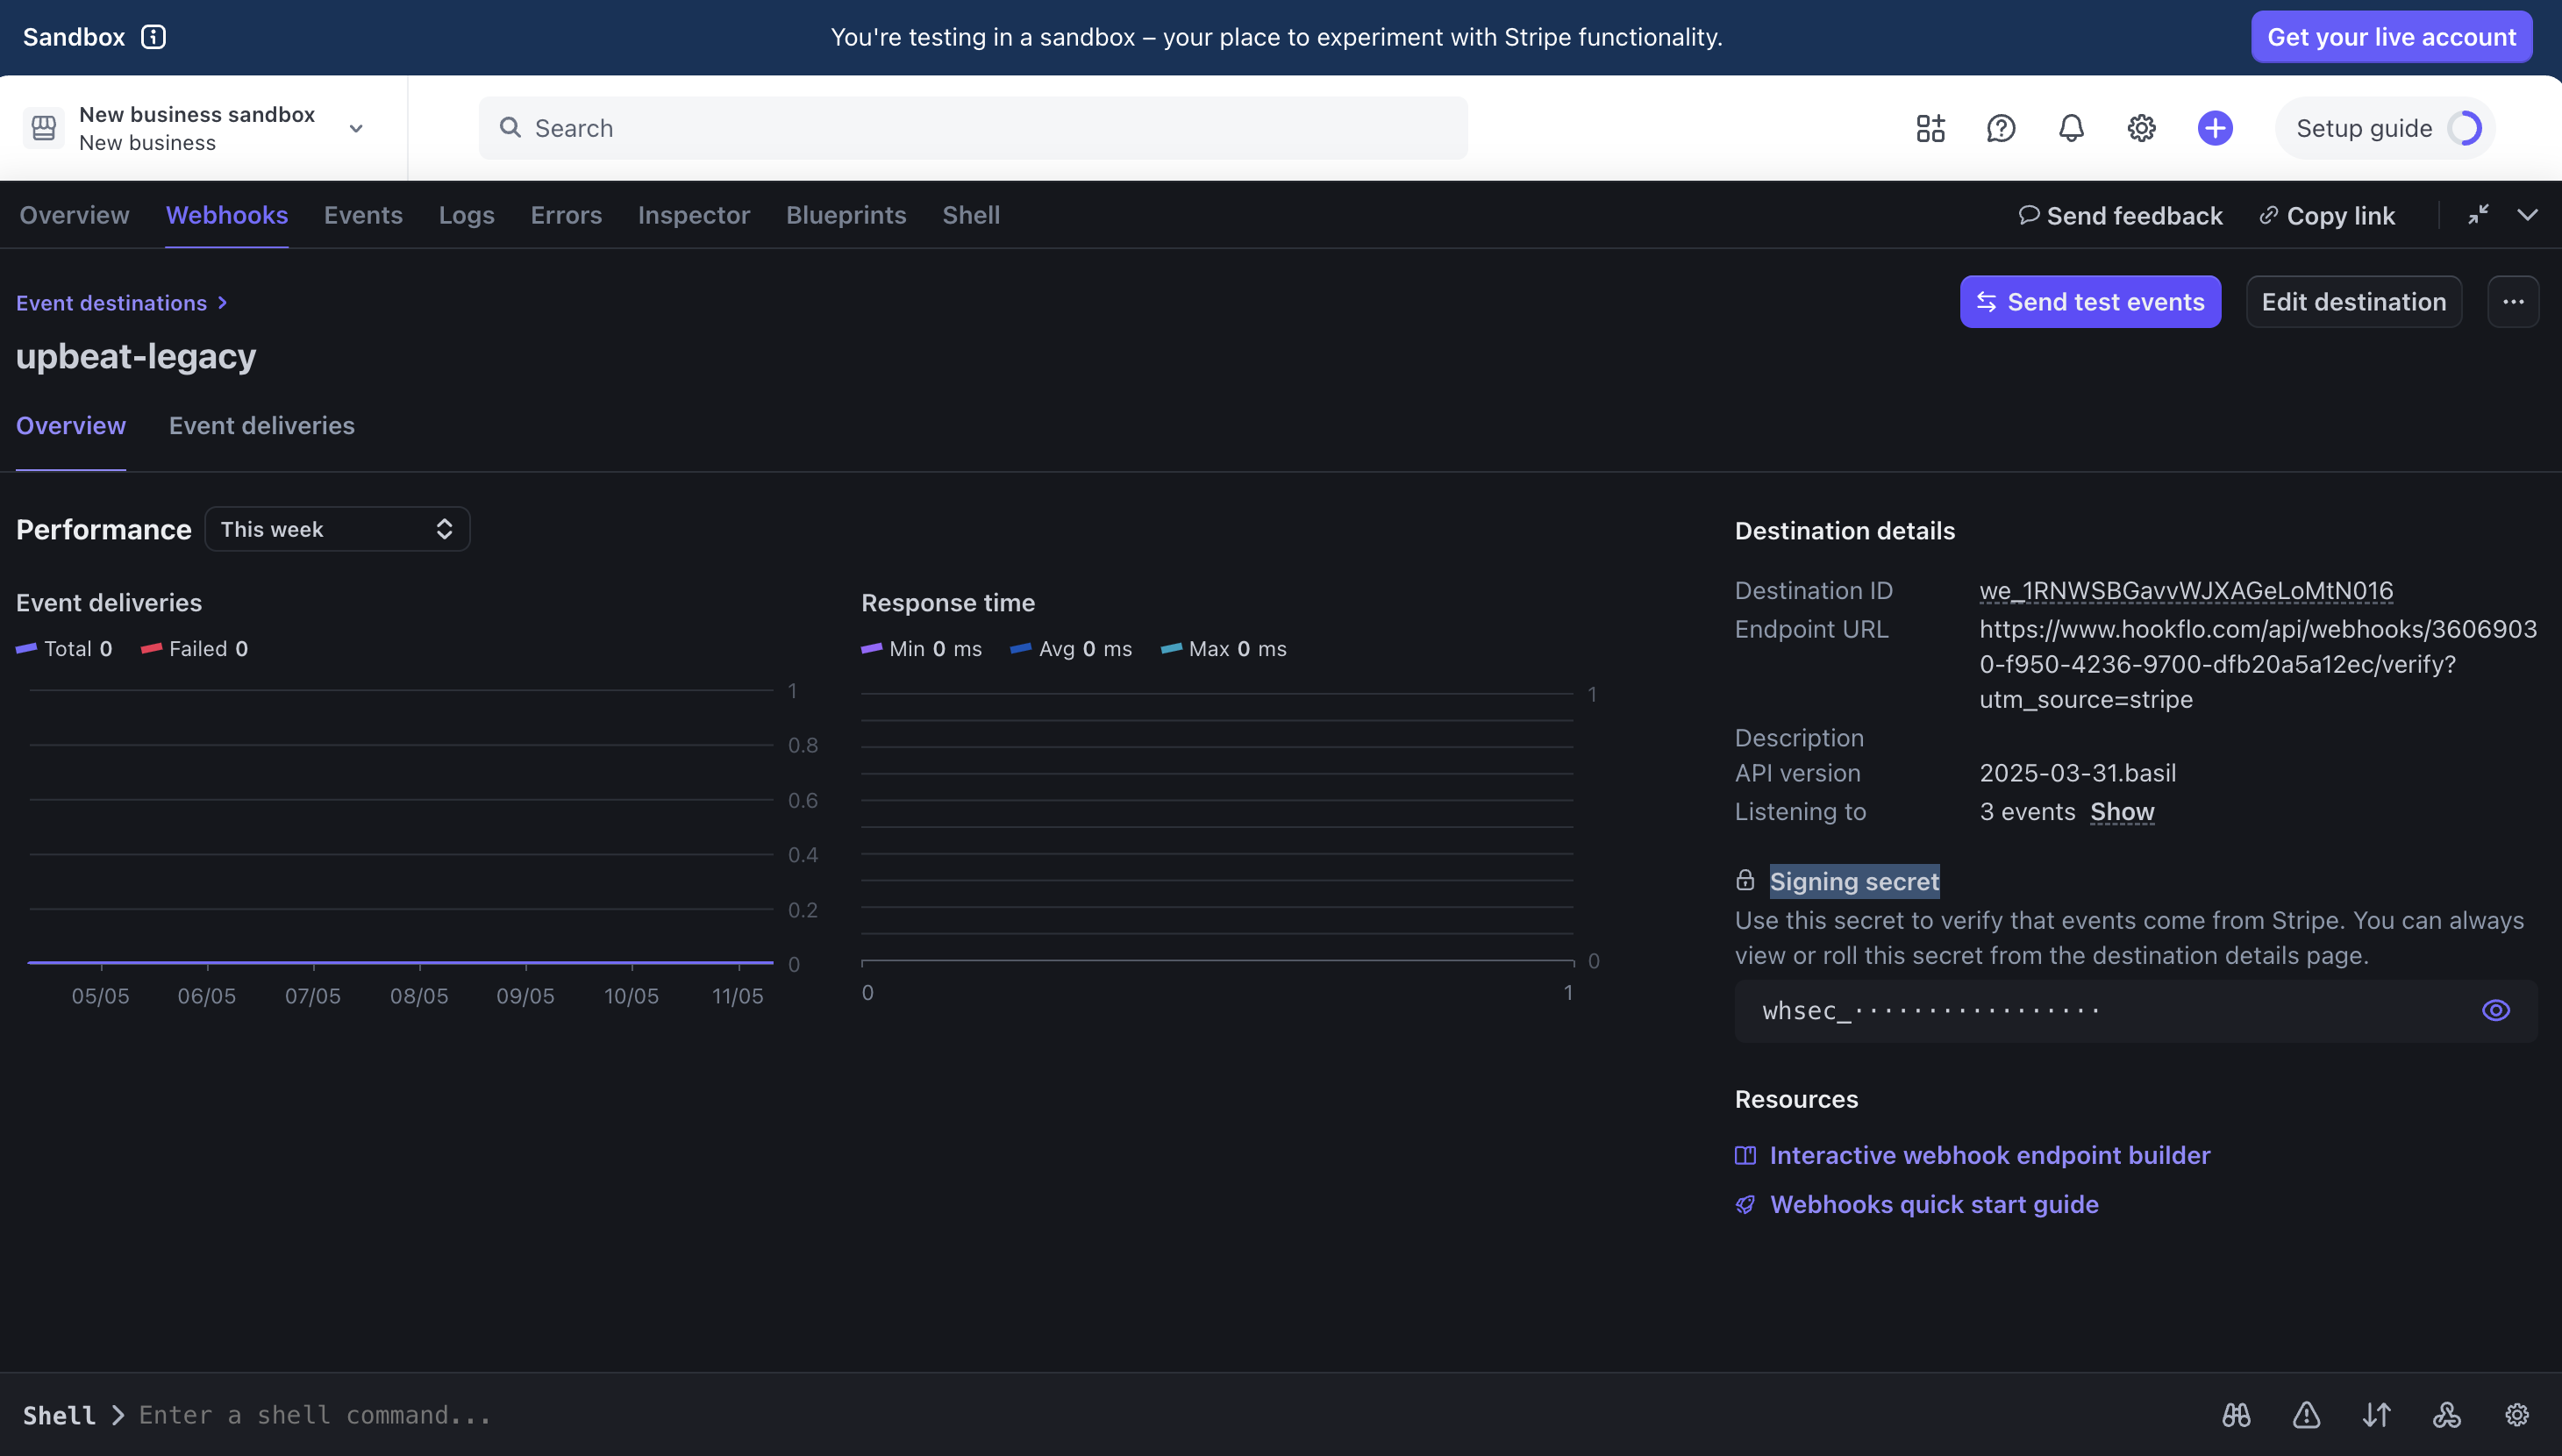
1. In your Stripe dashboard, find your newly created webhook endpoint
2. Click **Reveal** next to the signing secret
3. Copy the signing secret (it starts with `whsec_`)
This secret is crucial for verifying that webhook events are genuinely from Stripe.
\*Below screenshots are from Stripe Test Dashboard might differ in Live environment, But flow of integration with Hookflo will remains same.
1. Return to the HookFlo dashboard
2. Navigate to your Stripe webhook configuration
3. Find the "Webhook Signing Secret" field
4. Paste the Stripe signing secret you copied
5. Click **Save Configuration**
This step completes the secure connection between Stripe and HookFlo.
## Testing Your Integration
To ensure your integration is working properly:
1. In the Stripe dashboard, find your webhook endpoint
2. Click **Send test webhook**
3. Select an event type (e.g., `payment_intent.succeeded`)
4. Click **Send test webhook** to deliver a sample webhook to HookFlo
1. Return to your HookFlo dashboard
2. Navigate to [Notification Logs](https://www.hookflo.com/dashboard/logs)
3. You should see the test events appear with details about the changes
4. If you've configured notification channels, check your email or Slack for alerts
This confirms that your Stripe webhook is correctly sending events to HookFlo, and your notification channels are properly configured.
## Supported Events
Stripe offers a comprehensive set of webhook events. Here are some of the most commonly used categories:
### Payment Events
* `payment_intent.succeeded`: When a payment is successfully processed
* `payment_intent.payment_failed`: When a payment attempt fails
* `charge.succeeded`: When a charge is successful
* `charge.failed`: When a charge fails
* `charge.refunded`: When a charge is refunded
### Customer Events
* `customer.created`: When a new customer is created
* `customer.updated`: When customer details are updated
* `customer.deleted`: When a customer is deleted
### Subscription Events
* `customer.subscription.created`: When a subscription is created
* `customer.subscription.updated`: When a subscription is updated
* `customer.subscription.deleted`: When a subscription is canceled
* `invoice.payment_succeeded`: When a subscription payment succeeds
* `invoice.payment_failed`: When a subscription payment fails
### Product & Price Events
* `product.created`: When a product is created
* `price.created`: When a price is created
* `product.updated`: When a product is updated
For a complete list of events, refer to the [Stripe API documentation](https://stripe.com/docs/api/events/types).
## Webhook Payload Structure
Here's an example of what the webhook payload looks like for a `payment_intent.succeeded` event:
```json theme={null}
{
"id": "evt_1NwXaIJFJbz6iDgO7bCoVSfK",
"object": "event",
"api_version": "2022-11-15",
"created": 1633027930,
"data": {
"object": {
"id": "pi_3NwXaHJFJbz6iDgO0gnbIVoc",
"object": "payment_intent",
"amount": 2000,
"amount_received": 2000,
"currency": "usd",
"customer": "cus_LTf0miiJ4j18Ny",
"payment_method": "pm_1NwXaHJFJbz6iDgObthB6dgO",
"payment_method_types": ["card"],
"status": "succeeded"
}
},
"livemode": false,
"type": "payment_intent.succeeded"
}
```
## Advanced Configuration
HookFlo allows you to fully customize your notification templates:
### Email Template Example:
```
Subject: [{{type}}] Stripe Payment Event
Hello,
The following {{type}} event occurred:
Amount: {{data.object.amount | currency(data.object.currency)}}
Customer: {{data.object.customer}}
Time: {{created | date}}
Best regards,
The HookFlo Team
```
### Slack Template Example:
```
*{{type}} Event*
Amount: {{data.object.amount | currency(data.object.currency)}}
Customer: {{data.object.customer}}
Status: {{data.object.status}}
Time: {{created | date}}
```
You can use any data from the webhook payload in your templates.
Stripe has separate webhook endpoints for test and live modes. Best practices:
1. Set up separate webhooks in HookFlo for test and live environments
2. Use clear naming conventions to distinguish between test and production webhooks
3. Configure different notification channels for test vs. live events
This separation helps prevent confusion between test data and real customer transactions.
## Troubleshooting
If you're seeing signature verification errors:
1. Double-check that you've entered the correct signing secret in HookFlo
2. Ensure you're using the signing secret for the specific webhook endpoint
3. Check if the signing secret has been rotated in Stripe recently
4. Verify your server's clock is accurately synchronized (time drift can cause verification failures)
If certain events aren't being received:
1. Verify that you've selected those specific event types in Stripe's webhook configuration
2. Check Stripe's webhook delivery logs to confirm they're being sent
3. Ensure your HookFlo webhook is active and properly configured
If webhook deliveries are timing out:
1. Check Stripe's webhook logs for timeout errors
2. Stripe will automatically retry webhook deliveries that fail
3. You can manually trigger a retry from the Stripe dashboard
## Example: Monitoring Successful Payments
Here's a complete example of setting up HookFlo to alert your team when payments succeed:
Follow the steps above to create a Stripe webhook in HookFlo and configure your notification channels.
1. In your Stripe dashboard, go to **Developers** > **Webhooks**
2. Create a new webhook using your HookFlo webhook URL
3. Select the `payment_intent.succeeded` event type
4. Copy your webhook signing secret
5. Add the signing secret to your HookFlo Stripe configuration
1. Use Stripe's test mode to create a test payment
2. Check your configured notification channels for alerts
3. Verify the event appears in your HookFlo notification logs
## Security Considerations
When setting up webhook integrations between Stripe and HookFlo, keep these security best practices in mind:
* **Protect your signing secret**: Never expose the Stripe signing secret in client-side code
* **Validate all webhooks**: Always use the signing secret to verify webhook authenticity
* **Use HTTPS only**: Ensure all webhook URLs use encrypted connections
* **Implement proper access controls**: Limit who can view sensitive payment information
* **PCI compliance**: Be careful about storing or logging complete payment details
## Congratulations! 🎉
You've successfully set up real-time payment event tracking and alerting between Stripe and HookFlo in just a few minutes. Your team can now receive immediate notifications about important payment events, helping you respond quickly to critical situations.
Need more help? [Contact our support team](mailto:team.hookflo@gmail.com) or join our [Discord forum](https://discord.gg/SNmCjU97nr)
or [DM me directly on X](https://x.com/Prateek53788134).
.png?fit=max&auto=format&n=FVKCx30l3CvlX69H&q=85&s=561d79e1baef285c8a19edc54f99ed58) ## Integration Guide
This guide will walk you through setting up a webhook integration between Stripe and Hookflo, enabling you to receive alerts for payment, subscription, and other financial events.
## Integration Guide
This guide will walk you through setting up a webhook integration between Stripe and Hookflo, enabling you to receive alerts for payment, subscription, and other financial events.